Vehicle Wrapping, Introduction demo.

Deep recessed vans are always a problem when it comes to applying vinyl.
I had to do a van recently that had just that. Infact, this van had probably the deepest side panel recesses I have ever applied to. About 1.2 inches deep and about 3 inches wide.
I decided not to even consider using normal calander.. Nor cast for that matter.
Vehicle wrap it had to be!
I use two makes. Mactac and KPMF I have mixed views on both. But this time I have chosen Mactac. The choice was simply. I needed a bright vibrant orange and KPMF did not have it in their range. Mactac it was!
Picture 1 shows the van in question. If you look close you will see the ultra deep/broad recesses that I had to tackle.
Picture 1
Picture 2
This series of pictures show all the van recessed areas, nooks & crannies all being being cleaned.
I can’t stress how thorough you should be when cleaning a van for wrap vinyl to be applied. I am saying cleaned.. Ultimately, what you are doing is preparing the surface.
The best applicator in the world will have terrible results if trying to apply to a dirty or greasy surface.
I would advise the van to be power washed first. After this, dry the van down using only dry paper towels or the like. Once spotless and totally dry. I then wipe down with methilated spirits. Paying particular attention to the areas shown.
It is imperative that all areas that the vinyl has to be stretched over/into or turned under be cleaned by the meths & dried properly.
Also make sure you are in a draft & dust free room.
Picture 2
Picture 3 positioning and applying
This picture shows the vinyl with the app tape still applied.
Looking close, you will see all the areas I have made contact with the vinyl.
The rest is basically suspended due to the tension created by bridging the recesses.
All areas applied here, “I call” the “high ground”.
Picture 3
Picture 4
Here you can see I have stripped the application tape off. i have flipped the picture on its side to help show/explain what I mean by “high ground”.
Looking at the vinyl, you will see I have dotted areas that I class as high ground and secondary high ground.
What’s the difference? Well, looking again you will see there are actually 3 levels of surface. You have the outer body work (high ground) of the van but then it drops into a recess. This recess is about 1.2 inches deep. It then creeps back out but not as high, forming the panels. (Secondary high ground)
When applying at first, your concerning yourself with the high ground only.
Keep the whole logo taught, apply the vinyl hitting only the high ground areas.
It’s up to yourself where you start. In this case I started lower centre and worked upwards & out. I had a second body holding the vinyl taught as I applied.
Do not attempt to go in and out of any areas. Apply as a whole
Picture 4
Once you have your vinyl applied to the appropriate high grounds. you have to turn your attention to the areas that have to be stretched into. These recessed areas “low ground” have to be approached in the proper fashion. There is a tecnique I use, infact one most use but may differ slightly.
Picture (5a) shows the bridged gap/recess.
As you can see it is kind of loose looking. What you want to do now is tighten this up a little.
Picture (5b) shows what I do first. Taking a “licked/wet thumb” (yes only the high tech stuff will do for me) taking your wet thumb run it down the edged of the panel pressing firm but steady as shown. Do not rush this. It isn’t that it is hard but at this point, this is where “all matters” the panel recesses are the most common areas for problems to arise when wrapping vans like this. Take your time and get it right.
Run your thumb round the recess on both sides. You will see the suspended vinyl tighten slightly. If still loose, move in a little more and repeat.
Picture 5
Picture 6
[left]https://www.uksignboards.com/images/demos/wrap5a.gif[/left]Picture 6
Here we are shown the slightly tightened vinyl bridging the recess.
If you look at the top area above where I have the grey line, you will see the loose vinyl. now look up the length of the recess next to grey line. You will see it is very tight & smooth. Why?
Up untill you get to the top of the “T” grey line I have applied some gentle heat from about 8 inches. Moving up and down the length of the recess. It’s not a camera trick. The vinyl will almost instantly go drum tight.
Be careful not to go to close as you may blow a hole in the vinyl due to the heat from the gun.
Picture 7
Okay.. Time to concentrate.
In these pictures you will see I have wrapped a soft cotton rag round my thumb.
I find this the best way to apply in recessed areas. Most vehicle wrappers will agree!
The thumb in the rag is hard to beat..
Basically what you are doing is taking your vinyl down in steps, into the recess. Don’t just heat the vinyl in and plunge your thumb into it. You want to work the vinyl into the recess not force it.
I begin at the top where I run my wet thumb round previous.
Start in the middle and work your way out. Both directions.
Then repeat, this time slightly lower. The more time taken doing this the better, as there is less chance over stretching one area or causing “cages”.
While moving round the contours of the recess, you should be pressing firm all the time and applying heat at the same time. The gun doesn’t have to be close or on full. Just a warm air blowing from about 8 inches away or more. No closer.
Being too close will make the vinyl too soft and stretchy.
Like I said, work it round the contour slowly then switch sides of the recess and then back to the side you began. Moving down closer into the pit of the recess. “See pic 8”
This bit looks easier than it is. I don’t know how many folk say.. “Ahh is that all you do?” maybe it is, but! You always have to think a couple of steps ahead when wrapping. See the problems as they begin, not when they have unfolded.
It’s all too easy to think. “Ok, run my thumb round this bit by bit untill it’s all in place”. In theory, that’s maybe correct. But there is a small list of problems that can, & in most cases do arise. The most common one I would say is “rib-cage creases” I made this word up to help explain to our staff what I meant when complaining to them what they had done wrong! Basically if you try and push your thumb to deep into the vinyl in one go when applying you get a series of small creases in a row. It looks a bit like a rib cage does. Theses things are a nightmare to get rid of & in most cases your stuck with them. Pushing to deep or moving to fast for the vinyl when applying, will cause rib cages.
Picture 7
Picture 8
Shows two ways to begin a recess. I know both ways work! What one you choose is up to you.
I choose “A” as I find it works best for me and doesn’t over stretch the vinyl at any single point. It helps keep “cages” to a minimum.
Remember, It’s not all about just getting the vinyl on. Its also about what is going to keep it stuck.
Picture 8
Picture 9
This picture shows step 2 & 3.
Step 2 shows the vinyl having been worked down in steps half way into the recess on its walls.
Step 3 shows once half way down, pressing the vinyl onto the floor of the recess can be applied more easily than in picture 8 “fig b” doing it like this reduces any over stretching at any one point in the vinyl.
Picture 9
Picture 10
Step 4 shows, once the base has been reached you start to work the vinyl in like you did on the walls of the recess until the gap reduces in each corner & expels all the air completely.
Picture 10
Picture 11
Shows the way the vinyl should end up once complete. No bubbles or rib cages!
If you get a bubble, burst it! It is important you burst any bubbles before moving on.
If you followed these instructions step by step and kept the pressure on your thumb, bubbles should not be an issue.
Picture 11
Picture 12
Heating the vinyl…
Most class heating applied vinyl as a quick once over & your done..
Wrap vinyl is very different. I heat the job 3 times in total.
1st when applying the vinyl. The job is gently heated & stretched into position. Then given a quick a blast once in place.
2nd Once I have completed, say, one side of the van I go back to the start and give it a thorough heat.. I don’t mean heating the vinyl. I mean giving it a good blast until you feel the VEHICLE panel HOT!
(Always keep the heat gun moving, so as not to melt or scorch the vinyl.)
3rd once I have completely finished the application and the van has been heat twice as said. I go back to the beginning and give the entire van a right good going over. Paying particular attention to the deep recesses.
Please note: applying heat to vinyl is this fashion with large or small air bubbles will result in the heat blowing a small hole in the bubbles. Please be sure to eliminate any such bubbles before applying intense heat.
Picture 12
Picture 13
Shows a large area of the recesses. You can actually see just how deep they are.
I applied brown oracal 751 once the mactac wrap was applied.
The 751 was applied like regular vinyl with a little stretching.
Picture 13
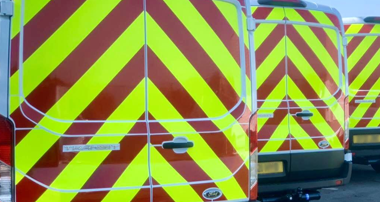
Picture 14 shows the finished vehicle.
Picture 14

Robert Lambie