Create your own all-in-one sublimation table

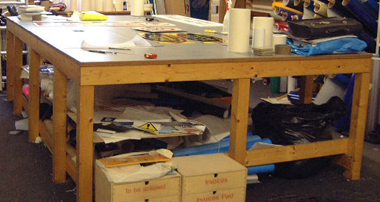
I recently bought a sublimation setup for self promotion of UKSB and our sign business.
I am a firm believer that “everything must have its place” for a business to operate smoothly, even IF I only intend using this equipment from time to time.
My trouble was, I only had one place I could afford to put it and it wasn’t big. I decided the best way to do this would be to build a sort of self contained table/bench to hold everything I needed to produce my sublimation products.

As I began to construct this bench it occurred to me that a recent bench built and demo’d by Phil Fenton was very helpful to many of us, so I decided to take some pictures along the way in the hope, this too may help some.

I have purposely NOT given sizes/dimensions for this demo simply because I think everyone will have a space they need a bench like this to fit. Their printers, computer, presses and the like all vary in size too. So I thought a general look over what I have done, can then be adapted to suit your own needs.
Further more, the materials I have used are probably overkill in some instances because I have just used wood and ply I had available lying around our workshop. So please keep that in mind…

Picture 1
In picture one, you can see I have put the basic framework together using 3×2 inch wooden batons and 80mm screws. I worked out the working height of my bench simply by taking the height from other benches around the workshop that I felt was a comfortable height to work at.

Picture 2
In picture two, you can see I have added a bottom shelf base to the table using .5inch ply. At this stage the ply is not fixed in position.

Picture 3
In picture three, you can see the basic frame work and base shelf as above. But below it you can see I have created miniature vinyl rack peg holders which will be used to hold sublimation vinyl and print media. To see how to create these types of racks, please refer to an old demo I did previously. Click Here

Picture 4
Picture four. I wanted to have a good secure fixing for the racks but I also want some support beams to help prevent a sagging of the table due in the middle, due to the weight of heat press etc…
This meant I had to fix into the top horizontal beam and the bottom horizontal beam. However, because I had the large base shelf it would mean cutting holes in it to allow my vertical beams to pass through and be fixed into. This is pretty simple, after finding roughly where I wanted my racks situated; I held a 2x2inch peace of wood in place and marked it with a pencil as shown

Picture 6
Picture Six shows same as above but after I have remove the sections of wood needed to insert the vertical beams. To create the holes I just drilled a 10mm hole in the corner of the marked area and then jig-sawed along the markings. Once done I smoothed off the edges with some sand paper.

Picture 7
Picture seven shows the four cut out holes in the base shelf. As you can see, before I have fixed anything into place I have positioned everything to make sure it is fitting and is sitting straight/level.

Picture 8
Picture eight shows the four upright 2×2 inch beams in position.

Picture 9
Picture nine shows the four sides to the vinyl rack peg holders in position.

Picture 10
Picture eleven shows the racks with their pegs for holding the vinyl rolls in place.
You can see I have now fixed the end panel to the table to hide all the fixings and ugly parts of the table. You will now also see 3 small beams joining the horizontal top beams of the table. This is explained in the following picture.

Picture 11
Picture eleven, here you can see a bit closer the two short beams I have fixed between the two top horizontal beams. The reason for this is I wanted to fix my heat press to the table to avoid it possibly being knocked over as it is a heavy press.
As this table will be near a door with traffic coming in and out all the time I thought it is better to have it fixed than risk it crashing onto a concrete floor and possible breaking the cast metal base. My press is very solid and balanced well, I mean more so when the swing away arm is out to one side.
Anyway, I worked out exactly where I wanted the press to sit on the table and marked the two top horizontal beams. Then fixed into position… I could have fixed the press to the table top but with it being only half an inch thick ply I thought it better to have something more substantial to grip/fix onto. The beams I have used are again, probably overkill but as I said in the beginning, I am just using the off-cuts of wood I have in the workshop rather than buying in.

Picture 12
In picture twelve below, you can see I have now cut the table top and inside dividing wall from the shelving and the racks. Both cut from half inch plywood, both NOT fixed into place just yet.

Picture 13
In picture thirteen you can see why I have not fixed the top and inner wall. I wanted to cut the shelf to fit snug around the legs and upright posts. Leaving things unfixed allows me easy access with the shelf.

Picture 14
Picture fourteen isn’t the best quality… sorry. The picture shows me using a roll of masking tape to mark a radius on the corner of the shelf, but also the same radius on the corner of the worktop. It’s not really needed but gives a little more of a finish to the work table. Once marked I used a jigsaw to cut and sandpapered smooth.

Picture 15
Picture fifteen shows the shelf, inner dividing wall and worktop fixed in place.

Picture 16
Picture sixteen shows the completed woodwork. The last side panel is now in place as well as that… I proceeded to use up the scrap facing ply I had and faced the rough cut timber I used for the legs etc. again, just to give it a better finish.

Picture 17
As with all our work-tops in our place. In picture seventeen you can see the top is covered with a 1.5mm sheet of plasticol metal. It is perfect for cutting and working on and lasts a lifetime.

Picture 18
Picture eighteen, the finished product. You can see things come into place with the positioned laptop, mug and heat press etc you will also notice I have fitted a shelf to sit my printer on which helps keep it up out of the way.

As mentioned at the beginning. This desk was made for “my” needs and suits the space I had available. Ideally you could adapt some of these ideas into an 8x4ft desk which would also give you extra working and shelf space. We have large tables situated around this desk so I didn’t have a real need for workspace as such, this just helps me keep everything in one place for when I need to use it.

I hope this demo may be of help to some…

Robert Lambie

Related Articles