Traditional-looking sign using Vinyl & Foamex

I have created the following step-by-step tutorial showing how to go about making a traditional-looking sign using only cut vinyl and Forex.
Step / Picture 1
The first step is to design the sign blank and layout:-
Beginning with two simple shapes, an “Oval” and a “Rectangle”.
Step / Picture 2
Place one shape on top of the other shape as shown below.
Step / Picture 3
Then carry out a simple software weld operation. i.e. merge both layers into one.
Step / Picture 4
This will result in the shape as shown. This will be the outline shape of the signblank we are about to produce.
Step / Picture 5
The next step is to design the sign. I have used a traditional looking font and colours to create the layout shown below.
Step / Picture 6
With the design work completed, the next step is to create the actual sign blank. First I cut out the shape of the sign in vinyl on my plotter.
Here you will see I have chosen to use a 10mm Forex board for the actual sign.
Step / Picture 7
The cut vinyl signblank shape is then applied onto the 10mm Forex board as shown.
Step / Picture 8
Follow the vinyl template, the shape is then cut out using a hand held jigsaw.
Step / Picture 9
Cutting with the jigsaw will invariably damage the vinyl that was used as the template, this is best removed when finished.
Step / Picture 10
Next, we need to sand the edges smooth, being careful not to scuff the face of the forex.
Step / Picture 11
Next, a fresh sheet of vinyl is re-applied.
Step / Picture 12
Step / Picture 13
This is then trimmed to size using a sharp craft knife.
Step / Picture 14
Next the edges are coloured using a strip of 12mm wide vinyl (best to use cast vinyl to allow it to fold and melt together with the coloured face
Step / Picture 15
Below shows the completed signblank ready for cut vinyl to be applied.
Step / Picture 16
Almost finished – the design is then cut from vinyl and applied onto the signblank as shown below.
Step / Picture 17
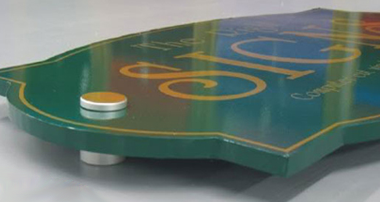
To mount the sign I have used a couple of brushed aluminium stand off locators (The face of the locators have been coloured using gold vinyl to match the design)
Step / Picture 18
Finally – the completed sign fitted to a wall.
I hope this tutorial is some help to you…
Phill