Activity Feed › Forums › Sign Making Discussions › Vehicle Wrapping › Wrapping my new van. How would you do it?
-
Wrapping my new van. How would you do it?
Posted by Martyn Heath on August 18, 2023 at 3:00 pmHi all.
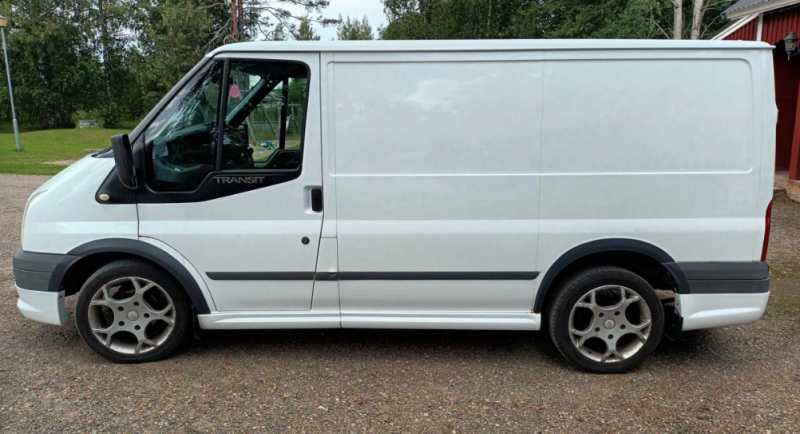
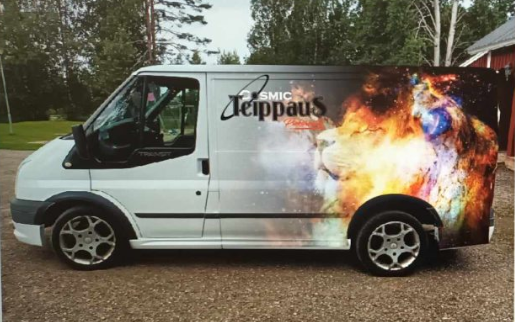
Hope you’re doing well.I have just got myself a “new” van and have designed my graphics.
I am going with the left idea, all in so to speak.
Now I’m questioning which method to install the graphics, panel drops, sliding door, then panel join then rear quarter or fitting with a horizontal overlap which sits in the bodywork join below the panel.
(my media is max 1300w and can’t do the drop-in one)How would you do it? and if panel dropping, would you join either side of the body join 5mm (to hide the overlap) or just overlap the normal 12mm so you see and join.
Comments appreciated.
 Craig Thompson replied 9 months ago 8 Members · 17 Replies
 -
17 Replies

-

Hi Martyn
We are restricted to the same width for printed installs.
I would personally do this horizontally and have an overlap in the bodyline. Just below the lion’s mouth.
As I am pretty anal about my overlaps, I would apply knifeless around 10mm above the intended line and fit the bottom panel first. Then before fitting the top panel, I would apply a 9mm tri-line along the top edge of the first panel to give me a lovely even overlap. Pulling the bottom filament after fitting. -

I’d forget trying to wrap that lip around the roof. Horizontal join like Tim said, which would probably take you a considerable way down the body (ideally near that black trim if it’s a trim?), then a slim piece at the bottom. When printing you might be able to get a slim piece done to wrap above the lip on the roof.
Wrap from the door shut of the driver/passenger door so no hard line where the wrap ends, if the gradient fades gradually you could disguise the difference between the paint and vinyl nicely there.
What material are you thinking of using?
-

I might be miss reading your post…
If your printing machine allows it, I would probably go with the RED line tiling option shown, because It keeps things more manageable when fitting and it is a simple two-drop print. My joins would then be lost in the panel joins or door openings.
I am guessing the size restricts you, so I have just shown some other tiling options.
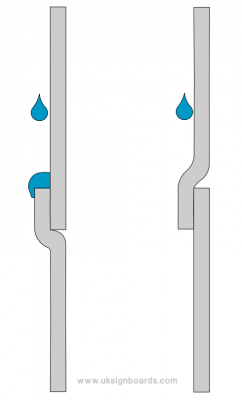
As has been said already, it is better to have the top tile overlapping the bottom tile as it stops water, dirt and grime settling on the leading edge of the vinyl.
Remember, your bumpers and plastic mouldings are looking a bit “bleached” grey.
Turn your heat gun on full and “close-up” wave over the plastic and it will return back to its original colour very quickly.
-

Thanks for the input guys, yes the media restrictions is causing the problems and i like the drop option but the panel joins are very slim (3mm) so im worried that this overlap is not enough.
The horizontal fitting makes most sense and the only option is the crease in the bodywork below the lions mouth as stated, but obviously its a long old piece to fit on the own but i know is doable.
Material wise, as i do so little printed wraps i still have not got a go to media. I have been using Mactac 10700 recently as i can get it by the metre but it is very tacky and hard to work with. Im thinking of using 10700 xr which supposedly has better movability and again by the metre but im also toying with the idea of using arlon slx + which i have been interested in for a while but the roll cost is putting me off along with it sitting on the shelf.
Regarding the plastics rob, aka hawk eyes 🙂 i have tried some plastic refurb liquids but as far have not worked. Maybe the heat gun is the only way but i was warned off this by my local valeter
-
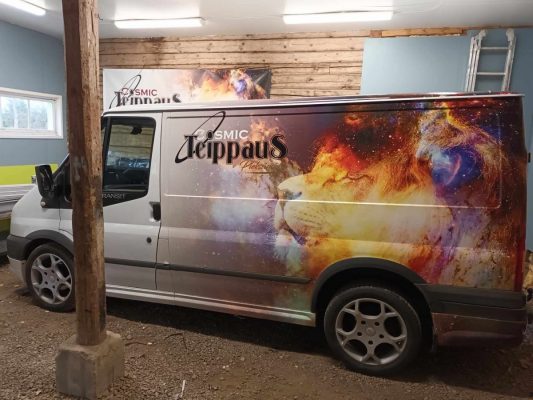
Hi guys, just an update on this. I finally got a chance to get it done. Turned out to be pretty time consuming, 2.5 days fitting and 19m of wrap. Maybe i am just slow? but the cleaning and bodykit seemed to be what surprised me. I ended up fitting horizontally in the body line just below the lions mouth, so in 2 pieces by myself. (the back doors are also done)
I worked out that i would charge around 3k for this job, seems bloody expensive but i dont think people would ever understand the work that goes into it.
Thanks for the advice
-

the van looks really good martyn. nice one mate. what vinyl did you end up using?
-
Thanks mark. i ended up using the mactac 10700 XR as i can get it local.
-
-

Looks great Martyn, nice job!!
I agree with your costings.. people have almost zero idea of the amount of work that goes into wrapping a vehicle, even a relatively simple one like this. I’ve thought in the past about setting up a live feed camera to show how long it takes… I wouldn’t do that as it would probably make me rush the job!
-
Any live feeds i have seen are at 50 times speed 🙂 which doesnt help much.
-
-
Agree with @Hugh-Potter
What people seem to forget is how much more expensive wrap vinyl is, and the additional risks of failure.
I dropped a clanger on two partial wraps, considering the time, cost of materials, and the fact we were rushed to turn them around so quickly. Unfortunately, I doubt I could charge what I’d like to because of local pricing.
-
As mentioned before, you get fulfillment from these types of jobs but in reality you could earn just as much money with more simple jobs and sleep easier at night. Its not like the jobs goes away once its out the door either, wraps have a tendency to rear their head months or years later which is always nice.
I wrapped my firends van a year and half ago, from white to black with graphics over the top, looked bloody good and as near perfect as i can do. Literally 1 year to the day i see him and he said “theres a bubble, what the fuck”, and there she was, a nice half inch bubble that will not go away and as far as the “customer” is concerned, the job is shit. I explained to him that this is not uncommon and if you walk around wrapped vehicles you will pick up on problems on over 50% of them. Temperature changes in summer on black and also -30c in winter also dont help.
-
-
Hi Martyn
The vans turned out really nice mate. well done! 😃👍
It’s good to see you have taken the time to go down over the body kit along the sill. finishes it off much nicer.Turned out to be pretty time consuming, 2.5 days fitting and 19m of wrap. Maybe i am just slow? but the cleaning and bodykit seemed to be what surprised me. I ended up fitting horizontally in the body line just below the lions mouth, so in 2 pieces by myself. (the back doors are also done)
I worked out that i would charge around 3k for this job, seems bloody expensive but i dont think people would ever understand the work that goes into it.OK, here is where you must tread carefully because you are right in one breath and wrong in another, but THAT can just come down to “my opinion”, but it is meant in a totally constructive manner.
If you want to charge £3000 to justify doing this job, that is exactly what you charge. End of story.
You MUST make a profit and be able to justify the required skill, and the long hours taken to properly go through the wrapping process.
Around 80% of sign companies fail to realise this. They just want to “wrap a vehicle” and worry about everything else until it’s bitten them firmly on the arse. By then, the damage is done, it hits them in the pocket, it hits the customer in the pocket and it damages the trade.Time on the job:
2.5 days is most likely longer than a freelancer or wrapping company would take to do this job.
Why? Because they are doing it daily and may have two lads on the one van, so can knock it out much faster. Probably, one day.
So you charging labour for 2.5 days will price you out of the park.Choice of material:
You switched to Mactac rather than the Arlon SLX, which is totally fine. I haven’t used the Mactac wrap so I can’t comment fair. But I know you are working alone so every benefit of slidability, low initial tack and repositioning of the vinyl, is crucial. Maybe paying a bit more for the SLX will have knocked hours off your installation, I don’t know. But the reason I mention it is, your time is more valuable than the material. sometimes paying more for the likes of Arlon, Avery or 3M can greatly speed the process up, but more importantly, lower the chance of a fail. Again, I have NOT used this version of Mactac, I’m just mentioning this as an observation mate. nothing more.Material:
It is hard to tell from the photo, but does the wrap stop at the front doors?
I am only questioning it because you have stated 19m of print, which seems a fair bit if no roof or front end by the doors. Then again, maybe it is down to how you have tiled it. so I could be wrong.Learning curve:
The most important thing to come out of this is your learning process, Martyn.
It sometimes takes doing a job like this, doing it right and going through the full process by the book, to truly grasp the work that is involved in wrapping a vehicle.you get fulfillment from these types of jobs but in reality you could earn just as much money with more simple jobs and sleep easier at night.
Exactly, it is understanding you can make more money turning around general vehicle graphics with oversized printed logos etc. and in multiples, and make much better money, less headaches, less expensive materials and zero comebacks. But when the “correct type of customer” comes along, willing to pay you “properly”, then that’s when you can commit to wraps. This is exactly what I do. I actually sigh when someone walks in and says, “got a van needing wrapped mate, how much?” 🙄
-
Hi rob, thanks for the reply.
Your correct, i was set on using SLX and for no other reason but timescale (my workload hasnt aloud me to get on this job, and weather rapidly changing) i decided to give the mactac a try having had a sample to compare to SLX. I will say the film had nothing to do with my fitting time, it was as low tack as SLX, easy to move and fitted well.
Yes the wrap stops at the front doors. Both horizontal pieces were 3.7m long, so around 8m per side (16m) and 2 drops for back doors at 1.7m each.
Side pieces we 1100mm and 850mm wide so there was a little waste on the 1370 media.
Now to keep an eye on the job and see how it wears with time to give me a complete picture of the media.
Theres so much that goes into these jobs and i especially under estimate a few parts of the process-
* cleaning- seems to take an age on a large vehicle, getting in all the joins and edges where the vinyl will sit but is probably one of the most important parts of the job to ensure longevity.
* stripping parts off- one door handle, number plate and lights and rear tail light all removed.
*cutting in- the fitting seems to be the quickest part
Like you said, doing these on a regular basis, like anything it becomes second nature. I unfortunatley/fortunatley come accross a job like this maybe once a year so its kinda back to the drawing board every time.
-
I agree, getting the bulk of it down is a doddle, it’s the finishing. I don’t have the patience for it, I get bored, and I find that aspect really takes it out of me, requiring lots of mental concentration.
In my mind I always seem to think that conventional signage returns a higher % and less headaches.
-
-

Agree also…
We tend to wrap back doors and normal vinyl graphics to the sides and maybe wrapped bonnet, a little extra work but looks so much more!
-
-
-
-
Log in to reply.