Activity Feed › Forums › Sign Making Discussions › Vehicle Wrapping › Semi – Part wrap fail. Advice needed how to improve.
-
Semi – Part wrap fail. Advice needed how to improve.
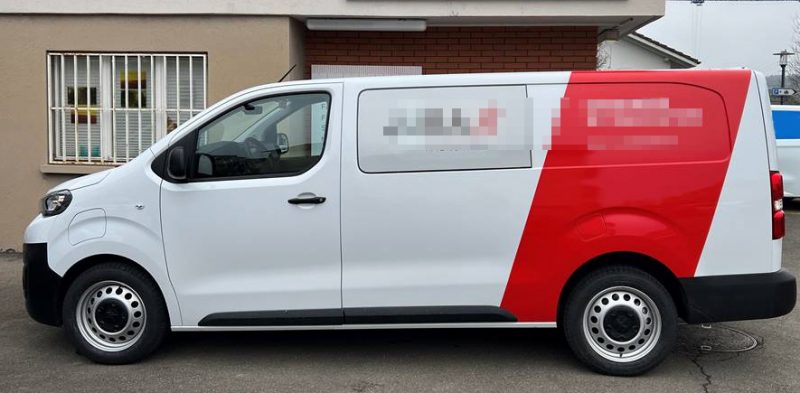
Posted by Pane Talev on June 10, 2024 at 9:32 amGood day folks.
I keep saying I don’t offer wrapping and that one job I do, fails… Now I need to replace it.
Avery supreme wrapping film red.
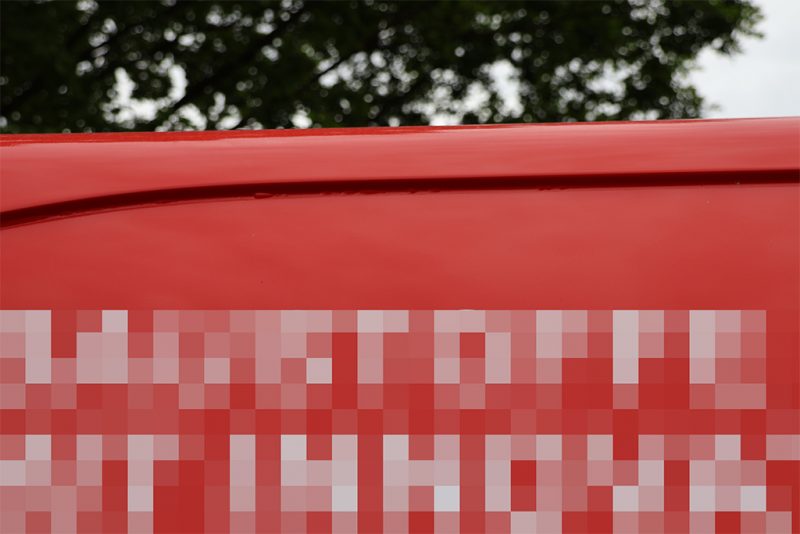
Installation was going smooth. I was heating on where the white outline is. (last photo) Good cleaning. Good post heating. I took my time in all stages.
How to improve?
 RobertLambie replied 2 weeks, 5 days ago 7 Members · 11 Replies
 -
11 Replies

-

Hi Pane.
Heres a brain exploder for you…
There is no reason that this has to be done in one piece!
Vinyl joins on a sharp bodywork bend are pretty much invisible, and a seperate strip around the return of this panel would be perfectly acceptable. I have done plenty of those that are still going strong years later, both printed and colour change.
The shine that always shows up on a sharp bend looks exactly the same as a vinyl join. Use it to your advantage.
My two cents.
-

I know the feeling happened to me – https://uksignboards.com/forums-2/discussion/wrap-failure-cause/
1) How big was the bridge that you made? I can’t get a gauge off the photo.
2) Where did you apply the heat when installing it into the recess?3) Did you thoroughly clean the recess & post heat it once it was applied?
I got invited down to a two-day wrap course following my failure, I was generally doing it right, but post-heating is critical.
-

Hi Pane
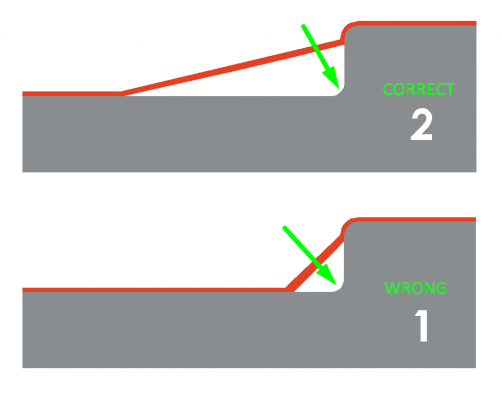
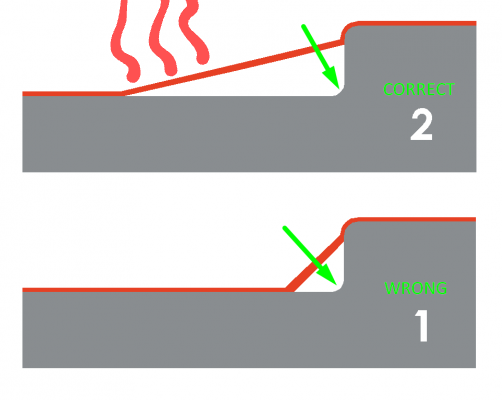
The following illustration shows the correct and incorrect way to begin your stretching of the vinyl into this recessed area of the van.
I can see by the tension points in your photo that you have applied the vinyl until it becomes tight in the corner of the recess. You have then proceeded to apply the vinyl “in the corner”. As shown in Example 1
you must leave as much vinyl “bridging the recess as possible” and then apply the vinyl into the corner.
this means you are using around 100mm of loose vinyl and stretching it into a relatively shallow recess.
Doing it this way means that a minimal amount of stress has been put on the vinyl.
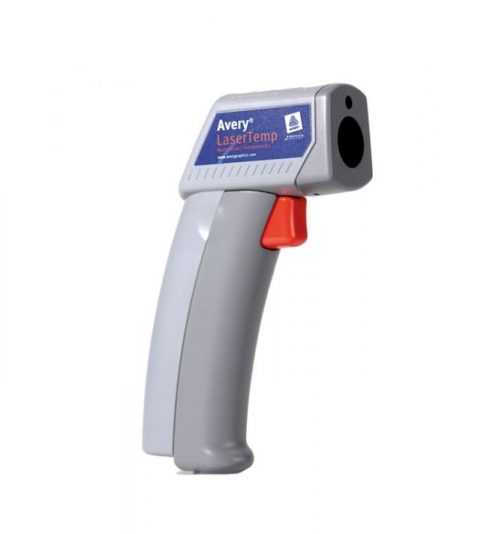
Once you have successfully applied the vinyl. be sure to post-heat the vinyl to a minimal of 100 degrees and “you must” use a laser thermometer to make sure you reach the targeted heat.
Different vinyls have different post-heating temperatures but a good benchmark is 100 degrees.For the record. Avery Supreme is a good choice, it should have zero problems with this type of application.
-
Just to add, you want to heat the vinyl on the flat area when working it in, rather than heat the vinyl going into the recess. Kind of where I’ve drawn the lines on robs picture, keeping the stretch on flat. Direct the heat away from the recess.
Avery is very good, but as I learnt it can give you a false sense of security and bite you on your ass.
-
-

This could possibly be a stupid question but always good to check – what emissivity setting are you using on the thermometer aluminium, paint, plastic?
-
I have never had the option of settings that can be altered to account for emissivity.
If you have a plastic setting, I would imagine that to be closer to vinyl, than the others.I have always stuck with the attached fixed setting, Avery Laser thermometer.
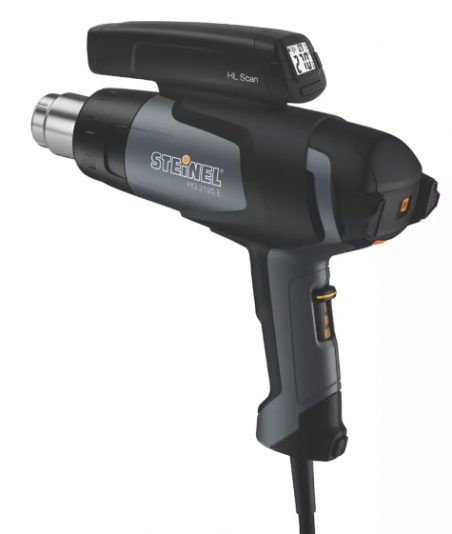
I prefer the laser dot giving a precise location temperature. I do not like the circular glow type.This is through choice, even with my heat guns, I prefer “full blast” or nothing.
Granted, not all heat guns have the same peak temperatures.
I have spent £140+ on Steinil heat guns with its mounted laser and countless others with various fancy settings to the manual 2 or 3-flick settings, over the years. I still revert to the £40 heatguns with basic settings.Different vinyl manufacturers spec different post-heating temperatures. from around 85 degrees to 120 degrees. but as I said, a happy medium is 100 agrees, you can go over but don’t be under. I remember about 13+ years ago, Oracal specified 170-180 degrees. There was no way I would advise staff to post at that sort of temperature.
1, It would take a horrendous amount of time to do a whole van.
2, Staff would either scorch the vinyl or the vehicle paintwork.
it was a year or two after, I heard they dropped it to around 115 or 120 I think!
Why the original temp and then change, I have no clue.
-

Thank you all for your replies.
I did another 2 vans recently and I did them as @SimonWorrall recommended. Cut in the recess. Barely visible.
-
If the material is being cut to prevent tension in the vinyl, which will “leave a small gap”, then using a polymeric vinyl which is inlaid in a relaxed state, then it will be fine, as long as care is used to ensure an adequate bond is made and there is no vinyl ridge left for water to sit on.
in short, Cast/wrap is NOT needed for this type of application.
Log in to reply.