Activity Feed › Forums › Sign Making Discussions › Gallery › Routed/Sandblast: stroller parking
-
Routed/Sandblast: stroller parking
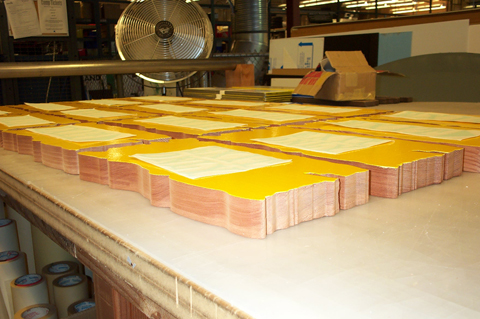
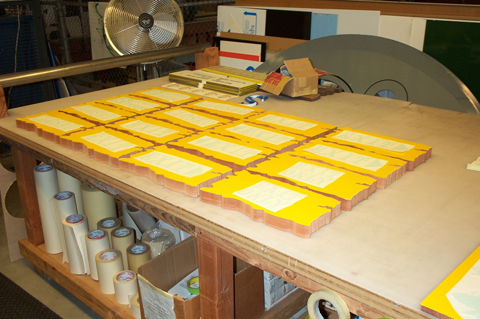
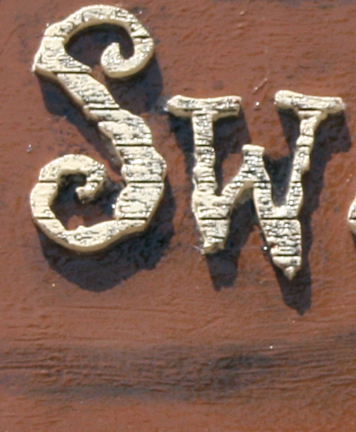
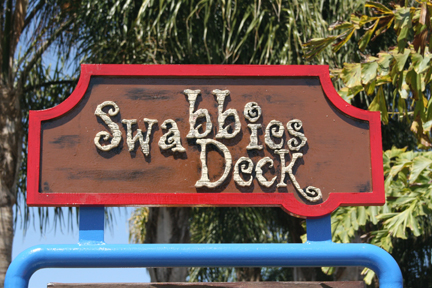
Posted by Marekdlux on May 23, 2006 at 7:09 pmHere is something I have been trying to get done before my vacation (Thursday).
16 signs for a new area in the park. It is Pirate themed, hence the font choice http://www.myfonts.com/fonts/comicraft/pass-the-port/ pass-the-port aged.
I routed them on my CNC, then had them primed and painted before I applied the sandblast mask. After we blast them, we will stain them, then we can remove the mask to reveal (hopefully!) beautiful yellow text. I’ve never tried it this way before, hopefully it will cut down on the hand lettering afterwards.
Hope you like.
-Marek
Attachments:
 Shane Drew replied 17 years, 10 months ago 9 Members · 24 Replies
 -
24 Replies
-

Looks good, marek
Will be interesting see the final result.
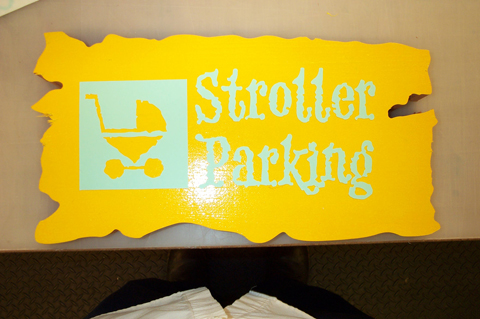
Are you sure the mask for the pram is the right way round?
and I read stroller as strotter?Peter
-
 quote Peter Normington:Are you sure the mask for the pram is the right way round?
and I read stroller as strotter?Not sure what you mean Peter? The blue area is what is not going the be blasted, all the yellow will be gone to reveal the letters.
Also, I’m sorry you can’t read Peter, it obviously says Strollers because I never make spelling mistackes. 😉
I didn’t design the font, I just type the words. 😀
-Marek -

hi marek
thank you for posting your work mate, i look forward to seeing the finsihed result.
what type of wood and what depth is it that you have used?
I would maybe have considered using a bit with a radious first then cut out shape. then again, that might look crap… guess its one of those things you would need to try one and see how it went.
keep us posted on developments. i havent done anything like this before. (sand blasting) but i have seen some cracking work from Henry baker. -
quote Robert Lambie:what type of wood and what depth is it that you have used?
It’s redwood, 1.5" thick (38mm).
We might destress the corners and things after it is blasted, just depends on how it looks. We did one sample and everyone was pretty pelased on how it looked.
-Marek -

I’m with Peter….
I would have made the "l"s have serifed bottoms rather than curly.
Just a bit of node editing or using the serif from the "r".
Have fun on your trek, Marek.
Love….Jill -
…no no no….
come on Marek, a serif on both ends.
Those just look like limp (oops I Swore)
love….Jill -
😀
I’ll change them in the morning. I’m ready to go home and pack my bags.
-Marek -

Hi Marek,
I tried this recently because a customer wanted a driftwood look. I found an angle grinder with a wire wheel in a good tool to roughen up the edges, but it needs blasting again afterwards to keep the finish even with the rest of the blank. Also used 1 1/2" western red cedar. Just out of curiosity what paints are you using. I was reccommended to use a water-base primer and paint system. But after peeling off the mask some paint came with it, but luckily the customer was delighted, as he wanted that real washed up on a beach effect.
Look forward to seeing the finished result.
Ali
Attachments:
-
that looks pretty good alistair… nice one mate. never been asked or tried this type of thing but i do like the effects it can give.
-
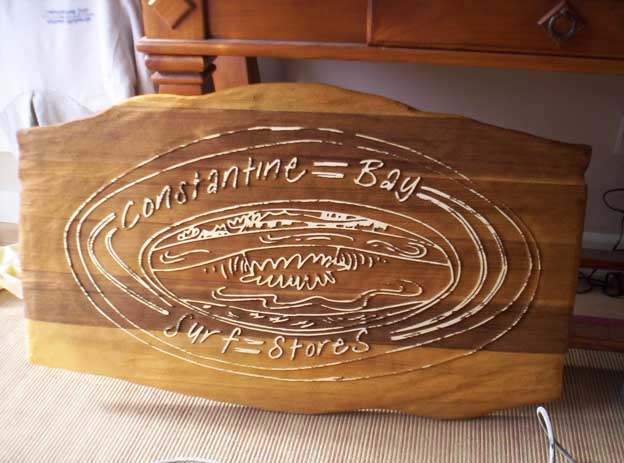
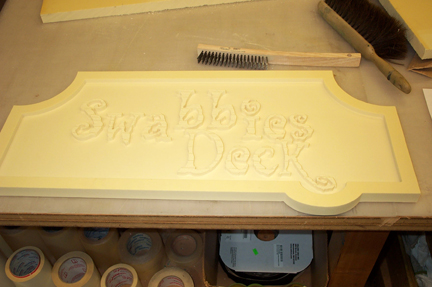
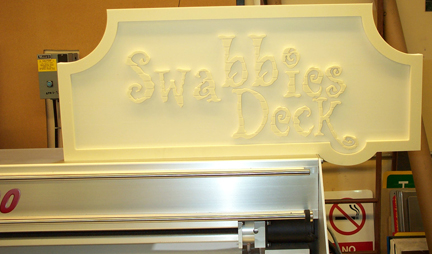
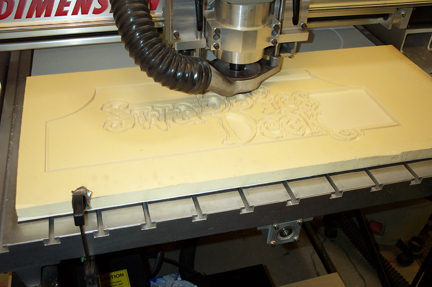
Here’s something I did today for the same project as above.
I’ll post some more after paint/install.
Any suggestions for a color scheme for this?
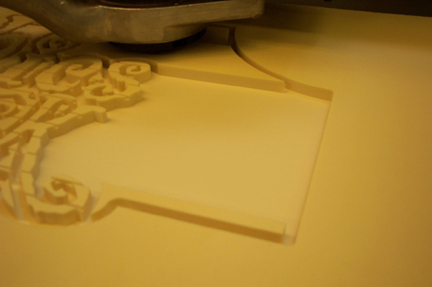
Routed HDU, then I took a big wire brush to the letters to give it a sandblast look.
-Marek
Attachments:
-
that looks great marek, i like the effect with the brush…
i have some sheets of HDU that i am gagging to dig out and have a play with. i may pinch your idea with the brush 😉 :lol1:
do you not have a vaccuum bed on your router? ide be lost without ours, saves so much hassle. that said, routing wood still needs clamped as the grain prevents a vaccuum. 😕 -
I don’t like risking cutting into the table mat so I use a sacrificial piece of PVC, then tape my piece to that. I usually don’t clamp, but I didn’t want to risk this one slipping so I put a couple of clamps on it. The vacuum usually holds down everything fine though.
-Marek -
i use a 5mm sheet of mdf as my waste board. the vacuum sucks "through" that brilliant holding most things firm. once its cut to bits i flip it over and use the back… i know what you mean about fear of slipping though… i sometimes tape small bits of materil into place incase it moves a bit…
-
Can you post a picture?
Not sure I get what you are saying. Do you have holes in the mdf for the vacuum to hold your piece down?
-Marek -
no mate, this is just regular "off the shelf" mdf, about 5-6mm thick. its not perforated in anyway… the vaccuum still sucks right through the mdf waste board holding the material in place. as it routs… lets say a letter.. its cutting "into" the mdf waste board by about a 1mm or so… so after a fair time routing, the waste board has channels/grooves all over the face, so i just flip it and use the rear. when thats done i just use a new sheet. as you will know its only a few pound for an 8×4 so not expensive at all…
ill try take a few pictures tommorrow. i think one of our guys is vutting some dibond letters in the morning.
-
you tape down your material though?
Maybe I am missing something. 😀
-Marek -
i dont tape down any material, unless its something like an A4 bit of something…. even then i only tape it down if its something like an engraving… just to be sure. basically the less coverage a material has the less grip the vaccuum has over it.
-
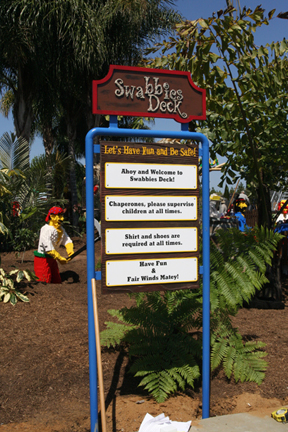
Here is the last sign finished. I also made the redwood sandblasted "Let’s Have Fun and Be Safe" sign with router cut dibond plates.
-Marek
Attachments:
-

nice work dude, i’d love to have a flatbed router to play with !!
Hugh -

Nice work Marek. I too would love a router. Its great that you get to work with so many different materials and machines and you get loads of fun stuff to work on.
😀
-
Robert,
You ever get a picture of the table?
Thanks.
-Marek -

I must have missed this post Marek. Nice work mate, well done.

Log in to reply.
