Activity Feed › Forums › Sign Making Discussions › Graphic Design Help › Photoshop van colour change
-
Photoshop van colour change
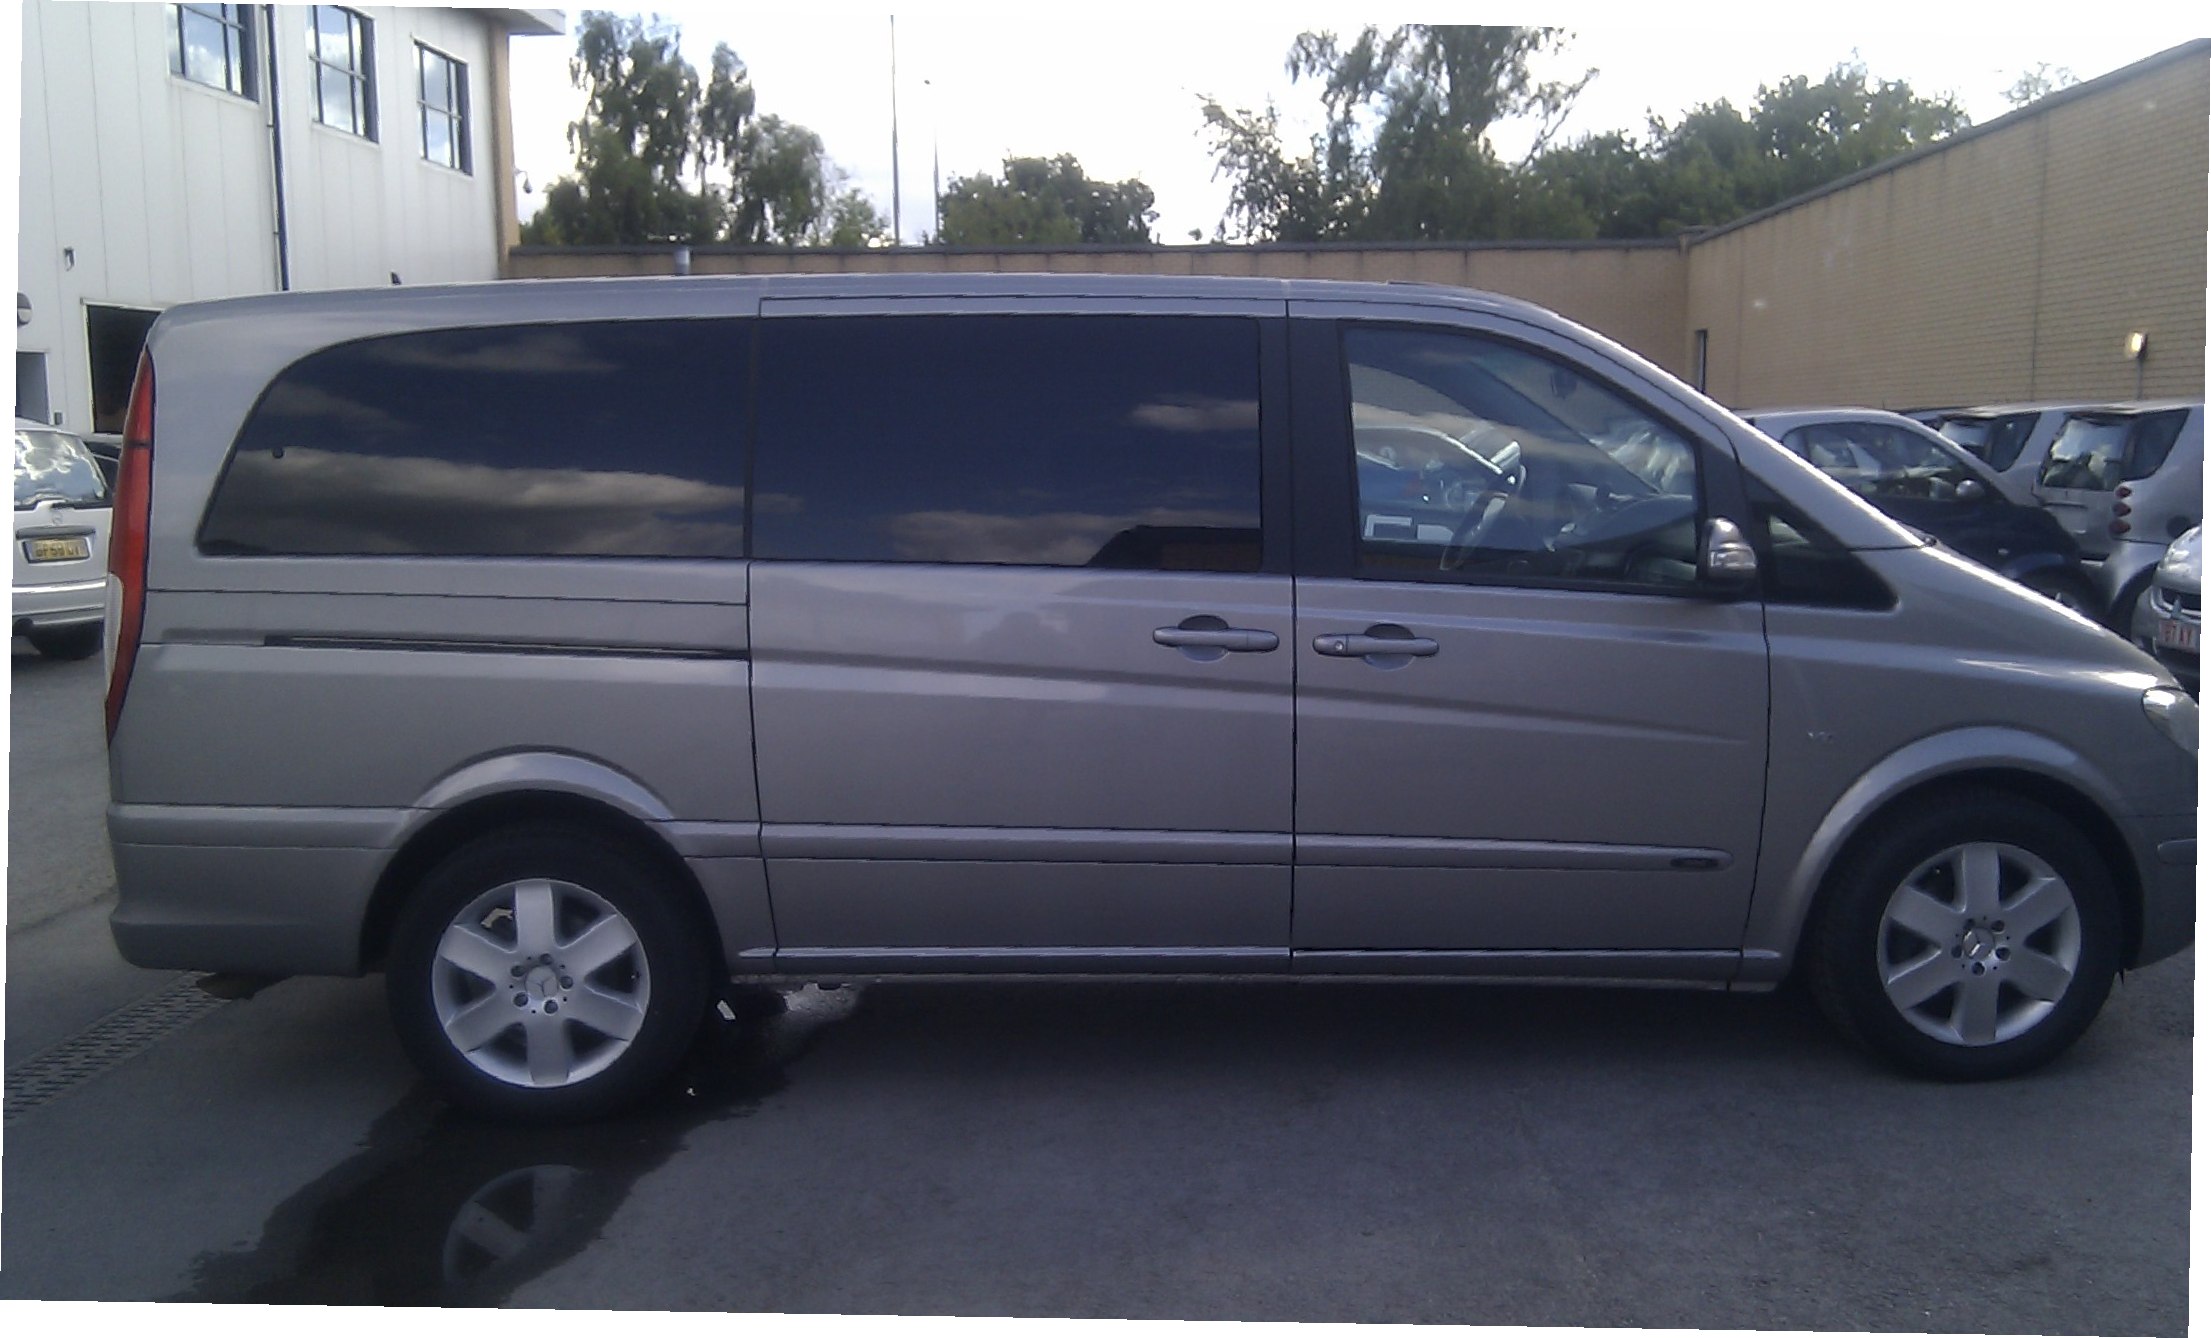
Posted by Alex Pirozek on August 13, 2010 at 8:22 pmHi all,
I don’t really ask for much but would anyone be so kind and slightly change the colour of this minibus from dark silver to normal light silver. I’ve spent ages with a mask tool in photopaint but my skills in photo editing are quite slow and i could do with it soon. The customer wants to see a true representation of their logos on the closest colour to their minibus but i could only take a photo of a gun metal grey one. I said it would be ok as i could airbrush it silver……….how wrong was I !!! 😳 😳Thanks in advance,
Alex.
Attachments:
 OwenTaylor replied 13 years, 8 months ago 7 Members · 12 Replies
 -
12 Replies
-

David,
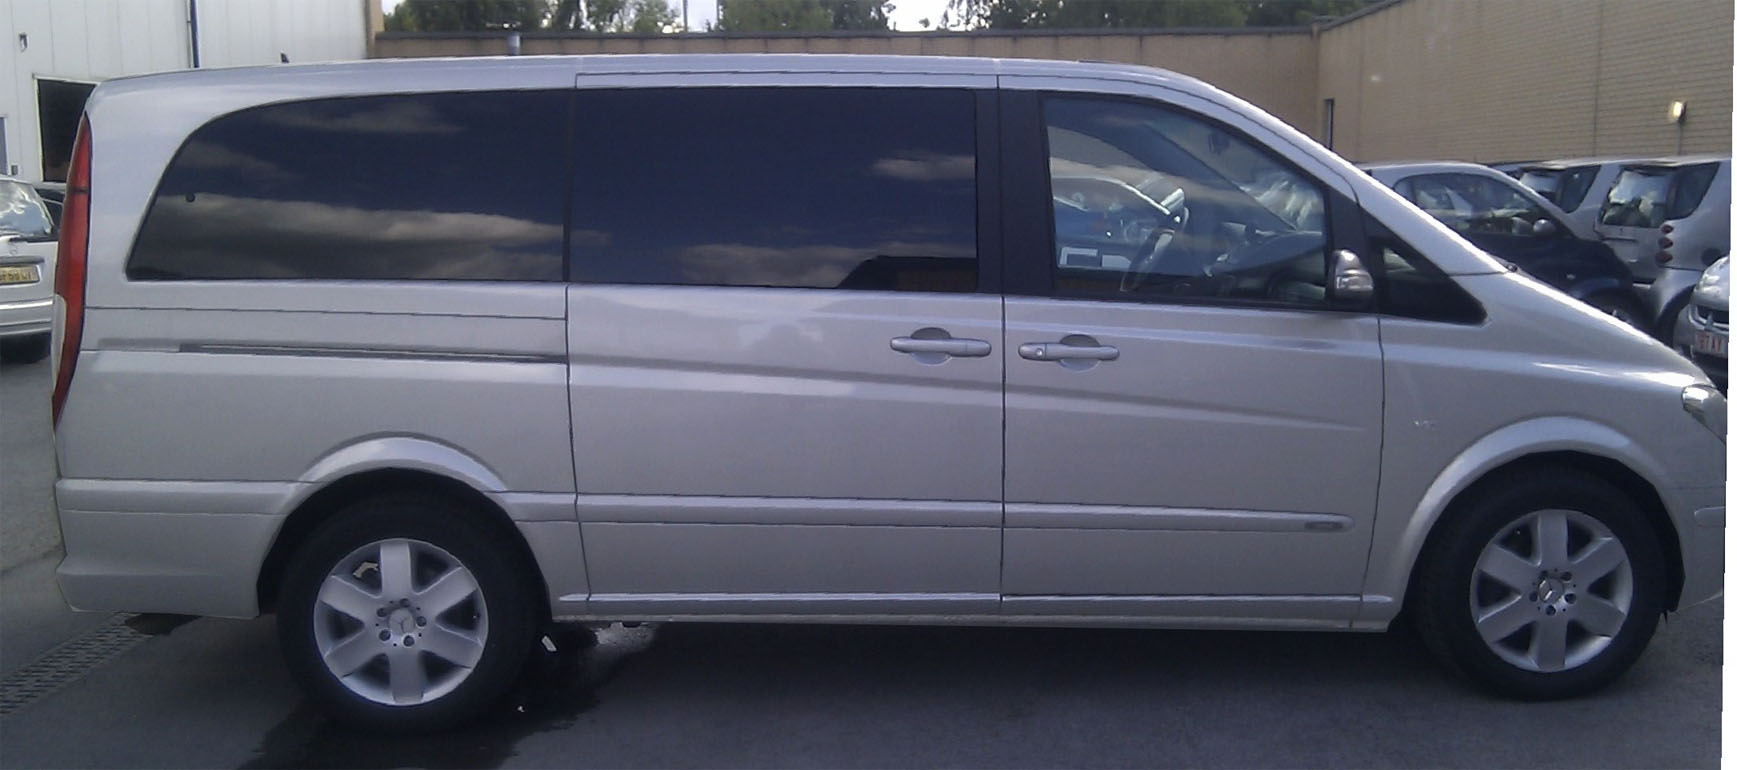
That’s absolutely fantastic and will be perfect for what i require.
I owe you a beer on this one as it’s made my life easier tonight.
:thanks2:Alex.
-

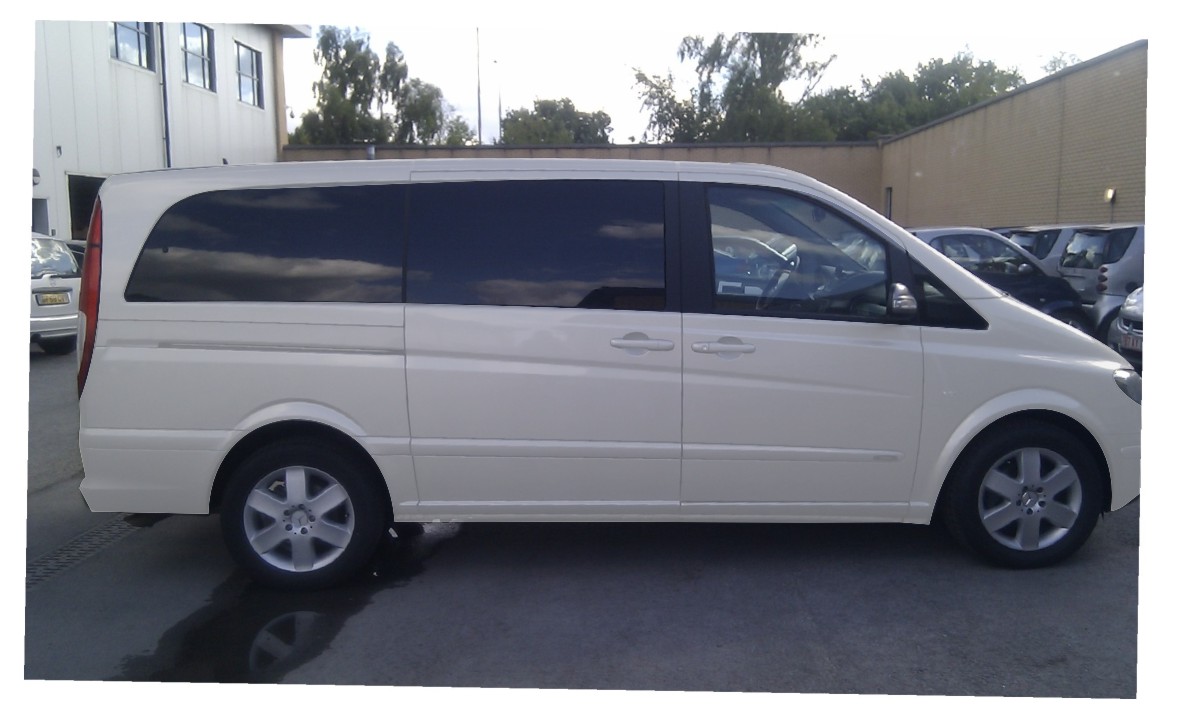
just done on as well so may as well post it…….
Attachments:
-
Glenn,
Thank you as well for going to the trouble, it might come in handy for future use.
:thanks2:Alex.
-

To compare notes with Glenn.
I just did an area selection and altered the brightness & contrast (as was a just to get a lighter shade not another colour).
You?
(It looks like you put a semi-opaque fill over the area).
-

if i was tackling it, i might see how much the wand would pick up and then change to paint-on-mask. that should pick up all of the body work and then use Hue-saturation/colorise button and move the colour.
btw.. going by memory here
-
David,
You just taught me something new as i would have been here all night using the magic wand tool and then spraying or using the eraser tool to change the body colour. I quickly tried your method by applying a general mask around the body and then used the brightness to lighten it all up, Just the job and took 4mins.Brilliant!
Alex.
-
quote David Rogers:To compare notes with Glenn.
I just did an area selection and altered the brightness & contrast (as was a just to get a lighter shade not another colour).
You?
(It looks like you put a semi-opaque fill over the area).
David….
I’m hopeless in photoshop so I did this as you say with a transparency in corel….just quickly drew an outline round the van and the window area and then combined the two
In the cold light of day (I’d had a drink last night as well) It doesn’t look nearly as realistic as yours
I always pride myself on being able to pick up software fairly quickly but I just can’t get on with the likes of photoshop
must try harder
-
Hi Alex,
David is spot on, but if you want to take it a step further, make your area selection using the Polygonal Lasso Tool then got to..
Layer
New Adjustment Layer
Brightness / Contrast.. .. make adjustments here.Go to the Layers window and blink the new layer to compare with the background original.
Layers are fun and well worth getting to know.
jeremy
-

Tons of possibilities in photoshop…
Great fun with hue/saturationEdit:
@ owen: sort of pen tool guy myself.
I showed it and you texted it ;o)
If background is similar to object, pen tool is the only way.My way, video:
http://www.screencast.com/t/ZWQ3Mzc5Yzkt -
 quote Jeremy Howes:Hi Alex,
David is spot on, but if you want to take it a step further, make your area selection using the Polygonal Lasso Tool then got to..
Layer
New Adjustment Layer
Brightness / Contrast.. .. make adjustments here.Go to the Layers window and blink the new layer to compare with the background original.
Layers are fun and well worth getting to know.
jeremy
Quick hint about selecting areas in Photoshop. I would recommend using the shape tool rather than the polygonal lasso. A few reasons:
– It’s hard to be accurate with the polygonal lasso and any curves can look like ’50 pence piece’ unless you do lots of small sections.
– If you double click by accident it closes the selection and you have to start all over.
– Once you click there are no second chances so you have to take your time and do it right first time.
– The selection disappears after you have used it.If you use the shape tool (fountain pen) you don’t have any of the above issues and you can go back afterwards with the direct select tool (white arrow) and tweak each point and curve as you would with a vector path like in Illustrator. It’s much quicker when selecting large round objects too.
Once you have drawn your path it will appear in a new shape layer. To use the selection just press ctrl+click the shape layer in the layers palette. This will load the selection. Then switch to your image layer and get to work!
Hope this helps
Owenedit – Jan just watched the video – uses the pen tool too. 😳
Log in to reply.
