Activity Feed Forums Sign Making Discussions Vehicle Wrapping Panelling graphics ready for part vehicle wrap

  • Panelling graphics ready for part vehicle wrap

    Posted by Daniel Evans on April 25, 2019 at 11:06 am

    Morning all

    I mainly do cut vinyl lettering on vehicles so I’ve not really nailed down the process of doing wraps / part wraps and tiling them ready for print.

    Just wondering how you set it up ready for print?

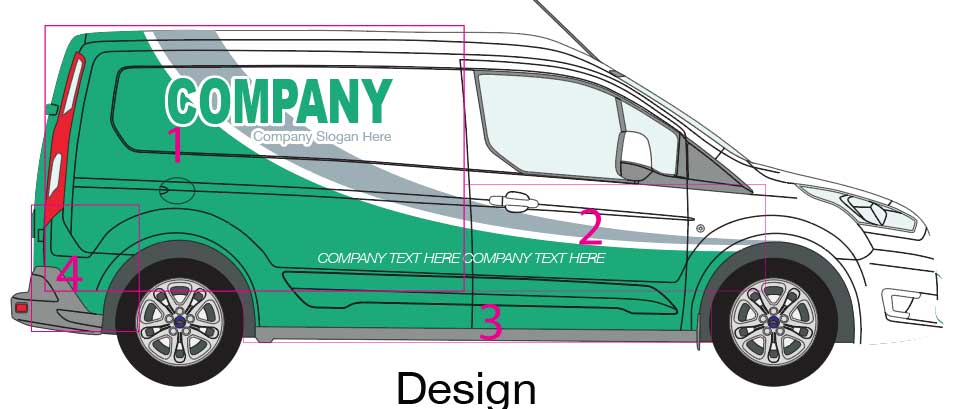
    I have attached a break down of what I tend to do, I may of missed a couple of steps as I was trying to do it fast so you had something visual rather than me just describing it.

    Measuring / Using Impact outlines
    I take it 99% of you use the impact library but..

    1. Do you physically measure the vehicle?
    2. If so, what parts do you make sure you measure?

    Bleed

    1. I suppose this depends on if you measure the vehicle or just use the template.
    2. How do you accommodate the parts that curve round the panels, i.e. where the rear doors meet the sides or when the sides meet the roof?
    3. What bleed do you use between the doors so you can lose the join line in the door gap?
    4. What bleed do you use when you simple need to tile graphics together on a single panel (no door gaps)
    5. Contour cutting is not 100% so you have to give the graphics a bleed to compensate for this, what bleed do you use and does it depend on the length of the graphics, i.e. is 5mm bleed enough when printing 3-5 metres

    Gaps between graphics
    On my design, the main part is green but I have the grey part that runs along the same line, obviously it would be easier to print these in the correct place so when it comes to fitting they’re already lined up, on cut lettering we would simple use application tape to hold them together but would you still use application tape or would you fit them separately when doing a part wrap? Or would you even leave the white in the middle and have the green and grey parts connected?

    Printing solid colours
    From my little knowledge of printing, I understand when printing solid colours, you need to print them in the same direction.I don’t have great experience printing solid colours but they may have been down to the third party inks I was using, I’ve now got rid of the Atlantic inks but would my tiling be ok so print a consistent colour?

    I may have my setup completely wrong so how would you do it?

    Dan


    Attachments:

    David Hammond replied 5 years ago 4 Members · 5 Replies
  • 5 Replies
  • Jon Marshall

    Member
    April 25, 2019 at 12:37 pm

    I’d probably lose the joins in tile 2 and 3 in the door gaps.

  • David Hammond

    Member
    April 25, 2019 at 12:56 pm

    You can loose one join at the door, and do the same on the other side.

    You may be able to do it if there’s a sliding door on the opposite side too.

    Depending on the size of the van, you could run panels 1&2 as one horizontal part, and put the join low down, where the plastic trim is, print another patch to wrap the bit at the back (marked as 4)

    I’ve not wrapped on of those, so I can’t picture the back corner, but some it’s easier to wrap as a separate part.

    One word of caution is to watch the printing, as if they’re rotated as they print, the colour can shift. Bit like if you get banding, the banding will rotate.

    Will you be adding the logo, slogans and text on top of the wrap, in cut vinyl?


    Attachments:

  • Daniel Evans

    Member
    April 25, 2019 at 1:17 pm

    Hi David

    I have now measured the van so I know the exact dimensions or close to.

    I can lose the joins on the sliding door on one side and have a join where the door moulding goes which you suggested.

    Or I worked out that I can print it diagonally and do it all in one piece, what do you think or is that too risky?

    Also, would you over lay the text parts? How would you deal with the grey line, print them both and apply together as separate parts or leave them joined together with and leave the white between them in place?


    Attachments:

  • Kevin Mahoney

    Member
    April 25, 2019 at 1:37 pm

    I’d want to do that in one go, text & all, if you need that little fillet at the rear of the wheel arch it will be barely noticeable. What material are going for?

  • David Hammond

    Member
    April 25, 2019 at 1:43 pm

    One go is fine, but won’t leave much to wrap around the doors when you slit it.

    I’d put the text on top. If the curves drop a little, you won’t know, and you can pop the logo and text on perfectly straight on top. Plus you can be 100% sure it’s not going to hit handles, or anything.

    Easier to cut the white text if needs be, rather than a full reprint. Depends how confident you are in your abilities, and measurements.

    Print them as they are, together, then either run it through the plotter, or get a knife on the bench and cut them to shape, leaving the backing paper in tact. Position on the vehicle, on the backing, hold them in place, slit the backing paper between them and apply them as two seperate items :thumbsup:

Log in to reply.