Activity Feed › Forums › Sign Making Discussions › Vinyl › Layered vinyl peeling off plastic sided trailer
-
Layered vinyl peeling off plastic sided trailer
Posted by Gordon Smithard on June 19, 2018 at 7:33 pmGot a call today about some vinyl lifting off a trailer. Done about 4 years ago with 5-7 year vinyl, but it’s only the double layered stuff that’s coming off, single colour stuff is still fine.
Trailer sides are some sort of plastic so I don’t know if this is down to some sort of plasticiser migration or what.
Customer is ok about it, wants a price to re-do, I’ll probably just do one colour this time as the original had a black border around red letters so I’ll just do red.
Anyone had this before? or any ideas what could cause it?
Same make of vinyl used throughout. Thanks in advance.
Attachments:
 Robert Lambie replied 5 years, 10 months ago 5 Members · 11 Replies
 -
11 Replies
-

what vinyl brand and series of the brand has been used?
Has it been applied with an application fluid?
What month approx was it installed?
Was it fitted outside or inside? -

Spandex, Image Perfect 5700, fitted outside, not sure what time of year but I’ll check back through my invoices, dry applied.
From memory it started peeling within a short time, about a year or so, customer not too bothered but now it’s looking a bit too bad. -
Just checked, June 2011, so it’s had a good innings. But like I said, it started peeling at the edges after a year or so.
Just seem strange the it’s only the 2 colour double layered bits that’s peeled. -
Thanks for the feedback….
Looking at the majority of the fail areas.
It does not fail on the single layered text as you say. so i would rule out the media and the surface its fitted too as the blame.the real issue is you have "stepped" the overlap of vinyl to create the shadow.
This step has reduced the pressure of "contact friction created "and needed" when applying the vinyl with your squeegee, as it bumps over the ridge at speed. so the larger areas are all firmly bonded but the surrounding area of the letter at the top is "loose" in comparison.
also, because of that "ridge/step/bump" it creates a small cavity behind the film also.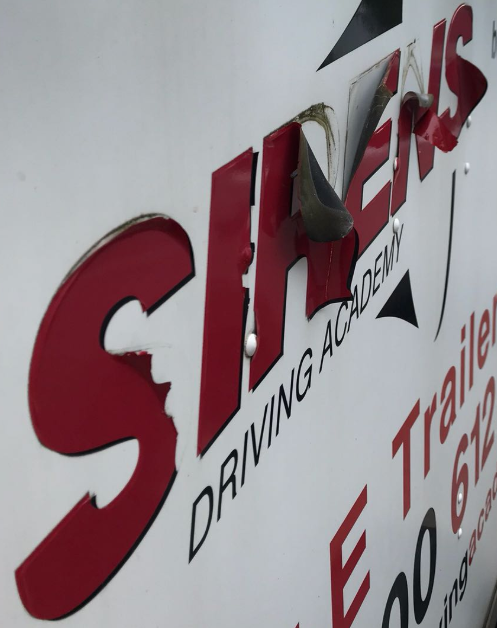
Now, If you look close to the areas that have failed and the progressive deterioration direction. they are more at the top of the letters working their way down or down and around the shape of the "step".
What is happening here is the water coming down off the roof or rain in general, is running down the face of the letters and running inside the "cavity" created by the ridge.
This now dirty water running through the cavity behind an area of vinyl that didnt have the same amount of pressure applied "just around the overlap" is deteriorating. Coupled by the accelerated shrinkage of a Calendered film in an area that doesn’t have the proper tack/adhesion that it should. this is the foundation for a progressive fail like this.
Continual dirty water coming down from the top, resting on the flap forward of vinyl, the more it will curl and peal back like it is in the picture, ultimately leading to the fail you have now.
Clear evidence of this on the letter "N" the dirty adhesive residue shows how the water has hit the letter at the top and worked its way down either side of the leg of the letter, forming a sort of pointed dirty adhesive mark. the clean areas just below this, is obviously were someone has tugged back the dog-eared vinyl by hand. Same applies withe the "R" etc. -
 quote Robert Lambie:Thanks for the feedback….
Looking at the majority of the fail areas.
It does not fail on the single layered text as you say. so i would rule out the media and the surface its fitted too as the blame.the real issue is you have “stepped” the overlap of vinyl to create the shadow.
This step has reduced the pressure of “contact friction created “and needed” when applying the vinyl with your squeegee, as it bumps over the ridge at speed. so the larger areas are all firmly bonded but the surrounding area of the letter at the top is “loose” in comparison.
also, because of that “ridge/step/bump” it creates a small cavity behind the film also.Now, If you look close to the areas that have failed and the progressive deterioration direction. they are more at the top of the letters working their way down or down and around the shape of the “step”.
What is happening here is the water coming down off the roof or rain in general, is running down the face of the letters and running inside the “cavity” created by the ridge.
This now dirty water running through the cavity behind an area of vinyl that didnt have the same amount of pressure applied “just around the overlap” is deteriorating. Coupled by the accelerated shrinkage of a Calendered film in an area that doesn’t have the proper tack/adhesion that it should. this is the foundation for a progressive fail like this.
Continual dirty water coming down from the top, resting on the flap forward of vinyl, the more it will curl and peal back like it is in the picture, ultimately leading to the fail you have now.
Clear evidence of this on the letter “N” the dirty adhesive residue shows how the water has hit the letter at the top and worked its way down either side of the leg of the letter, forming a sort of pointed dirty adhesive mark. the clean areas just below this, is obviously were someone has tugged back the dog-eared vinyl by hand. Same applies withe the “R” etc.It is elementary, my dear Watson. :smiles:
-
Good theory but I always fit layered vinyls separately, ie black gets fitted first then red over the top, otherwise like you say, you get that tunnel of air under the step.
-
Hi Gordon
No mate, you will get the tunnelling regardless to applied as one or as separate layers.
You will also get the loss in squeegee friction contact around these areas as the squeegee bumps down this ridge.The way to eliminate the tunnelling is when creating the artwork. you would weld the layers so you have two layers stacked even. or weld it so that you have flush cropped/clipped layers that butt join.
-

I never overlap vinyl for this very reason, if I have to do a drop shadow on the plotter & not printed, it’s always cut as a knock out & butt joined. Ball ache but I think it’s worth the effort
-

We only layer like that if there’s a specific coloured vinyl required, or if it’s a small amount, otherwise we print it.
We do as Rob says, and make sure we weld the top & bottom layers, for the bottom layer, so there’s no step.
It looks better with no ridges, and also helps with aligning the layers :thumbsup:
-
Good call about the welding, might try that and see what happens.
-
quote Simon Worrall:It is elementary, my dear Watson. :smiles:
😆 :smiles:
Log in to reply.
