Activity Feed › Forums › Sign Making Discussions › Vinyl › How to get rid of tiny bubbles
-
How to get rid of tiny bubbles
Posted by David Hammond on January 19, 2012 at 1:44 pmI’ve just made up the sign attached below.
I tried the tutorial on here about layering up vinyl dry, by adding a registration line along the bottom. Trouble is the signs 1.8m long to was a pain to get it right, so applied the layer wet.
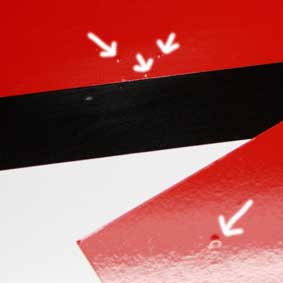
It went down a treat, but after 25 hours lots of tiny bubbles have appeared. I’m having some real trouble getting vinyl down without a blemish.
Attached a pic of the sign, and another of the bubbles.
What’s the cause of this, and how do I get rid of the pesky things!
Thanks in advance.
Attachments:

 David Hammond replied 12 years, 3 months ago 17 Members · 30 Replies
 -
30 Replies
-

stick a pin in them and press, these small bubbles usually go away after a few days.
BC -

for such large lettering I would have overlayed wet direct on the panel.
Overlaying dry is ok for small sizes IMHO not for so large format as it is a PITA and often lead in poor results (OK I’m not a R.Lambie like expert :lol1: ).
Towards small bubbles: they will disapear after few days/weeks but I recon it won’t appear clean when you deliver to your customer.
-

I did the layering up on the board.
The shadow was done as per Phil’s tutorial. Really good technique.
I’ve ran it through the laminator after pricking some with the scalpel, but still no luck.
-

if as Karl points out there is crap underneath and you would feel it if you tried to prick and press out then its a cleanliness issue, if not as others have said dont worry they will go and dont feel bad about explaining this if asked
-

if its dirt under the vinyl on foamex you can use the back of a teaspoon to help smooth out as the foamex gives way with enough pressure.
-
quote Chris Windebank:if its dirt under the vinyl on foamex you can use the back of a teaspoon to help smooth out as the foamex gives way with enough pressure.
Good tip Chris. Never heard of that one. I don’y know….been in this game over 20 years and still I know nuffink! 😕
-
This one’s on composite.
I don’t think it’s dirt I’ve popped a few larger ones and they’ve disappeared.
I’m just using a drop of stardrops in with some water when applying wet. Might have to try some application fluid, see if they improve.
On a side note. What’s the best way to install pin stripes, the ones on this sign were a bit fiddly to get down straight.
-

its particles of dirt attracted by static off the vinyl.
brush down and then wipe down the bench you are working on with a wet cloth.
dry off the bench.NOT standing next to the bench area. but away from it.
wipe down the board "rear first" with a damp cloth. then repeat on the face.sit board on table and now make sure you dont have any dust or whatever on your clothes.
before appraoching tabe;. check your vinyl is shook and no dust or whatever on REAR or FACE.
now stood at table and about to letter. wipe down the face of the board again with a damp vclean cloth or meths/IPA
now your ready to letter the sign.
The biggest problem you will have is static attracting dirt.
as soon as you pull the vinyl from the acrrying paper, the static will make dust jump several feet onto the rear of the vinyl.so lets say earlier in the morning you were cutting foamex, all those tiny particles of pvc are sticking all over you.
pull some vinyl from the release paper and they will jump right onto it. trust me… i have the t-shirt, baseball cap and thong to prove it! 😉 :lol1:its a common ignorance amongst sign makers, but regardless to what level of application you are about to do. prepairing the work area is paramount to a good finish.
also… on a side note and nothing to do with the application… might be the picture. but looks like your cutter blade might need renewed or your cutting pressure to deep. 😉
p.s. ditch that soapy bubbles liquid. rapidtac 2 if you must apply wet. in my opinion, DRY all the way!
-
quote :but looks like your cutter blade might need renewed or your cutting pressure to deep.
What makes you think that Rob? Blades quite new and hasn’t had much use recently.
I’ve watched your video on Registration and applying layers dry, but something this big it wasn’t easy so reverted to doing things wet.
-

Tack rags are a great addition to any signmakers tool box. We wouldn’t be without them.
-

If the sign doesn’t need to go out for a few days, you will be amazed at how well the bubbles all disappear of their own accord.
I’ve made signs on a Friday afternoon that I thought I was going to have to re-do – but by Monday morning they looked so much better and a few days later were absolutely fine.
-
Tack rags??? Am I being simple?
I’ll try and give the work bench a clean down and see how the next sign goes on. It too needs layering up, but is about 2x the size 😮
The sign was done yesterday, but I wasn’t happy with the blue band across the bottom, and went and removed it whilst the plotter cut a new one. Only to find out that the roll had 6inches less than I needed on it.
I might postpone it until tomorrow.
-
quote David Hammond:Tack rags??? Am I being simple?
.
We buy them locally but these are the same http://www.decoratingdirect.co.uk/viewprod/c/CETTR/
I know this doesn’t help but for what it is worth I would have printed that anyway.
Cheers
Gary
-

On a lighter note, I can hardly see the bubbles but what does stand out is FAX in big block capitals 😀 Does anyone still use faxes?? 😎
-
The customer came in with a corner of 10mm foam PVC, and asked for a new one because the wind had broken it. He had a print out of the last one, and amended the CORGI to Gas Safe.
We still have a fax machine but can’t remember what the number is.
-

David, like others have already said if they are tiny then they may well be some sort of contamination, don’t forget that if you get a particle of dust or dirt on the board under the vinyl there is a good chance it will have some air around it. This might lead you to believe it is not dirt causing the problem because if you put a pin in it the air will come out making the lump smaller.
I’ve gone one better than Robert, as well as having the "T" shirt & other clothing I have also read the book, watched the film & tried the soup :lol1: :lol1:
-
Thinking about it there’s a high change it could be contamination.
The bench gets used for everything, and I have a suspended ceiling throughout. With all the building work that’s gone on above my work space there’s probably a lot of dust.
I did as rob said and wiped down the work bench (MDF top) and it was fairly dusty.
Going to order some rapid tak tomorrow, and will work try and be a little more thorough with pre cleaning routines.
Is it worth me getting some IPA to wipe down with before application, or is that mainly for removing grease/oils etc?
-

David,
a tip I got from someone on here I think – I spray of mist of water in the air before applying sometimes – seems to reduce dust a bit.
Martin
-
I would say it is worth having & using, I use it for cleaning as well but substrates get a final wipe over just before I apply any graphics just to be 100% sure they are dust free.
It’s not expensive to buy, biggest problem is that it destroys the "O" seals in spray bottles fairly quickly, keep meaning to ask someone to get me some viton E60C rings :lol1: :lol1: :lol1: -
change your worktop for glass or polyprop, its quite cheap and lasts for years.
-
Another tip is to cover the bench with left over silicon backing paper.
-
 quote David Hammond:Tack rags??? Am I being simple?
First came into contact with tack rags years ago in the motor industry
They use before spraying vehicles to get any small dust particles from the surface -

I have loads of problems with dust so I hoover every day first thing and it’s made a huge difference to the amount of dust that gets onto my jobs, also flees jackets etc hold dirt that get attracted onto the sign by static.
Could go on for ages but you get the picture, as Rob said you need to reduce the static and keep your work surfaces clean.Steve
-
yeah, if you’re putting down wet, I’ve recently discovered rapid tac and the results are far superior than using soapy water. You are also able to remove the application tape far quicker. Cheers
-
 quote :I tried the tutorial on here about layering up vinyl dry, by adding a registration line along the bottom. Trouble is the signs 1.8m long to was a pain to get it right, so applied the layer wet.
Hi Dave you say it is a pain to align the registration line dry because its 1.8m long. have you tried removing the backing paper from just the registration line and wetting only that portion. In that way you get the best of both worlds. You can slide it around easily to get the line in place. Tape it down, remove the rest of the backing paper and you can then lay the vinyl dry.
-
Yes I tried that, I think my registration line was to thin (about 5mm), which is ok when doing smaller pieces but I think on the larger bits 10mm will be more stable.
-
Yep I tend to use a 10mm line on most things. It allows you to line up both sides of the line. Maybe even bigger like 2-3 cms for a 2m sign.
You mentioned getting a pin stripe straight also. you can cut the pinstripe with a wide border/margin lay the whole lot which is more likely to be straight as the material is wider and less likely to bend and then weed off the border afterwards.
Log in to reply.
