Activity Feed › Forums › Sign Making Discussions › Vinyl › How to creating a monogram in CorelDraw ?
-
How to creating a monogram in CorelDraw ?
Posted by NeilRoss on January 20, 2012 at 11:36 amHi Folks,
Here’s something that I’ve been scratching my brains over. I need to create a number of monograms in vector format. My graphics app of choice would be CorelDraw (currently v12).
I want to create them in an interwoven effect (see example image – using arial typeface for simple example). I can do this manually but it’s very time consuming and at production time they will be created in more complex typefaces. So my question isn’t about design – but rather the method of creating the shapes.
I just wonder if there is a macro out there that would do it or help in some way, or perhaps there is some method in CD that I’m unaware of. Anybody done this before?
Attachments:
 NeilRoss replied 12 years, 3 months ago 5 Members · 16 Replies
 -
16 Replies
-

I Noticed Alans post about the macros had something on
might be worth a look
http://www.gdgmacros.com/ -

No super quick way but look at the eraser tool for a start
Alan D -
cannot remember if your version has smartfill tool, if it has quite easy to do and quick, using x4 here
Attachments:

-
 quote Chris Windebank:I Noticed Alans post about the macros had something on
might be worth a look
http://www.gdgmacros.com/Yes, I noticed Alan’t post about the macros the other day and that was what made me think there just might be something out there. I’ve searched for a macro but haven’t turned anything up.
-
quote Alan Drury:No super quick way but look at the eraser tool for a start
Alan DAlan- Yes, I know about the eraser tool and it does the job but it’s a very manual intensive activity. I may have up to 40 monograms to do so I’m trying to find out if there is a more automated method. The other reason I’d like something automated is so I can easily maintain an even width gap between the overlapping segments. In CD The Front minus back and Back minus front functions work a treat for ‘kiss fit’ work and it was something like this that I had hoped for. I can see that due to the alternating under/over nature of the work it would probably be fairly difficult for any macro to achieve – if at all.
-
quote Chris Windebank:cannot remember if your version has smartfill tool, if it has quite easy to do and quick, using x4 here
Chris – thanks for trying this out for me. I’m afraid I don’t have that in v12 and I’m not sure it would do. Can you tell me where the stroke of the S overlaps the leg of the M, does it remove the section of the M where it overlaps. I could remove these sections manually I guess but they would need to go. Also is there a parameter that would allow me to specify a gap width (similar to a letter outline width) between the overlapping segments as shown in the example?
Your full size image doesn’t display for me so I couldn’t quite make out if there was a gap there or not.
-
Hi Neil, the smart fill tool lets you fuill in anything enclosed. Bu using the beizer tool you can quickly draw a straight line where you want the fill to end. This also keeps the original. Hope this image is better
pm me your email and I can send through
Attachments:

-
Hi Chris – see what you mean now – thanks for the illustration.
Cheers,
Neil -
Take the fill out of the object but give it an outline and the smartfill will work quit well
Just tried this on a few shapes and the smartfill coupled with welding works very well and can be plotter friendly
Alan D -

I think Neil is using V12. I dont think there is a Smart tool in this version.
Earl -

Hi Neil. You could also try using the ‘intersect’ tool. Simply change the intersected items to the colour you want.
Part shown here.
John
Attachments:

-
quote John Hughes:Hi Neil. You could also try using the ‘intersect’ tool. Simply change the intersected items to the colour you want.
Part shown here.
John
John – Thanks for this, but I need to end up with vector toolpaths for engraving. I think what we have here would leave me with the segments remaining where the letters cross over and therefore would be toolpaths running across the wrong parts. I don’t think it’ll work for this one, but correct me if I’m wrong in that assumption though.
Nevertheless it’s a cracking method of achieving the affect and I’ll remember when producing artwork for visual effect.
Cheers,
Neil -
ok – after intersecting you can ‘weld’ some segments back in tho obviously not of them. ‘back minus front’ or vice versa may be usual also.
On the other hand get X5 ! – well work it.
John
-
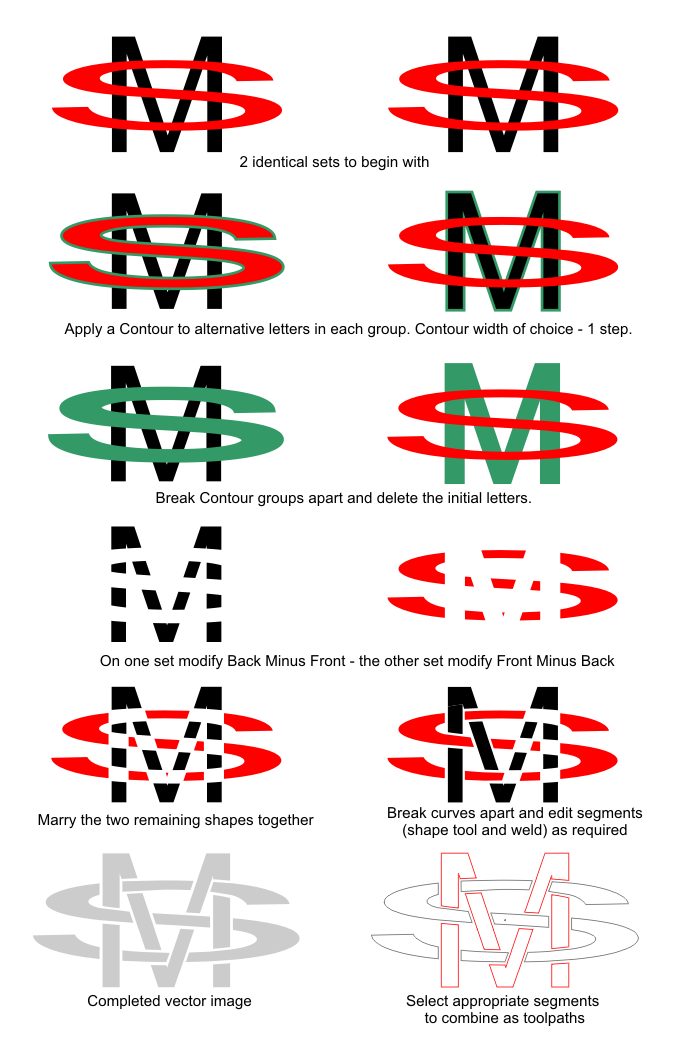
OK folks here it is;
Following a lot of head scratching I finally found a workable and in the end fairly quick method of achieving this and ending up with production toolpath(s). No doubt there’s other methods but this is how I got it done in v12. It’s hardly worth describing how I went about it as the steps in the attached image should illustrate it quite well. At first it all looks very complicated and convoluted but in practice it’s very quick and straight forward.
Attachments:
-
Thanks John. And thanks to everybody else who helped out. I think some cleaver fellow(ess) could probably make a macro fairly easily for this apart from the final part where I guess only the designer can decide which segments need to be ‘over and under’. That’s a challenge for somebody else! 😉
Until then this’ll do for me. 😀
Log in to reply.
