Activity Feed › Forums › Sign Making Discussions › Vinyl › Fitting detailed frosted vinyl to uneven glass surface
Tagged: etch, frosted, glass, glass-etch, intricate, manifestation, window
-
Fitting detailed frosted vinyl to uneven glass surface
Posted by Simon Worrall on May 4, 2022 at 9:20 amHi. Got a thorny one for you guys to consider.
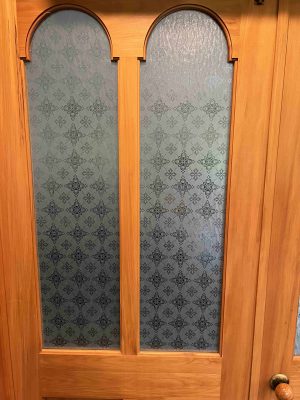
I have spent the last 2 days weeding four very complicated patterns for installation on dimpled glass panels.
(This is an insurance job, to match as closely as possible to a full set of real etched panels)
There are lots of very tiny pieces. I have used 3M dusted crystal, which is the best match I could find. Dusted crystal is mounted on a clear backing paper, and the cutting and weeding went very well with hardly any loss.
However, now it’s time to mount them on the glass.
How best to approach this? Bearing in mind that the glass has hills and valleys, perhaps 2mm from peak to trough.
DO I mount it wet, at the risk of small parts floating away? Or do I mount it dry, with the risk of air bubbles forming?
Also, what do I use for a squeegee? Obviously, a flat squeegee won’t contact the troughs, so it has to be something flexible. Do I use a flexible neoprene wheel for this? or a felt squeegee?Here’s a pic of the original.

-
This discussion was modified 2 years, 2 months ago by
 Simon Worrall. Reason: The pic didnt upload first time
Hugh Potter replied 1 year, 1 month ago 8 Members · 17 Replies -
This discussion was modified 2 years, 2 months ago by
-
17 Replies
-

Well, that looks a Joy to weed! 🤨
I would apply it dry.
Use a firm flexible squeegee, such as 3M Gold but with a soft felt edge along the blade.
I am guessing you will have slightly oversized the panel or have you cut it tight to the shape of the window?
-
what you should do is, prior to applying the live job.
take an A5 bit of the etch with zero pattern on it, tape it up, and fit it to the glass.
this will let you see how the vinyl will apply to the glass surface and the type of pressure to apply to your squeegee.the small detail will only help conform to the glass surface as well as minimise any bubbles, so I would see a benefit in having it. obviously being careful when it comes to removing the tape,
-
Rob.
The panels were supplied by the glass guy, with measurements given by the joiner. I didnt get involved in that. I hope its correct, I dont want to go through that again! (guessing carpal tunnel syndrome is a few years closer, not to mention loss of eyesight)
I am not sure how the vinyl will contact the glass everywhere if I use the squeegee you suggest? Even with a sleeve its going to float over the troughs causing trapped air.
-

Just thinking, are the glass panels already in place? if not a cwt or similar mounting table, softer rollers. Would probably work if they are not already mounted.
-
-

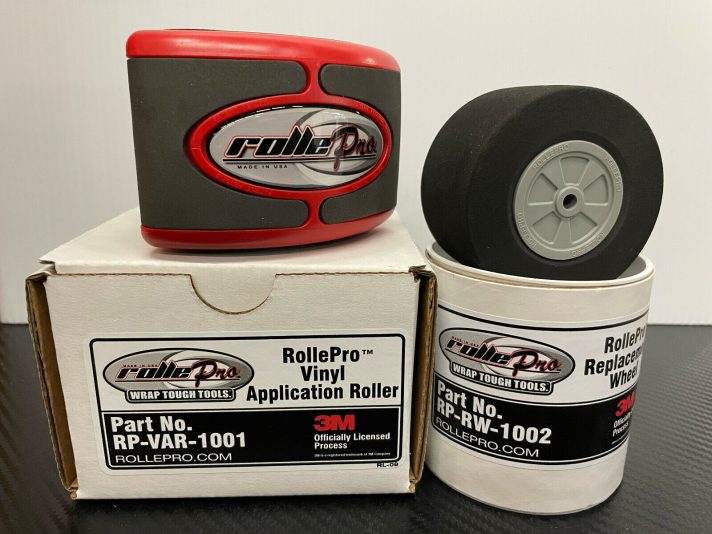
Try one of the Rollepro, foam rollers for applying vinyl to walls or over rivets.
its soft enough to conform to the stipples, and about 30mm wide.
-
After staring at this, dreaming about it, (and wishing I had used air release frost before I started weeding), I finally took the plunge and rolled them on. I actually didnt think the roller would be able to cope with the peaks and troughs (I have a fairly rigid silicone roller I had turned around a solid steel core) but it worked perfectly, and not a single air bubble appeared in the whole pattern.
-
Great to hear you got there in the end mate. 👍
I definitely think you used the correct vinyl adhesive though. Weeding small intricate graphics with any air-release vinyl is a nightmare because of its limited adhesion to the lining paper due to how the adhesive structure is made. By that I mean you will lose a ton of the intricate parts of the design as they simply fall away or lift from the liner.
-

i hope you charged them plenty for that mate?
i don’t think i would have had the confidence that my plotter wouldn’t chew the detail up, never mind have to weed it all after! 😳well done you! 👍
-
Yup.
As Rob said, if I had used air release it would have chewed it all up! Good thing I didnt as it turned out.
This 3M frost comes mounted on a plastic backing paper which can take almost anything without losing pieces of vinyl, there is a very strong grip to the point where you have to use the high tack application tape just to get it off. (3m makes app tape in at least 3 different tacks.)
They actually make a whole range of colours with the same backing, which is what I use when doing very detailed stuff. It is 10+ year vinyl, possibly the best vinyl you can get, and it is not cheap, but well worth it for some jobs.
The clear plastic backing is very hard for the plotter to cut through, so you can err on the heavy side when cutting and it will take it.
-
Aaargh! The glass guy has only gone and broken one of the panels!
The price just went up. 😳
-
This reply was modified 2 years, 2 months ago by Simon Worrall.
-

Argh, gutted!
Sorry for late reply, missed this thread! I can’t think of anything worse than weeding out this small detail stuff, drives your nuts, cramps your fingers and ruins my already ruined eyes!
I did a similar job on similar glass some years ago, I called the customer about 30mins (10%) into the weeding; even the plotting took nearly two hours a panel. I gave them a choice at that point.. we either continue on this path but it’s likely to be near £600 in labour / time alone, or we just print the design in a darker grey on to frosted etch for £250 fitted! Looked awesome and virtually no effort in the end.
-
This reply was modified 2 years, 2 months ago by
-
😬 nothing worse mate. i hate it when you do a great job and someone comes along and stuffs it up!😫
-

well done simon! 👍
i dont think i would have even considered doing that job. the weeding looks an absolute nightmare. 😫-
Yup. Listened to 15 episodes of “things fell apart” and four episodes of Joe Rogan.
Sort of killed the pain.
-
-
I just came across this video and thought it was the same type of door and design as you had here, Simon.
Comparing both, I am obviously wrong. I still wouldn’t want to have to do either his or yours! 😂
https://youtu.be/oovLX07E4g4


Log in to reply.