Activity Feed › Forums › Sign Making Discussions › General Sign Topics › First time putting up cut acrylic letters using locators
-
First time putting up cut acrylic letters using locators
Posted by James Boden on November 3, 2015 at 8:31 pmHello peoples,
It’s my first time putting up acrylic lettering using locators next week. Can anyone offer some words of advice or point me in the right direction of useful videos 😀
Thanks in advance.
Ewan Chrystal replied 8 years, 4 months ago 13 Members · 29 Replies -
29 Replies
-

Make sure you have screws that will fit down the locator, without distorting it. Especially if you’re using the smaller ones.
Also helps if you have an adaptor for your screw driver, that will fit down it too.
Fit the template, and drill the holes marked on the template, being as accurate as you can.
What kind of surface are you fitting them too?
-

I always pilot drill the holes even into timber. Also, don’t nip the screw up so the cup is tight. Ideally, the cup will spin freely on the screw.
-

Can i hijack this thread if you don’t mind as i have a similar query.
I’ve got a similar job coming up and i’d like some help with the set up if possible.
The letters are 700mm high and 10m overall length. I’ll have a cherry picker on hire for this. My question is really to do with making sure i put everything on straight and level. For something this size how would i go about marking it out? Would a string line be suitable for this or do you think a laser level would be better to get a straight line? And what about things like fixing the template in place? Its going onto a flat stone building btw.
Any advice would be much appreciatedThanks
-
Out fitters did some built up letters last week, about the same size in height, but 5m wide.
We produced the template on 4mm correx, printed and trimmed out square.
Marking the centre of the sign on the template, enables them to fit the centre first, get that straight, then work our from there.
With each panel being square, they just measured it and butted them up.
I hope that makes sense.
-

No problem, hijack away..
I think this is my concern too – getting the letters as straight as possible. The actual process attaching them doesn’t seem too complex.
Thanks for the advice so far 😛
-
Ah right, so you/they didn’t use the paper template on the wall?
-
Ours was being fitted outside, so we opted for correx, in case it rained or was windy.
Was the installers idea not mine. :lol1:
-

Hi Ewan
I always use Foamex templates outside where possible.
It’s very durable, can be cut to size and squareness, butted together to form very large stub outs.
If it rains, and you use paper, you will end up with a soggy mess on the floor and a client with no letters on their building :lol1:
If you need any advice, feel free to give me a call – 07881627231 -

I too have used all manner of things for templates.. Correx (Corflute in this part of the world), paper, cardboard, vinyl backing paper, and possibly the easiest to use I have found is cheap removable exhibition vinyl.
Simon -

hello
use button head screws
leave the protective film on the face until you have fitted them
IF there is no protective film on them, considering you are a novice, take extra care
in making sure you have the letters the correct way around before sticking the males on.
I.E. make sure the ‘c’s are the right way up and the ‘U’s are not back to front – plus all the others.
when you are pressing the letters into your drawing, make sure you are looking directly down on them.
note the locators are made from PVC and not acrylic
don’t use tensol to stick them as the you will see the tensol glue shrinkage through the face
before you start glueing them on…. tape down some 60/80 grit glass paper on the bench, count out
how many you need – at least 3 per letter, m’s and w’s want 4
sand the surface to be glued – there is always a bit of flash on them and the sanding helps the adheision
when about to glue, spin your thumb with some glass paper in the area you wish to glue to roughen the letter
try not to place them too close to the lower edge, as you don’t really want to see themthe most important this is to mark similar letters on the back 1-2-3 and on the template to correspond.
https://www.google.co.uk/maps/@51.47202 … 312!8i6656
I didn’t do this but I laugh my tits off every time I pass……..
-
 quote Steve Maple:the most important this is to mark similar letters on the back 1-2-3 and on the template to correspond.
https://www.google.co.uk/maps/@51.47202 … 312!8i6656
I didn’t do this but I laugh my (oh i swore !) off every time I pass……..
That’s a shocker 😮 it’s normally the S’s
-

Like the S when the Sir Alex Ferguson Stand was revealed
http://i.dailymail.co.uk/i/pix/2011/11/ … 34×286.jpg
-
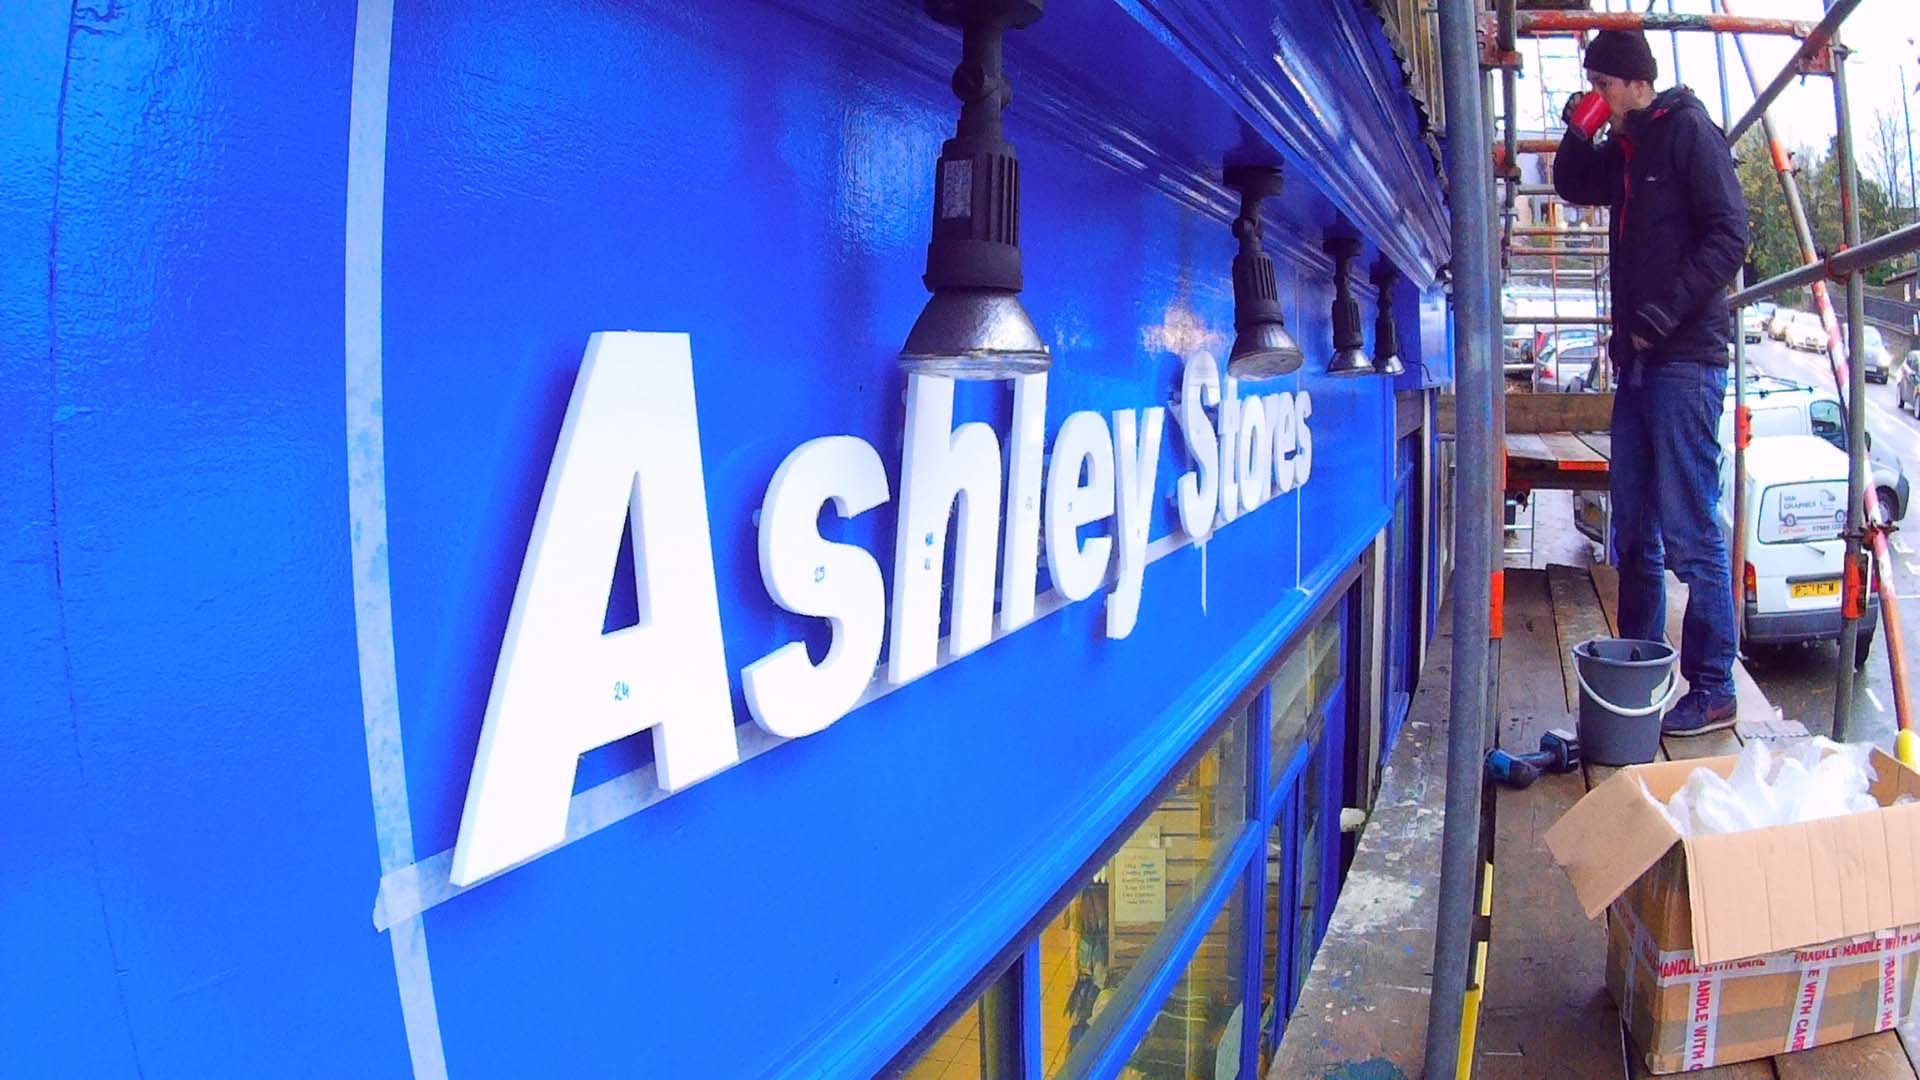
Thanks for the advice peoples. The installation went up without a hitch 😉
Attachments:
-

Looks great James!
Well done buddy!
-

Looks pretty good to me.
Easy when you know how isn’t it James, my only criticism is your choice of picture, suppose to be one of you working hard not standing about drinking tea :lol1: :lol1: :lol1: :lol1: :lol1: :lol1: :lol1: :lol1: :lol1: :lol1:
-
Hey Martin, don’t knock it. That tea was well deserved!! 😛
-

Looks good but , I just zoomed in, why did you number the letters on the front? I you put the numbers on the back you don’t have to worry about cleaning if all off at the end.
-
 quote Iain George:Looks good but , I just zoomed in, why did you number the letters on the front? I you put the numbers on the back you don’t have to worry about cleaning if all off at the end.
If the protective film is still on does it make any difference? 😕
well done pal
-
quote George Elsmore:quote Iain George:Looks good but , I just zoomed in, why did you number the letters on the front? I you put the numbers on the back you don’t have to worry about cleaning if all off at the end.
If the protective film is still on does it make any difference? 😕
well done pal
When ever I have had these supplied by a trade supplier the numbers have always been on the back even with protective film on the front.
-
the halogens may melt those letters 1000 watts will.
all looks a bit low. -
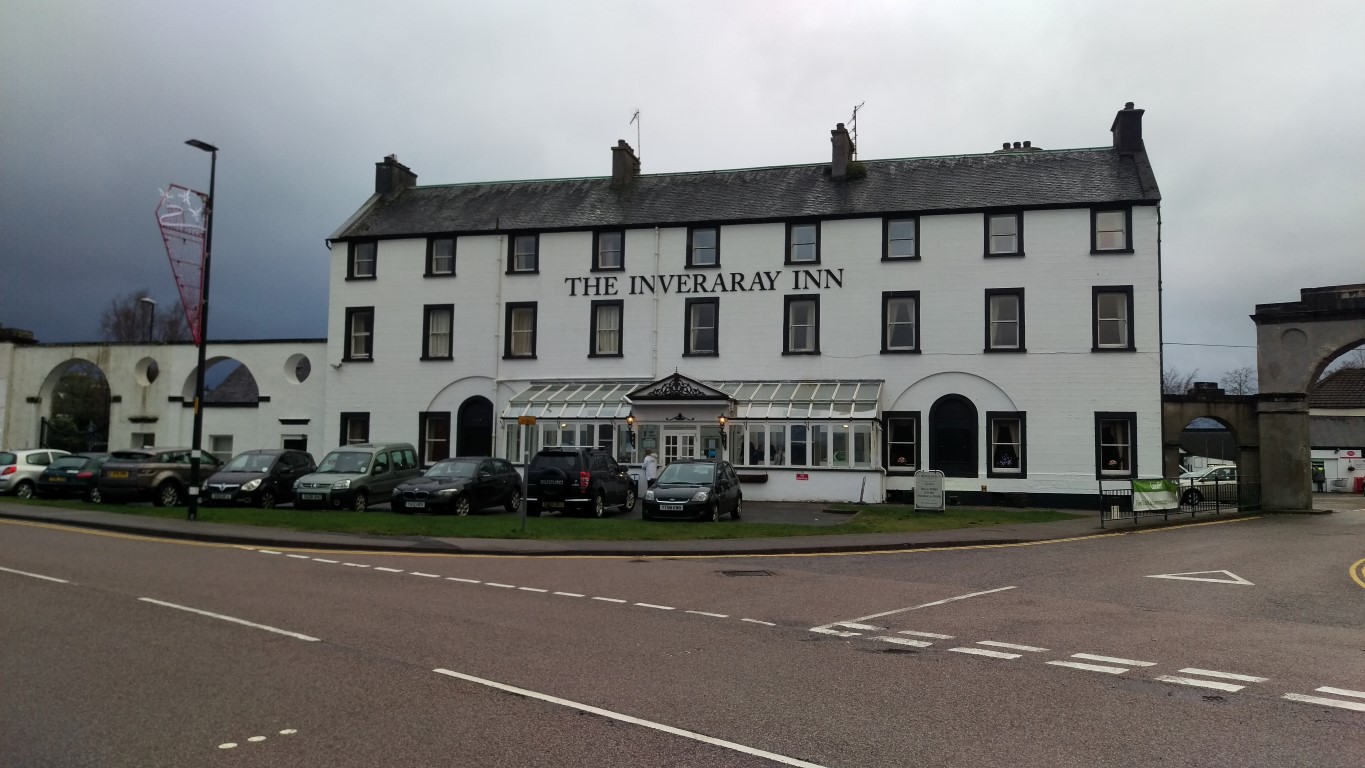
Heres the one did. This was my biggest install to date. 10 metres long for the stand off letters on the front of the building using correx templates. The side of the building is painted on and for this used foamex templates @ 4.2m x 2.6m

-
Ewan….
Damn that was a big old job…
Well done to you mate.
How did all the templates work in the end for you?
-
Nice job Ewan.
I am 99% sure I have been in that place a few times, if its the place I think it is…
Over the stone bridge and got a big sailing ship moored up on the loch?
-
That’s it David. My home town.
James they worked a treat. Had to trim the tops off the big one to fit under the sills but other than that went s fine.
In hindsight I should have used masking paper for the smaller ones as the paint kept bleeding behind the template. I ended up painting over it and used cast vinyl for the letters but was all a learning curve. Thanks again for your help and advice -
What a small world and lovely place to live. I keep meaning to revisit that neck of the woods.
Did you hire a platform for the installation?
Log in to reply.
