Working with the Lens Tool in CorelDRAW

The Lens tool In CorelDRAW
Lenses are a simple but very powerful and effective tool.
I am hoping to show you how two of them can be used in day to day design and layout.
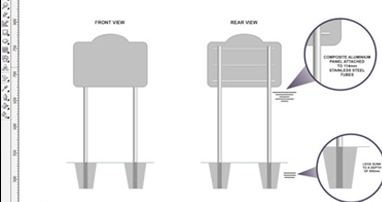
Here is a very simple drawing of the kind of layout you might show to the customer as a proposal

By using the magnify lens it allows us to zoom in and enlarge a particular area of the drawing
Firstly create an outline object with no fill (I have used a circle but it can be any shape you like)…. then go to Effects and choose Lens from the drop down menu, this will then open the lens docker.
Make sure your outline object is ‘to the front’ of the sign layout by pressing Ctrl PgUp and then position it over the section of the drawing to be magnified. In the lens docker choose Magnify from the drop down menu and then click Apply. You can change the amount of magnification up or down until you are happy. The lens is ‘Live’ (which means it can be moved any where on the drawing) until you check the Frozen box and then click Apply

Once the magnified area has been frozen you can then select it and move it to one side giving you an ‘exploded view’ of your original drawing

The Magnify Lens can also be used on bitmap images

2. The other Lens is the Fish Eye Lens.
Again, simple to use but it can give some very interesting results.
Create an outline with no fill…………then create a separate fill area

Place the outline object over the fill area making sure it is ‘to the front’ (ctrl PgUp)

Go to Effects and choose Lens…this will open the Lens docker……..From the drop down menu within the docker select Fish Eye…………you can change the rate up or down until you are happy with the effect remembering to click Apply

The lens is ‘Live’ (which means it can be moved any where on the drawing)….check the Frozen then Apply box which then allows you to move the frozen Lens to one side.
It is quite straight forward to add effects to enhance the image.
Create another circle at the same size as the original Lens…….Using the Interactive Transparency Tool (wine glass… circled) create a fade…….Make sure the fade is ‘to the front’ and then centre it over the Fish Eyed Lens Object

With a bit of tweaking here and there and using the Interactive Mesh Fill tool to create the background colour some interesting effects can be achieved………

Hope these tips are of use to you….
Glenn Sharp
Mascot Signs