The Italian Job
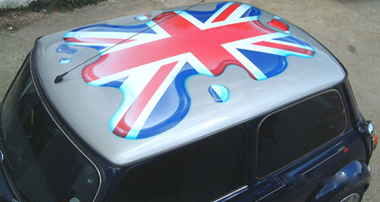

Ian – who owns the Hellraiser Valkyrie I painted last year – always wanted his Mini Cooper roof done with a Union Jack for his missus. He had settled for a vinyl kit (shown) and wanted something a bit different. His idea was to have the Union Jack flag look as if the paint had been poured onto the roof!
So . . that’s where I come in!

Splodge!

Because I wanted to be able to make this look like the Union Jack was almost poured onto the roof, I needed some real light angle reference to help me model it for painting. the success of this type of ‘Trompe L’oeil’ painting (French for ‘fool the eye’ and pronounced Tromp Loy – I know you always wondered, didn’t you!) will depend on me getting the light reflecting off the wet painted look.
I carefully poured ink and paint onto a piece of plastic and moved it around to get the right light and then photographed these with my digital camera.
Photoshop Magic!

I took the photo of the Splodge that I liked the best and then brought it into Photoshop. I had drawn a detailed Union Jack flag in Adobe Illustrator and dropped it on top of the paint splodge by dragging it from another open window in Photoshop to create a new ‘Layer’. This layer is then set to ‘Screen’ in the layers palette which makes it look as if it’s actually part of the paint, it becomes transparent. Now I have some great reference material to work with.. but I wanted a bit more!
Bryce – From 2D to 3D

Again, here I have used the power of the PC and Bryce which is the coolest, easy-to-use 3D programme out there (in my humble opinion!) Been using Bryce for years and it has a great facility to get objects saved as pictures mapped onto 3D surfaces. I wanted to get a rough idea for light modelling and then I planned to take it into Photoshop for final shading and hi-lights.
Bryce – Wireframe Object

First I made a mountain in Bryce and then mapped a grey-scale ‘ramp’ to get the 3D shape I wanted. I then mapped the coloured Union Jack Image onto the top of the mountain (now my paint splodge shape) and I’m able to view it from the top camera and then render. This is for a quick visual to see how it’s going. The blurred-edged map left makes the mountain in Bryce the correct shape for the flag – cool eh!

Photoshopping the Flag from Bryce

After Bryce has rendered the image it still looks too flat and does not have enough hi-lights. So, I bring it into Photoshop and using the magic of layers, I draw a path around the object, make a selection and then modify this selection to make it smaller. I then Blur this selection and add paint blends (white hi-lights) from the bottom right corner and from the top down around the edges. These will be the top highlights I paint last.
Photoshopping the Flag from Bryce

After Bryce has rendered the image it still looks too flat and does not have enough hi-lights. So, I bring it into Photoshop and using the magic of layers, I draw a path around the object, make a selection and then modify this selection to make it smaller. I then Blur this selection and add paint blends (white hi-lights) from the bottom right corner and from the top down around the edges. These will be the top highlights I paint last.
This gives me a very convincing 3D, wet-looking shape with a Union Jack flag. With this image and my previously edited splodge, I’m armed with enough British patriotism to get down to the workshop and start laying on some paint!
Stripping the old vinyl

I’ve taken off the old vinyl flag by heating up the cold, brittle vinyl with a heat gun. This makes it much easier to remove the image which was applied from a kit. Once all the vinyl is off I clean down the roof with a mild panel wipe (de-greaser). Remember to wear rubber gloves when using solvent-based products, they can enter through the skin and really, you don’t want that now do you?
Laying down the lines

The roof is already cleared over a delicate pearl and I want to be careful not to cut into the paint as I can’t see exactly how deep the clear is. I chose to use 3M 800 Wet & Dry for this. Once the roof is keyed I use blue fine line tape to rough layout my splodge which will be the masking edge for the Union Jack flag.
Masking

Once all the masking is laid down by using a signmakers transfer tape (low tack masking film in much larger rolls) I take my scalpel 10A and carefully cut all the areas where I want to apply paint. Because the lining tape is already on the metal it helps from cutting into the roof, which is definitely a bad thing! Xtra care has to be taken on this job as the covered pearl silver/cleared areas I don’t want to mess with! I don’t want to have to touch this in later as it all will be seen with a paint splodge sitting on the roof’s middle.
Tracing the drawing

Once all the masking is laid down by using a signmakers transfer tape (low tack masking film in much larger rolls) I take my scalpel 10A and carefully cut all the areas where I want to apply paint. Because the lining tape is already on the metal it helps from cutting into the roof, which is definitely a bad thing! Xtra care has to be taken on this job as the covered pearl silver/cleared areas I don’t want to mess with! I don’t want to have to touch this in later as it all will be seen with a paint splodge sitting on the roof’s middle.
I laid some masking paper on the original flag b4 I took it off which gave me a perfect template to work to for my painted flag as the one already on was fine for scale and layout. I traced over my lines with a marker, laid it on the surface, slipped some TraceDown underneath and traced on.
Usually, I would have used chalk for this but because I was using the more matt-based Auto Air, I wasn’t 100% sure if the coloured chalk would mark or stain the base coat white I laid down and the white base was going to be visible in the artwork. But now I know better . . the AA is so tuff once it’s on you can even take a mild degreaser/soft cloth and after dusting the surface gently with a tack cloth, get any marks off just fine.
Masking the details

Once the Base Coat Sealer Light is down and hot air dried, (2-3 light coats and a last heavier coat each one dried independently) the drawing is transferred as described above then the surface is cleaned and it’s time to start masking the lines. I’m using a 3″ roll of tape to fill the wider middle after using 1″ to lay the first masked lines down. I had absolutely no problem with the Auto Air lifting on this job and I taped it a fair bit.
Red Detail

After the masking is complete and checked I also laid some loose sheets of A3 paper which were just the right size to cover any areas other than the red which was the second colour to go down. For this, I used Graphic Red which was perfect. Again, light coats to build the colour with the last coat a little heavier and heat-set between.
Red Shading

Using Transparent Cherry Red and darkened it down a little more with Transparent Blue and added a little more Transparent Base to thin the pigments even more. This way, I can control the amount of shading very accurately on the red sections of the flag. I started to add the shading detail around the paint ‘splodge’ edges to begin rendering the form and getting some surface depth to the shape.
Masking the details

So the edges are partly sprayed, we’ll come back to those later but for now, time to protect them from my blue overspray! Again just cheap A3 paper (or you can use newspaper but be careful of the print) to mask off the red and then I can go on with the Detail Marine Blue.
Detail Marine Blue

I’m using the Iwata LPH 50 gun to put these colours down which is a great piece of kit for small-medium sized paint jobs. You can get a great amount of detail from it and it also will go to a quite wide fan/spot for larger areas. Dusting the AA on here which the real key to getting this just right.
Heat Setting

You can see me using the hot air gun to heat set the paint, this is important for 2 reasons; 1) It cures the paint correctly allowing it to ‘bond’ to itself and to the surface and 2) it was damn cold in this workshop where I painted the Mini and I needed to keep my hands warm! I found this Detail in marine Blue was a bit unforgiving going on too. It was the older formula of paint and I had over-reduced it to get (I thought!) a finer spray. BIG NO-NO! Don’t over-reduce the paint for larger area coverage like this as some colours, especially the Detail range, are prone to ‘colour migration’ which basically means Fish Eye City! And boy, I had that on this blue. A couple of heavier pigmented coats sorted it though! Over-reduce is OK for very fine work in smaller areas.
Masking the details

The Marine Blue was the perfect colour for the Union Jack flag! Several light coats have given a rich surface colour so it’s now time to get some more detail shading done to make this look more like a spilt splodge of paint!
Masking Off!

The roof is starting to take shape now the masking is all off. I had a couple of tiny areas where some red had bled through but this was because I’d left a tiny gap in the masking! Touched that in first with the white and then we’re ready to go with some Kandy Blue detail shading.
Blue Kandy Detail

I used Transparent Candy Blue for the white/blue detail areas because what happens is, where it falls over white it retains its true blue appearance, where it falls over red it shifts towards brown because it’s transparent and where I then follow on into the blue for shading, it makes the blue darker. Good eh! One colour, 3 sets of details. It’s all about how to make the paint work for you.
White wet-look hi-lites

I lay some more masking paper over the shape and can easily feel the ‘ip’ of the masked edge. This makes it very simple to draw out the edge of the shape and then draw a secondary in-lined shape echoing the outside but inset about 2″. This will be my first masked area for the glossy white, wet-look highlights.
Masking Off!

You can see the shape now I have cut it (removed it first from the roof and cut it freehand against a piece of MDF). See the inset line – I have stepped it in because this is how my visuals looked.
Spraying the Hi-lights

Laying over white it doesn’t matter here about a tight, masked edge at all. I want a soft edge because this is supposed to be an organic material. I’ll come back in with more detailed highlights at the end.
White wet-look hi-lites

Here I am masking off the rest of the roof to get all the lighter areas worked in after I have tested the hi-lights at the other end of the poured shape. The LPH 50 was perfect for spraying the hi-lights on this allowing fine control but with a wider area coverage.
Watch for overspray!

Taking a Tack Cloth I gently dust the surface to remove any white overspray. The paint will get everywhere, especially when you’re doing large fades like this which have to be very subtle.
White wet-look hi-lites

Off comes the loose, paper masking and you can see that this is going to look pretty sweet! It’s starting to look quite realistic now but still needs a secondary hi-lite to make it look more ’rounded’ and 3D.
Detail White

Using the HP-BC I lay in some more freehand highlights to make this really look wet and give the edges of the paint ‘splodge’ a better ‘curved’ and dimensional look.
Un-Masked

So here we can see it in its full glory – Land of Hope & Glory no less! (sorry!) What I’m doing here is using the blue to create a drop shadow against the silver pearl roof so it looks as if it’s really sitting there. This helps with the illusion of depth. I’ll also add more shading detail to the smaller ‘blobs’ and I have added a run down the back of the roof. We decided (Ian and I) once this was painted that it needed more paint on the top corner of the roof as it looked like it was running from nothing. Although the photos don’t show it, I added this later and it looks much better now!
Ready to rock!

This is a better shot from the front of the car showing the highlights in greater detail. You could be fooled into thinking that the paint is actually reflecting that light but it’s all painted on! The only real tricky bit about this job was getting the shadows and lighting correctly to pull it all off and that is where all those original visuals and paint photos helped. Fooling the eye can be faked because our brain sees what it thinks is real and fills in all the bits. As long as you get a pretty ‘close’ rendition your grey matter will say, ‘Hey – a wet-painted Union Jack Flag!’
I am especially pleased with how this came out and Ian and his wife just loved it!
Just the Job!


That’s all for now folks, hope you enjoyed it!
Beej…


