Stunning Special Effects using Vinyl & Paint

Picture 1
In this demo, two colours are required, white for the highlights and
a dark blue for the shadows.
The type of paint you choose is up to you. Many swear by screen inks
whilst others use Createx Auto air or One Shot applied over an
the initial coat of Frog Juice.
For this demo, I’m using Halfords car touch-up paint. It’s always
available and it sticks to vinyl like the proverbial. To decant it
from the rattle can I use a small piece of plastic pipe cut as shown
in this picture. This would not be convenient for large jobs but for
the small airbrush jobs that crop up, it is great. A finishing coat of
clear lacquer such as ‘One Shot speed dry U.V. acrylic clear’ or
‘Frog Juice’ is advisable.

Start by cutting the lettering using your chosen vinyl. Tape it down
to your work area and clean it with isopropyl alcohol. For the benefit
of this demo, I’ve plotted a line a couple of mil outside the actual
cut line to give some idea of where the letters actually are. If you
find you can’t see the cut of the lettering you intend to spray,
outlining in this way with a pen is a great help. Alternatively
rubbing a small amount of charcoal pounce powder into the cuts
helps.
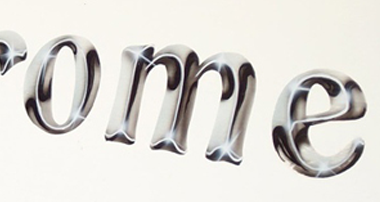
Picture 2
Determine your light source, in this instance top left. This means
all shadows occur on the bottom/right of the lettering and
highlights on the top/left. With the dark colour airbrush the
shadows in by spraying along the cut line or just inside. This means
half the spray pattern falls on the letter and half on the outside.
(Remember the plotted line here is 2mm outside the cut)

Picture 2
With square-cut letters, you may want to create a slightly chiselled
look. Do this by using a piece of card as a loose mask. First where
a shadowed side and bottom meet, mask through the corner and spray
just sufficient paint to hint at a corner line. Then using the card,
mask the corners to cover the highlighted areas and complete shadows.

Picture 3
Once all the shaded areas are done, change to the light colour and
using the same technique spray in the highlights.

Picture 5
At this stage, you may have decided that it’s all gone terribly wrong
and feel like throwing it in the bin before someone sees it, don’t,
the best is yet to come.
Once thoroughly dry remove any over-spray dust with a soft cloth and
coat with your chosen lacquer.

Picture 6
When the lacquer is dry you can weed and reveal your work of art.

Picture 7
This picture is something of a cheat, but you can see that by simply
reversing the colours you get a totally different effect. The colour
combinations are endless.

Picture 8
And when you’ve mastered the above and feel you’d like to move on.
You can always try your hand at?

Have fun and I look forward to seeing the pictures of your
airbrushed signs.
Allan…