Special Effect, Making Vinyl Look Like Wood.
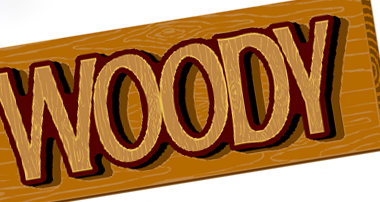

This latest text effect is called ‘Woody’ for obvious reasons! It’s a relatively simple animated style that adds wood grain to almost anything – including text and plank-like objects.
Without any further ado – let’s show you how it’s done…
First, we mark out a rectangle on a piece of paper and draw a simple woodgrain effect using a medium nibbed felt tip pen. Ensure all lines break the edge, or form a complete loop within the rectangle (below left). Next, scan this into your sign software program and digitise it on-screen (in Signlab this is done using the Accuscan module) or use a similar tracing program to vectorise it (below centre). Finally, remove the outer ‘path’ and then ‘combine the paths’ of the remaining shapes to create the block of shapes shown here (below right).

Now choose a font – in this case, we chose ‘American’ which is a Signlab high-quality cutting font – and colour it accordingly.

Next, use the inline function to create a slightly smaller version of the original text (shown below as the darker core of each letter)

Move the original (lighter) text to one side, leaving just the smaller (darker) in-line version.

Take the woodgrain design you made first of all and place it behind the first letter. Squash it and stretch it to best fit the letter and move it around until at least some of the tighter knotted parts of the design fall within the shape of the letter. Make copies of the woodgrain design and repeat for each letter (move the letters apart if necessary). Mirror or flip the woodgrain design both vertically and horizontally as you go – so as not to create too regular a pattern.

Take each letter in turn and weld it to its corresponding woodgrain design using the ‘AND’ weld function which will leave only those parts common to both in each case. Don’t forget to ‘GROUP’ the pieces that make up each letter shape.

Now, bring back the original (lighter) coloured text and place each of the new woodgrain shapes inside each letter in turn.

Using the outline tool – create a thick dark Brown outline to the original (lighter) text and then use the ‘round corners’ function to soften both the inside and outside curves.

Next, create a Black drop shadow to this latest dark Brown outline using the ‘SHADOW’ tool.

To finish – add a light grey outline (called a Halo) to the Black drop shadow!

In this instance, we then applied the woodgrain design to a rectangle to give us the ‘face’ of a plank of wood – added a small end block with concentric rings welded away to give the ‘end-grain’. The light grey Halo shown above was removed and replaced with a second block shadow – this time in a Dark Tan colour.

We hope enjoyed re-creating this latest Cut-Vinyl text effect