Liquid Epoxy Resin, doming of graphics
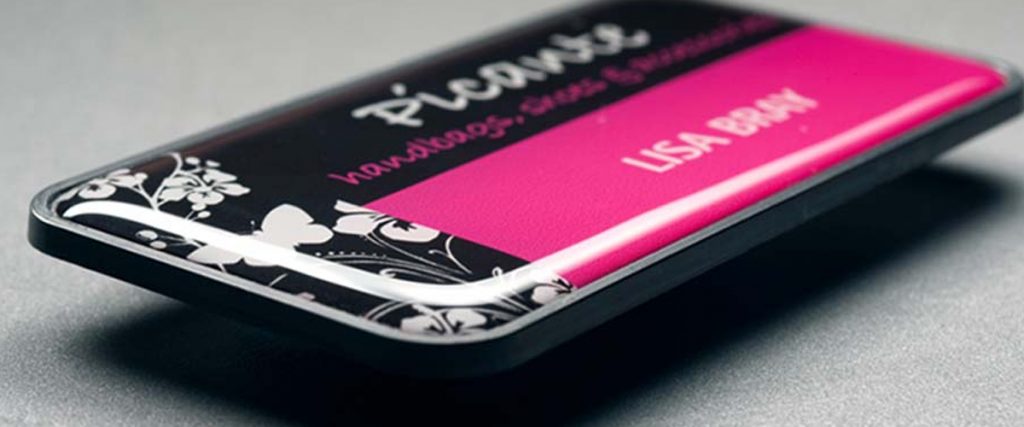

A short demo offering some tips and tricks on applying liquid epoxy resin doming to cut or printed vinyl graphics.
Equipment

1 ) Resin
2 ) Hardner
3 ) Cutter (Used for removing bubbles, you could use a nail or similar pointed thingy)
4 ) Pencil (We use this to stir up the resin and hardener, you could use a lolly pop stick or something similar)
5 ) Old syringe (Used to distribute the enamel across the object)
6 ) Hardener Syringe (Keep them separate to avoid cross-contamination between the large tins)
7 ) Resin Syringe (As Above) (Cutting off the fine point on the bottom, will make it easier to get the resin out of the tin)
8 ) Mini gas-powered soldering gun (used to evaporate the bubbles from the enamel)
9 ) Plastic cup (used to mix enamel in DONT USE POLYSTYRENE AS IT MELTS)
You won’t need items 1/2/4/6/7/9 if you are using the stuff that comes in syringes that mix as you press the trigger. Skip the next step if you’re using these.
Mixing the hardener and resin
The proportion of resin to hardener is normally 2:1, we always mix up approximately 20ml of resin and 10ml of hardliner at a time. First, get the resin syringe and suck up 20ml, then carefully dispense this into the plastic cup. Repeat the procedure for the hardener, making sure to use the other syringe, and only getting 10ml.
Taking the pencil or lolly pop stick, stir in the figure of 8 motions until the two liquids are thoroughly mixed together, taking care not to create any bubbles.
Preparation and fixing of the objects to be enamelled

This is very important to the outcome of the whole thing, get it wrong and you might as well not bother starting. Find somewhere clean and tidy to do the enamelling. The area on which you are going to fix your objects needs to be perfectly level (if it isn’t you might end up with all the liquid settling on one side, producing a lopsided coating) We use a lump of Italian marble (OOOHH!) as we can re-use it again and again (Using a non-porous surface such as marble means the liquid cannot soak in, in the event of any spillages) but a piece of smooth mdf would be fine. Use spacers if necessary to make the surface flat.
Next, you may want to lay down some strips of double-sided tape, onto the board. This will hold the objects still whilst you are beggaring about with the enamel. If you were enamelling, for example let’s say, stickers you’ve knocked out on your Roland camm or Gerber edge which have the backing paper on you wouldn’t want to use double-sided tape. Run masking tape across the edges of the backing paper, this holds them securely, but will leave the backing paper on when you come to remove them.
Blow any swarf, muck, hairs or dust that may have settled on your work.
Applying the resin
Using a smaller syringe (not shown) suck up some of the liquid from the cup. (Not required for pre-mixed cartridges)
Now with a steady hand apply a small bead of liquid down the middle of the object and allow to spread naturally, do the same on the next one along (work horizontally down from the top so you’re not leaning over the ones you’ve finished)
When you’ve applied the first bead down the first row, go back to the first one. Now using the old syringe (item #5) CAREFULLY drag the liquid on the object towards the edges and corners. If there isn’t enough on the object to spread across it, apply a SMALL amount more (You can always put more on but it’s difficult to take it back off) and continue spreading. Repeat the process along that row.
Pay attention to getting the enamel right into the corners, as it’s not somewhere where it will go naturally.
Bubble Removal
If you have, for example, an engraved badge, you will need to “tease” any bubbles out of the crevices created by the letters. Do this using item # 3, don’t worry about popping them now, as the gas gun will sort that all for you.
Fire up the gas gun, apply heat to the surface of the enamel, and allow any bubbles to pop (If they don’t pop straight away, continue to the next one and come back if they still don’t tease them closer to the surface using item #3)
Repeat the “Applying the resin” and “bubble removal” processes along each row of objects
Once you’ve finished, go back to the first row and just double-check that the enamel has reached the edges and no bubbles have appeared, if they have hit them with the gas gun again.
Allow to cure for AT LEAST 24 Hours (Manufacturers curing times will vary so check your instructions first)
If you have the facility to, cover up the objects to prevent any falling debris from setting in the enamel. We use a rectangle of mdf with 2″ battens fixed around the edges, this gives us a space between the top of the badge and the mdf.
Trouble Shooting
Something has fallen into the enamel (when still in liquid form) :
Tease out the object using item # 3
I have put too much enamel on, and it ran over the edge:
Taking a new syringe suck up the excess of the board, to prevent it from coming into contact with any other objects. Take a screwdriver and wrap its point in an old rag and run it along the edge of the object (you only need to do this, if its a product you do not want to waste, if its one of a batch of 200, just leave it alone)
I have some tried and tested measurements that one of the lads has worked out, which will let you know how much resin to apply to depend on size and edge finish (a bevelled edge takes less than rounded corners) for example a 75mm x 20mm bevelled badge will require 1.6ml of resin to cover. I will post these underneath once I get back to work on Tuesday
All of the above gear can be purchased from:
Interfax Acuflow Limited
Unit 2B Reddicap Heath Road
Sutton Coldfield
West Midlands
B75 7DU
0121 378 2289
sales@acuflow.co.uk

.


Responses