How to post better photo images on the www

The following is a collection of tips regarding the posting of images online as well as here on uksignboards.com. It contains some generalisations and is aimed primarily at newcomers, but who knows, there may be something in there that will help with your own!
Posting better Pictures…
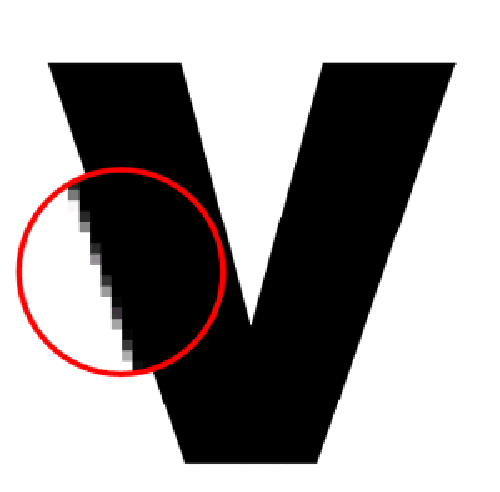
There are two major types of computer images. First, there are bitmaps, which if you look close enough, are made up of thousands of tiny pixels just like the photographs in a newspaper or the pictures on your TV screen. The problem with these images is that the larger they are, the more ‘bitty’ they appear.
The above shows a bitmap with a section magnified.
_______________________________________________________________________________
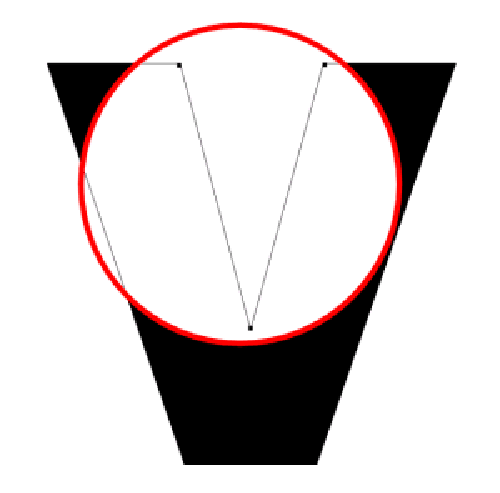
Then there are vector images. Imagine a rubber band stretched around pegs set into a board. By moving those pegs you can change the shape of the rubber band and make letters and logos. It doesn’t matter how big you make it either, the rubber band will stretch to give you a perfectly smooth shape every time.
The above shows a vector with a section magnified in wireframe mode.
_______________________________________________________________________________


There are two common formats of compressed bitmap images on the internet.
The first is called JPEG (pronounced ‘jay-peg’ and written as ‘jpg’). It stores images using millions of colours that normally result in bigger files. The degree to which it compresses an image can be altered to achieve the best ‘trade-off’ between file size and picture quality.
With JPEG’s, up to 20% compression normally results in near-original picture quality.
(above – JPEG’s of 20%, 40% and 80% compression)
_______________________________________________________________________________


The second common format is called GIF (pronounced with a hard ‘G’ as in ‘Gate’) and stores images using a maximum of 256 colours which can result in smaller files providing the original is not a complex image – as we shall see. The GIF offers two stages to compression. Firstly it asks ‘how many colours can I use to store the image in question?’ (common choices are 16,32,64 and 128). It then offers a further set of options that juggle the number of colours chosen to give the best look.
(above – GIF’s comprised of 128, 32 and 8 colours)
_______________________________________________________________________________


Regardless of the quality you choose, remember, the bigger the image – the bigger the filesize!
When posting here on the UKSG board, use a maximum width of 650 pixels.
If you want to double up images, limit each to 300 pixels wide, this will allow for some space between them.
(above – JPEG’s at 400pixels and 200 pixels wide with file sizes of 50kb and 17kb respectively)
_______________________________________________________________________________

The bigger the file size the longer the images take to load. Check the size of your images using Windows’ explorer or from within the graphics program prior to uploading. Try to become familiar with the loading times of certain file sizes in order to avoid creating a monster!
(The image above is about 84kb in size and would take 12 seconds to load via a 56k modem.)
_______________________________________________________________________________


(above left, JPEG @ 400 pixels wide/39kb/6 secs…above right, JPEG @ 200 pixels wide/12kb/2secs.)


(above left, GIF @ 400 pixels wide/128 colours/68kb/10 secs…above right, GIF @ 200 pixels wide/128 colours/21kb/3secs.)
You’ll see from the file types and load times of the four images above that, for photos, JPEG’s often provide the best solution! Not only do the GIF’s take longer to load but they are often less colourful which could make your work look dull!
(note the difference of intensity between elements such as the rear light clusters and number plate)
_______________________________________________________________________________


However, when the original isn’t a photograph but a vector graphic with large areas of similar colour (as created by cut vinyl signmaking programs) then the GIF wins hands down against JPEG!
(above left, GIF @ 300 pixels wide/16 colours/7kb/1 sec!…above right, JPEG @ 300 pixels wide/20% compression/17kb/3secs.)
_______________________________________________________________________________
GENERAL FILE SIZE INFORMATION:
- 1 megabyte = 1,000kb = 1,000,000 bytes
- ½ megabyte = 500kb = 500,000 bytes
- ¼ megabyte = 250kb = 250,000 bytes
- 100kb = 100,000 bytes and so on.
- Keep most images under 100kb if you can.
- No larger than 75kb but only for the largest images.
LOAD TIMES:
- 10kb will load via a 56k modem in 1-2 seconds
- 20kb will load via a 56k modem in 3-4 seconds
- 40kb will load via a 56k modem in 6-7 seconds
- 80kb will load via a 56k modem in 12 seconds
- 100kb will load via a 56k modem in 15 seconds
If you right-hand click once on any image on the UKSG site and then select ‘properties’ you will see what the size is in ‘bytes’.
_______________________________________________________________________________


The resolution to use for images on this and most other internet sites is 72 dpi (dots per inch.)
any higher than this and you will not see any great improvement by eye.
(above left, 72dpi and right, 150dpi)
_______________________________________________________________________________


When reducing the size of your image, if your software offers both ‘re-sizing’ and ‘re-sampling’ – choose the later! Re-sizing does just that, it simply crunches down the image to a different size, ignoring any distortions of edges and colour blends etc. Re-sampling actually re-calculates the image at the new size and compensates for these problems resulting in a much better image.
(above left, re-sized and right, resampled)
_______________________________________________________________________________


Be sure to crop your images to remove any irrelevant material otherwise you’re wasting precious filesize and your target matter will occupy a much smaller area. You can use this to good effect when referring to one specific area of the subject.
_______________________________________________________________________________


You can also crop in image, not just to make it smaller overall but, to re-proportion it too. In this way the subject will appear larger in the space available – as with the two images above that both occupy the same limited depth.
_______________________________________________________________________________


Consider taking photos from various angles – use greater creativity not only in your work – but how you present it!
_______________________________________________________________________________


Use Filters to enhance your photos…but remember, less is usually more…it’s difficult to take the perfect photo every time but with a little practice you can enhance some with the help of the computer – like the ‘sharpen image’ feature shown above…or…
_______________________________________________________________________________


…increasing the contrast and intensity.
Anyway, have fun experimenting with images…the information above isn’t meant to be definitive – just helpful…