Freestanding Sign Erecting.


Freestanding Sign Erecting
Freestanding signs are not as difficult to install as most may think.
I would say I have installed around 80 freestanding signs all over the UK this year alone. All of which I have never had one complaint about (touch wood).
The equipment I use is all our own. Not having them needn’t put you off.
Most tool hire companies will rent you them very cheaply indeed. I would advise you to buy them because they are not expensive, that way you always have them at hand for future work.
Equipment used:
Pointed nose pinch bar
Spade-headed pinch bar
Small hand garden trowel
Digging spade
Shovel
Large Water bottle
Mixing board (metal or wood)
Gloves
Boots
Spirit level
Tape measure
Cement/sand/stone chips or post-mix
Plastic coated Sign poles
Trestles and catwalk – or steps, scaffolds etc will do
Looking at the picture you can see all the tools and equipment used.

Sign location
The first thing when erecting this type of signage is to get the positioning right.
If you get this wrong you will have a hard to rectifying any mistakes afterwards…
In the picture the two guys (having a laugh to themselves due to me taking the picture)
Are holding the measuring tape out indicating the width of the sign. if you have the extra hands. Get someone to hold the actual sign at the exact angle you wish it to be viewed. Then walk right back from it. Viewing from different angles. Making sure it’s in the place you want it. Then. Draw a line along the grass where it sits.
This will give you the exact line to keep the holes parallel and at the angle you wish them to be.
Obviously, if you are only putting a single pole in this will not be an issue.

Beginning to dig
Once your angle and spacing of the holes has been marked out. Using the spade.
Cut away the grass sods.. Almost the diameter of the hole you’re going to dig.
Then quickly measure from the centre of the hole to the centre of the next. Making sure your still the same distance apart as required. You want to come in a minimum
Of about 1 foot on either side of the sign. So. Let’s say the signs 8foot x 4 feet. The poles should be a maximum of 6 feet apart.
The sign I am putting up in this demo is 8’x4’ the poles are 3 metres long. Each hole is approx 24” deep x 18” in diameter.
I will go into depth etc further on in demo.
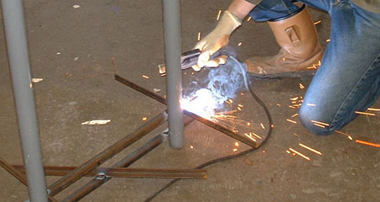
Once the sods of grass have been cut away you will start to use your pinch bar.
If the ground is very hard I would advise the pointed pinch. If gravely/soil then use the spade-tipped pinch. Shown in the second picture below, you can see im using the pinch to dig. The pinch takes the backache out of digging. It’s heavy and tall.. When lifted slightly and speared into the soil it easily digs deep due to the centred weight.
Once stuck in. simple pull to one side and the soil breaks up. Continue spearing the hole until all the soil is broke up around the base. Then, using your spade lift out the loose soil. & Repeat until at the depth you require.
I can honestly say the pinch bar is a “must have” if doing this type of work.
(Notice I am wearing gloves. Work wear gloves like this cost about £1-£2 a pair.. Last for ever also.. They stop blistering & cuts to hands. the pair i wear are cloth with a rubber palm and fingers. it gives good grip and gives me peace of mind that if i hit something electrical. i only have to worry about the flash )

Hole depth & width
As a rough guide to hole depth & width I use two sizes of post mainly.
3 metres & 5 metres
3-metre post would require a hole 24 inch deep by 18-inch diameter
5-metre post would require a hole 36 inch deep by 22-inch diameter
If you are erecting a site board or traffic sign, 9/10 times the architect drawings will state the depth etc so that’s easily followed if given.
In this case I am using a 3-metre post..
Look close at the pictures. The hole dug doesn’t taper to a point, as it gets deeper. The bottom is almost as wide as the top. This is important to get the right foundation for the post. See diagrams.

Mixing
Here you have two options.
You can mix the cement/sand/chips by yourself..
Or
Buy in pre-mixed & bagged equivalent.
Obviously you may say.. Go for the premixed stuff.. But depending on how pig the sign is I feel mixing yourself is better as the chips in the premix is more like gravel than stone chips.. I just feel you get a heavier more robust concrete mix doing it yourself.. Anyways…
An easy way of counting how much material is needed it goes on the size of hole of course.
The 24inch deep hole takes:
2 bags of stone chip
1 bag of sand
1/5 – 1 bag of cement.
Or
4 bags of pre-mix
The 36inch deep hole takes:
3 bags of stone chip
2 bag of sand
1 bag of cement.
Or
5-6 bags of premix
Mix using the shovel only on top of your mixing board.
When mixing you could just take the amount of bags to be use, pour them all out on top of each other and start to mix.
This just gives you a sore back and doesn’t get it all mixed properly all the way through.
Normally, I would pour out 1 bag sand and 1 chip.
Mix it well,, then pour on the second bag of chips
Continue to mix.. Next pour on the cement and mix.
Once evenly mixed.. Create a trench in the middle of the mound of mix and pour in water. Then start to mix..
Please note.!
It is better to pour in to little than too much. If you make your mix to wet you will have problems getting your pole to stand straight.
Just keep adding small amounts then mix well.. Add some water and mix well…
Repeat until all the mix is a grey colour and is sticking together. You don’t want a runny or wet looking mix..
However, if you do make it too wet… just add more sand to absorb. The extra left over can go into the next hole.
See picture, the shovel stands upright when stuck in mix.

PostMix
Post mix is basically a godsend.. for general signage.. Not for large road type signage & the like.
If you are a small company only dabbling in this type of work then get yourself to a B&Q warehouse and buy some post mix. No mixing no nothing. Just dig the hole, pour in half then water then pour in other half & water again. Check its straight and leave for 24hrs. Go back and apply sign panel.
I know it says on the bag sets in minutes/hours whatever but I personally feel because the chips are so small & the mix is quite wet. It is advisable to leave 24hrs before applying the sign.
costs about £4 a bag

In picture “A” below you can see we are backfilling a “V” shaped sign.
This basically means instead of 2 signs back-to-back they are separate to form a “V” shape. Most times it is possible to have both poles in one hole. If this is the case I recommend a minimum of 8 or 9 inches apart. You must also create a much wider hole, but same depth

Please note: regardless of the type of mix you use. When back-filling the hole with pole in place I would advise you to continually check if the pole is straight in both directions using a spirit level. If kept straight from the beginning the pole holds firmer. If this is not done & you move it about to straighten. You create play in the concrete below the surface.

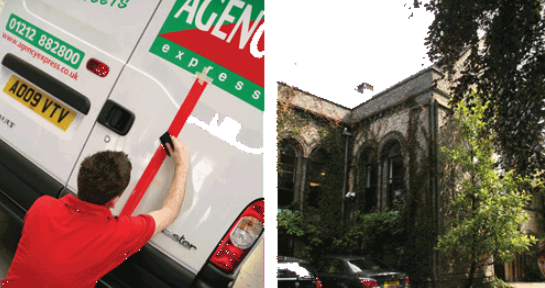
Shown below are two different site locations.
The poles are all in place but not completely back-filled.
If you have to hang a sign the same day the holes are dug I would not to use post mix.
I travelled throughout the UK erecting this type of signage and installing the sign panels, same day. I did not use postmix when doing this.

Shown below is the safest way I know of to fasten sign panels to poles.
I am using aluminium trestles to create a bridge to stand on.

While someone holds the sign another will attach the clips.
Once the clip has been attached at one side only tighten the other
Once it is checked to be level, using a spirit level.
Then proceed to tighten the other clips.
I have witnessed some of our guys putting the clips on slack and then attempting to slide the sign up the poles.. It won’t work.. Or I should say. Can work but causes more bother than it is worth.

This brings us to the end of the first part of this demo.
Part two will be posted over the next week.
In it I will show the proper way to assemble a sign panel with sign channel.
It will cover riveting and VHB tape-type assembly.
It will also cover different types of sign clips, and when & when not to use them..
Robert Lambie