Home Forums Sign Making Discussions Vinyl What’s the correct method lining up vinyl onto sign?

  • What’s the correct method lining up vinyl onto sign?

    Posted by Nathan on 7 April 2005 at 16:25

    I’ve designed a sign that has 2 pieces of vinyl to the edge of the sign, before going ahead with this I’ve had a practice run on a smaller sign but had some problems.

    In my first attempts I over cut the vinyl with the intentions to trim to the edge of the board once applied. I found it impossible to get the vinyl aligned to the board as I couldn’t see it due to the vinyl been larger than the board.

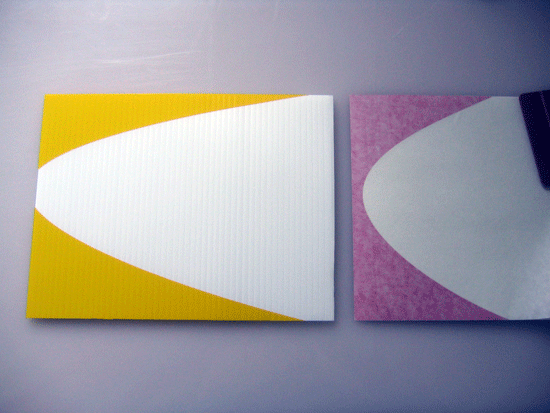
    I then tried by cutting the vinyl the same size as the board and trimming the application tape to the exact shape to help me with alignment (as images). As I suspected the vinyl is not totally flush with the board and shows the edge of the board in places.

    What’s the correct method to do this and have it aligned correctly?

    Thanks
    Nathan


    Attachments:

    Mrliquid replied 20 years, 7 months ago 4 Members · 4 Replies
  • 4 Replies
  • Steven Griffiths

    Member
    7 April 2005 at 16:31

    What I’d do is do it back to front. Cut the vinyl oversized as you did the first time round. weed it then lay it sticky side up (un-taped) on a super clean worktop. Spray with a little water then lay the board on top. Then squegee as usual.

    Hope this helps, bet there is a load of othee ways to do it im sure.

  • Robert Lambie

    Member
    7 April 2005 at 17:16

    there are a few simple ways of doing this, but without a sorta diagram ide confuse the hell out of you. :lol1:

    a simple one if it is foamex. cut your slightly oversized vinyl and apply it to the foamex “before” you cut the foamex with your stanley knife. once applied, mark out your cuts and proceed to cut the foamex with stanely knife. “see post/demo on staright edge cutting foamex” to keep you right on cutting with stanely. 😀

    if i get a chance ill make up a small diagram later. 😉

  • Nathan

    Member
    8 April 2005 at 12:21

    Thanks for the comments.

    I didn’t think of doing it that way Robert but I think I’ll go that way next time as my material is already cut to size.

    I ended up adding 2 squares in the top and bottom right hand corners, 1 inch from the edge of the material and cut them out, I then made marking on the boards 1 inch in which allowed me to align the vinyl using my cut squares.

    I have posted a picture of the finished samples which I have done on Correx. The first layer of pink went down fine with no bubbles (applied with a felt squeegee), I then cleaned the vinyl to apply the black overlay. When applying the black a few tiny bubbles appeared on the curved overlay pieces but the text seems to be fine, I tried this again on my second sample being extra careful but still ended with the same bubbles?

    I don’t know how long this generally should have taken but both the signs of 24″ x 18″ took me 1 hour to cut and apply.


    Attachments:

  • Mrliquid

    Member
    8 April 2005 at 12:51

    Hi Nathan

    I have a way I always approach jobs like this.
    The key is to trim the top edge to the exact size,apply the image and trim the other 3 edges after application. You can either butt the top edge up flush or let it over hand a couple of ml for trimming also.
    I always apply things dry for maximum tack and being able to get it to the customer quickly. For dry application you can line the top edge up flush and do a verticle hinge (masking tape) down the middle allowing you to apply half at a time. The other option is to wet apply.
    When trimming the other 3 edges I would recommend working your knife from underneath as there seems to be more control and less chance of cutting the substrate.

    Hope this helps

    Paul

Log in to reply.