Home Forums Sign Making Discussions General Sign Topics Using application tape dispensers

  • Using application tape dispensers

    Posted by Michael E Jones on 28 April 2014 at 10:02

    Morning all

    We recently moved into some new premises and finally had the room for some nice large finishing tables. Having previously had a fairly crude setup for application, we purchased an application tape dispenser to sit at one end of the bench (this one: http://www.mdpsupplies.co.uk/applicationtaperoller.asp 1349mm version).

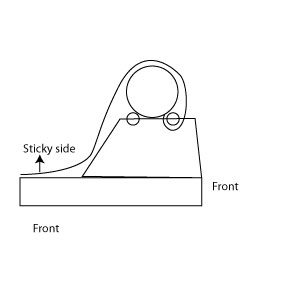
    We typically use a low tack clear app tape and apply lots of small graphics. For this reason I’ve always used the app tape with the sticky side facing up (see example picture one!). The dispenser has been perfect for this rolling it our over the bench then applying the various graphics.

    We are increasingly using a paper app tape (and may use it exclusively going forward). This has marginally higher tack than the clear option we use (described as a medium tack). The issue I’ve experienced however is that feeding it in the way of example 1 means it sticks to the front roller and is very difficult to feed out (normally ripping/stretching the app tape in the process).

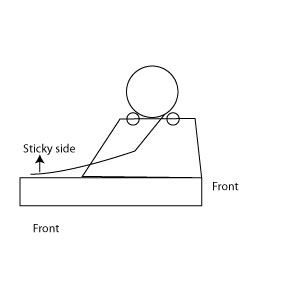
    I’ve been trying to think of other ways to feed the app tape therefore with still having the tape facing up. See example 2! This has some success by feeding it out the back and looping it over but it is still very difficult to feed out just because you’re pulling in the opposite way to the feed. You can make it work but manually rolling the rollers and keeping the app tape taught as it feeds to stop it sticking underneath but it can take some time to feed a large section.

    I therefore just wondered if anyone else had any other suggestions (and to make sure I’m not just being stupid!). It might be that we move to a laminator for all our applicator needs in the medium term but would be great to try and find a solution for this in the short term.

    Thanks in advance!

    Mike


    Attachments:

    Hugh Potter replied 11 years, 7 months ago 6 Members · 14 Replies
  • 14 Replies
  • Jamie Wood

    Member
    28 April 2014 at 10:14

    We have a dispenser which we use for small jobs, and always have the adhesive facing
    down, as this is how they are designed to be used. Any particular reason why you need
    it facing up?

  • Michael E Jones

    Member
    28 April 2014 at 10:26

    I’ve just found it easier to be perfectly honest, no real requirement to have it facing up.

    Normally the workflow is to mount about 8-10 graphics all in one go and I’ve found it far easier and quicker to just pull the tape out and apply the graphics to the tape rather than the other way round.

    I did try having it face down when we first purchased the roller but found that laying out all the graphics and then keep the tape taught as you mount it was very tricky, particularly if the graphics below started moving about, and generally resulted in wrinkles. Potentially haven’t perfected my technique there however…

  • John Singh

    Member
    28 April 2014 at 16:21
    quote Jamie Wood:

    Any particular reason why you need
    it facing up?

    Was my question too

  • Mike Grant

    Member
    28 April 2014 at 21:58

    Can you try this way?


    Attachments:

  • Michael E Jones

    Member
    29 April 2014 at 08:04

    Thanks Mike – good suggestion. I think that might work from about half way through the roll, unfortunately it’s too wide to start off with to fit under the rollers (apologies – might rough sketch wasn’t to scale!).

    Sounds like the easiest approach will be to just work the other way up so will give this is a try. I suspect like most things there’s a knack to it which I haven’t quite got (why I went the other way originally) but hopefully will over time.

    As I said, I suspect we’ll be getting an Easymount in the not too distant future so hopefully will be a thing of the past. Out of interest, does anyone use one of these for mounting – how do you find it? I think for our needs we’ll just need the sign model they stock as we have don’t do any lamination work (we only produce internal wall graphics). Albeit that said I did wonder what the difference between the Sign range and the Cold lamination range is – from what I can see there’s little apart from the Cold lamination has a digital control panel?!

  • Hugh Potter

    Member
    29 April 2014 at 09:15

    I often tape up a cluster of various small sections, I just lay them on the bench, pull the paper out (sticky side down, and lay it onto the vinyls from around the mid point, hold it taught and lay it down on the decals, apply and then work back towards the roll.

    I never put it on under any tension, it stretches the paper – especially the clear stuff, and when it shrinks back it rucks up the liner.

    that said, so very small stuff I do exactly what you do.. I just roll it on the bench sticky side up and lay the bits on – purely because the plastic tapes have more static and will often lift / move small decals below.

  • Michael E Jones

    Member
    6 May 2014 at 15:23

    Hi all – quick update…

    After a little bit of practice the face down suggestion is working well – actually far quicker when you’re app taping a lot of small graphics so thanks once again.

    Just looking forward, I just wondered what the more automated options for us might be as we take on larger projects and therefore might start talking about having to apply app tape to high hundreds, if not thousands of relatively small graphics in a relatively short period of time.

    After a little research the options appear to be:

    – The Sheeter (still give labour intensive that said)
    – A laminator (Easymount sign series for instance)
    – Rolls roller

    Are these the main bits of kit that could speed things up in this area or are there any I’m missing?

    The first one is likely to still be too mechanical. The second, as I understand it, might cause us issues if we’re trying to mount lots of small graphics (I’m imagining feeding perhaps two or 3 graphics through along a 1200 roll all at the same time) as the application tape might start sticking to itself if there’s no release liner. I understand you could just run it with release liner on the bottom but for the volumes we might be talking this may not be very efficient.

    I saw the Rolls Roller and S&D last year and remember thinking that could be ideal. I’m imagining laying out all the individual graphics along the bed and then just running over it – is it really that simple? Also, do you have squeegee afterwards (I’m assuming not, which would be big plus!).

    Any thoughts most welcome!

  • Hugh Potter

    Member
    6 May 2014 at 16:50

    are you printing the graphics or cut vinyl?

    if printing then laminate the whole sheet before cutitng them up.

    if single colour cut vinyl do the same.

    if multiple colour cut vinyl then layer them up on the bench using reg marks – squares will do, ..top colour gets masked first, then layer them all up and cut afterwards.

    if lots of single colour cut vinyl decals then cut lots of different ones on the same colour sheet as required, mask all at once and then separate, no real sense in cutting in ones or twos!

  • Michael E Jones

    Member
    8 May 2014 at 20:47

    Thanks for the reply Hugh, sorry been v busy over last few days!

    Its both digital prints and cut vinyl (nothing layered however). Thanks for the thoughts, so the workflow is print, cure, contour cut, weed, laminate app tape, trim down.

    As I understand it, one issue with the laminators for app tape is that if there’s areas unused the app tape can stick to itself. One issue Im just playing with is the coloured films we use are all 1220mm wide whilst the print media is 1370mm wide. I know Easymount offer a 1400mm wide model (still to check whether we can get the app tape we use in wider rolls (currently its 1220mm but might be able to get wider and slit down to 1370mm).

    However, given the above, is there anyway to use the same app tape on the laminator for both media sizes, rather than having to keep changing the roll between two different sizes?

  • Lorraine Clinch

    Member
    8 May 2014 at 23:00

    From a personal POV, I would just go with the wider width, and cut down after taping. I tried saving tape, vinyl, and squeezing stuff into the limits. Now I make life much easier, and belay the idea that there is waste that ‘could’ be used. Now I do what is best for my production. If I have time I save, if I am busy I waste.

    Lorraine. 🙂

  • Michael E Jones

    Member
    9 May 2014 at 07:09

    Thanks Lorraine – I can appreciate that more than you can imagine. When things are busy speed is the key, and will be for us going forward.

    I was having a search about yesterday and did come across the Easymount Sign operating guide video (https://www.youtube.com/watch?v=i4ZvSmyEkt0)

    Jumping to about 1m 36s in the video, there appears to be the option to just run release liner along the bottom (which I’m presuming can be collected at the other end and then re-used?). That would allow us to apply the app tape to multiple smaller graphics all at the same time by just feeding them all through.

    Does anyone use a laminator in this fashion – does it work well?

  • Hugh Potter

    Member
    9 May 2014 at 09:14

    I have an easymount 760 (I think), I’ve not used it for app taping – just laminating or flood coating (same principle),

    often my posters are smaller than the 630 wide lam I have on there, simply place carrier paper (face up) through the rollers first, then get your lam in there and it will stick to nothing but the liner / release / backing paper – call it what you will! I have a 3m piece I just keep looping through and replace when need be, though I am looking to make a heath robinson style mounted thingy on the front of the laminator – to hold a rolll of liner paper, and a roll at the back to take -up the slack and keep it off the floor.

    Grafityp supply it on rolls I believe, perfect for this application!

  • Michael E Jones

    Member
    9 May 2014 at 09:41

    Thanks Hugh – that’s exactly what I’m thinking re the release liner.

    The app tape we use is only available in 1220mm so I think we’ll end up going with a 1400mm wide machine, 1370mm release liner (to give some margin either side) and just loop this through. I think you can get the machines with a take up unit at the front to feed in the release liner, then I’m hoping to mock up something to collect this on the other side and just keep looping through as you say.

    Sounds all good on paper at least!

  • Hugh Potter

    Member
    9 May 2014 at 10:03

    no problem, it’s not as easy as it sounds with loose paper but on a fixed roll it should be easy enough. I recycle the paper once I’ve lifted the laminated item from it but if liner is cheap enough it can be slit off with the lam’d item.

    size wise, if you cut or print to 1370, or are likely to in the future, then go for a larger machine, the lamiate can still be slit down by the seller and 630 lam is a whole lot easier to handle than 1370!

    I use a grafytip cast clear matt vinyl for my poster lam etc, I don’t need it for UV so it’s cheaper to do it that way, they slit it to whatever I want, usually 2x 630 but, i do have rolls suitable for A3 & A2 which I keep on the bench upstairs and do by hand if only one or two.

    Hugh

Log in to reply.