Home › Forums › Sign Making Discussions › Vehicle Wrapping › Lorry part wrap
-
Lorry part wrap
Posted by Martyn on 9 July 2025 at 08:56Hi.
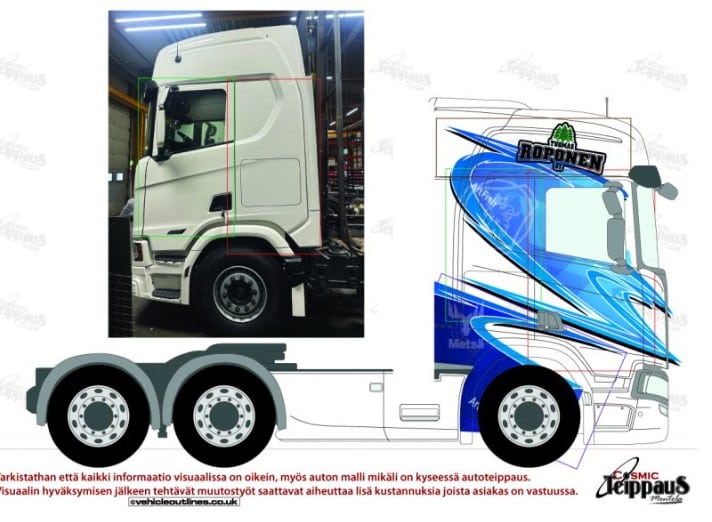
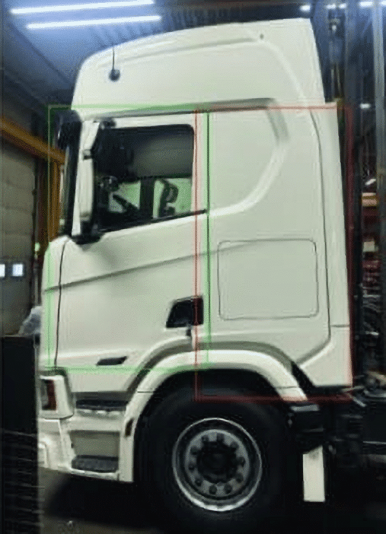
Looking for some pointers/advice on the best way to print and fit this design.Due to printing widths, the design needs to be split into sections. This is what I’m thinking, but my main concern is the overlap/joining of the section along the top of the window line.
I’m interested in how you would approach this one.
Thanks Peter Cassidy replied 5 months, 2 weeks ago 7 Members · 14 Replies
 -
14 Replies
-

If you can anchor the part above the window with a good 6inches, then apply the rest that should remove the chances of distortion for the top section making alignment of the overlap easier?
Looks to have a few deep recesses too, the door gaps around the door should give you a little bit of grace aligning between the two panels.
NB: I’ve not wrapped a HGV 😂
-

Hi Martyn
With cab units, I have found that it is often better to simplify the installation “if possible”.
As you will know, truck cab units are much bigger in person, and unless all, if not some of the parts, can be removed, handling big panels of vinyl at the top of trestles or steps can become a nightmare!I know it’s a case of “easier said than done”, but chopping the design up into manageable tiles can really help make the job much easier. Not just handling the vinyl, but by giving yourself large overlaps which can be fed inside the door and trimmed, rather than trimming “the bridge” of vinyl crossing door joins. The finish is much better and enhances the overall job.
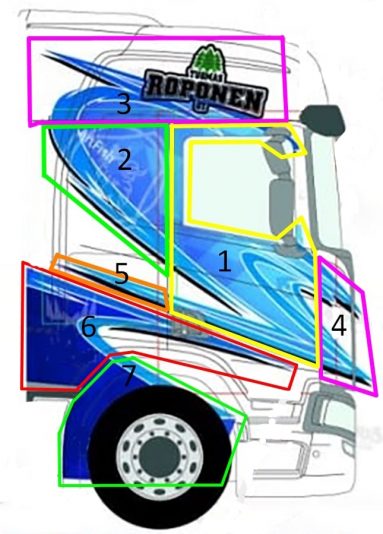
Breaking the job up into segments can sometimes save you vinyl, or increase it, but do not be put off if more is used because what you lost in vinyl, you will make up for in the application time and finish.Looking at the cab side, I would probably do it something like this.
Start with number 1 – Yellow.
This will be your anchor point and will determine how the jigsaw is put together.
If the mirror won’t come off, you will be able to cut through it at the window pillar and work your way around the window.Next would be 2 – Green
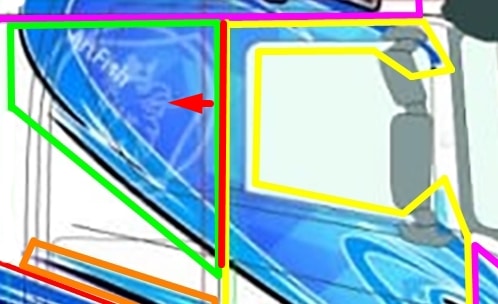
This panel is pretty small, but also the most difficult due to the deep recess.
Having the large overlaps with tiles also helps in this situation because you have to work and feed that vinyl down into that deep recess. Now, depending on how you feed it in, the vinyl at the window will creep back a bit. (see diagram showing the red arrow and red line where the vinyl “might move back” when the vinyl is fed/stretched into the recess. If that had just been a print bridging the door join. That vinyl creeping back could cause problems. I am not saying it definitely will, it’s just worth noting because you could expose more white between the door and the next panel. If it’s a tile with an overlap, then you just feed it inside the door, and you will have a nice finish.Tip: Take a scrap of any old wrap you have in your workshop and give the panel and recess a go.
Get a feel for how you will take the vinyl in, lift it and relax the vinyl again, and give it another go.It is amazing how much easier tackling a wrap is when you have a “Game plan” in your head. All too often, we take a live job, turn up on site and have to do it perfectly the first time! The pressure you’re under creates more problems. A quick practice run for 10 minutes changes the whole approach.
Next would be 3 – Purple
Sometimes these areas have a weld join, and it is easy to hide the join. If not, it is not very noticeable due to how high up it is. It is easily trimmed to about 5-10 mm, or use some knifless tape.
However, the rest of the vinyl (overlap) can be fed inside the cab slightly, again giving it a nice finish.The rest of the tiles are much easier… But numbers 6 and 7, if their joins have large overlaps, it may help with the shape of that wheel arch panel, because they can sometimes be pretty deep. you could wrap up and over the wheel arch, of run some knifeless tape on top of the arch as far in as you can, bring the vinyl up and over it, and time it with the knifeless tape. It helps give it a nicer finish unless you wrap to the back.
Hope this makes some sense! 🤣
-

Thanks guys. Just what i needed, some confirmation in my head that i’m on the right tracks.
Some great pointers rob, never thought about splitting it into more pieces but like you said it should make it easier to handle and give some grace in moving things around and wrapping deeper into sections.
I will post a pic of the finished product.
-
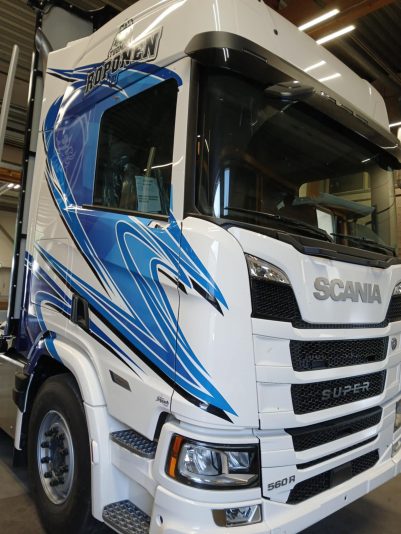
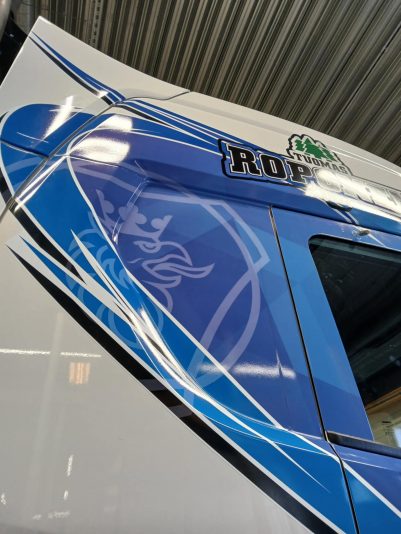
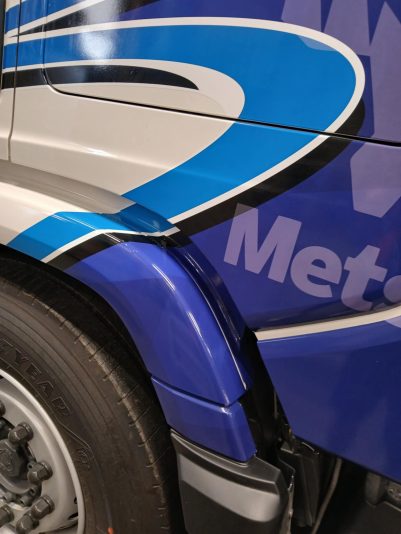
Pics of the finished product. Prints lined up very well and cropping into smaller sections definitely helped. The part that actually gave me this biggest problem was the wheel arch, firstly i fitted the deep upright section then thought i could do the face and top as one but there was just too much tension. I opted to fit it in 3 sections, inside upright, top and face which took a fair bit of time trying to get the lines to flow right but we got there.
Job took me day and half, 12hrs. Seems a bit long to me but these things always take longer than they look.
Thanks again for the help guys.
-

that looks wicked Martyn. brill. 😎👍
what vinyl did you use?
-
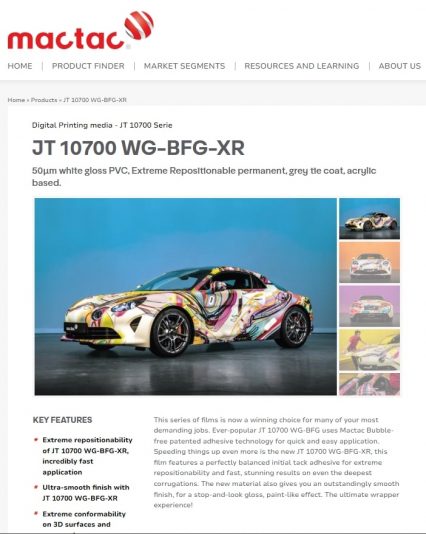
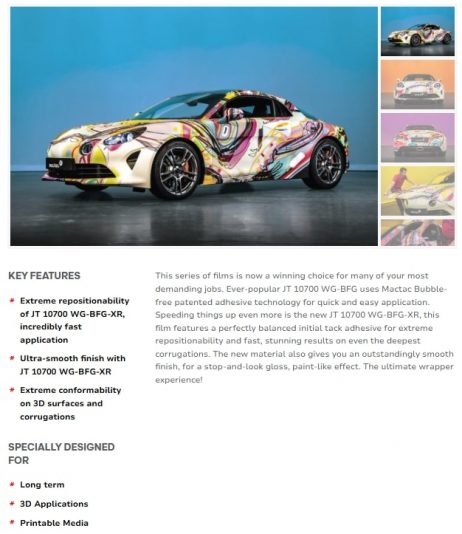
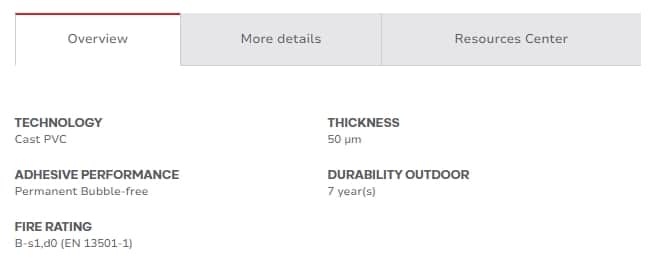
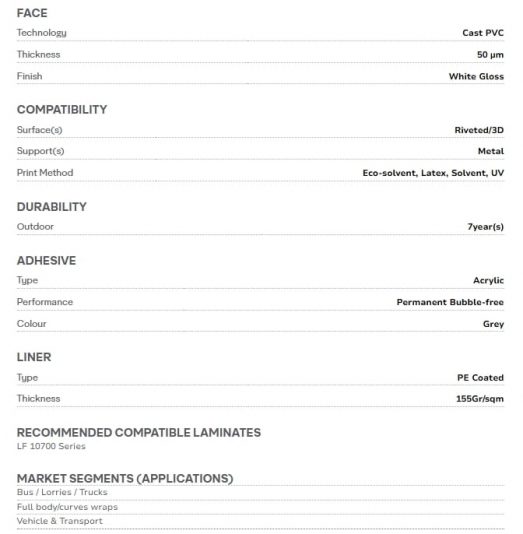
Mactac 10700 XR- my supplier does this by the metre, which works best for me as I don’t do lots of wraps.
https://www.mactacgraphics.eu
-
-

Nice work Martyn. How did you come up with the design? I’ve always struggled with this kind of wavy abstract stuff
-
Customer sent some pics he liked and we went with a similar theme. Drew the outlines up them selected a range of infills from shutterstock and the customer chose one. Artwork did take some fair time to get right
-
-

Fantastic, i really like this Martyn. It looks great! i don’t know anything about wrapping, but that looks very tricky. 🤓 impressive. 👍
L❤
-
You have done a great job there, Martyn. Very nice work, mate! 👍
The dreaded truck wheel arch, there is no perfect solution for doing this.
If you apply the vinyl right at the back, then apply the vinyl to the face of the arch. From a side-on view, the alignment is perfect. But even peacing in a section from the arch to the back, means the artwork needs to warp a bit to align. “hard to explain”.Applying and trying to stretch it, as you say, puts the material under too much tension.
We have done lots of cab wraps, and for one customer, the front corners leading to the bonnet have large air spoilers and wrapping them is a pain in the arse, because of lines in the graphics stretching and not aligning. one mistake and its wasted. anyway, they insist it is to be in one section, so when we do these we print 2 left and 2 right corners, just incase we spoil one. obviously we bill the extra panels to the customer. But it’s that or it’s done in bits.
Anyway, always good to see a job posted from the artwork stage through to completion. Thanks for taking the time to share your work, Martyn. 👍


Log in to reply.