Home › Forums › Sign Making Discussions › General Sign Topics › Lamination Guides/Tutorials?
-
Lamination Guides/Tutorials?
Posted by Peter Edwards on 18 September 2008 at 19:35Hi Folks,
I just got hold of a Emseal 810 and am starting out laminating. I’ve been (wisely) advised that I should cut my vinyl and laminate to the size I need to size in order to minimise waste etc
I’ve had a quick go which ended with the laminated piece having LOAD of bubbles in it!
Can anybody describe or point me to a good tutorial on how to laminate using small pieces as I’m obviously missing something ere!
Cheers
Pete
Peter Normington replied 17 years, 3 months ago 6 Members · 7 Replies -
7 Replies
-

ARe you stopping the machine midway through the print? Is this where the bubbles are occurring?
-

Hi Pete!
I could send you the video that we got from our suppliers when we bought the laminator. It probably isn’t the same laminator, but you’ll get the hint.
Just send me you email and I send you a link from where you can download it. -

Hi Pete,
Ok I’m no expert but I mainly produce decals from quite expensive materials and so I’m used to laminating cut pieces of vinyl (rather than laminating from a roll loaded in the laminator). How small are the pieces you are trying to laminate? By small I mean up to 30" wide and less than 1m in length.
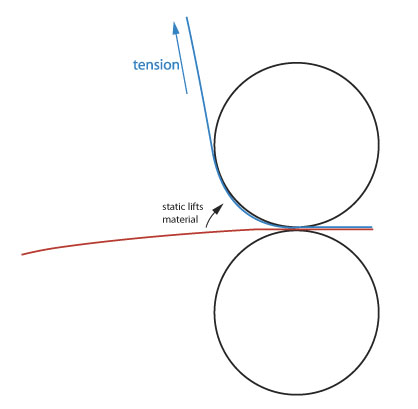
To ensure there are no air bubbles you usually need to apply tension to both base and laminate so that they dont touch before they enter the first set of rollers. This can be caused by them either falling together due to gravity or by static (caused by removing the laminate backing) pulling the two together.
my procedure for small pieces is this:
1. cut laminate to approx size + a few cm on the leading edge (the edge that will go through your laminator first).
2. Line up your laminate and put two small pencil marks in the corners to allow you to roughly register the laminate.
3. With the laminate face down place a straight edge (a large ruler etc) across the width of the laminate a few cm from the leading edge. Carefully score through the backing paper with a knife.
4. Now you need to hand laminate the small strip you created onto the edge of your job using the small pencil marks to register the position. I usually work from one end removing the backing as i go and smooth down with a squeegee. Careful with this bit as any creases/bubbles trapped now will probably ruin the job.
5. Feed the leading edge into the rollers then stop after about 1 cm. Peel up the backing on the laminate and hold in one hand keeping tension on the vinyl as best as you can. Use your other hand to apply tension to the base material. Ideally you would have 4 hands for this but maybe when evolution runs it’s course, lamination will be easier!
6. Run the vinyl through the laminator at slow to moderate speed and you should be left with a piece of backing paper in one hand and a nicely laminated job. Now just trim off the excess you added to the leading edge.
You may have to play with the heat and pressure settings on your laminator to achieve 100% perfect results. I usually find a small amount of heat is better. The above process is fairly time consuming – for very small jobs I would just practise hand laminating using a sqeegee then pass is through the laminator afterwards to apply a final bit of heat/pressure.
Hope this helps…
Owen
heres a little diagram i knocked up
Attachments:
-

Thanks for the replys chaps,
Jason, no it happens everywhere. Owen thats some awesome instructions, thanks! What decals do you do out of interest?
Thanks all!
mod-edit 1 :police3:
see board rules -

Hi Pete
I use my emseal 810 for laminating small decals normally and sheets no longer than 1m in length. It took quite a few attempts at cracking the method I use now. First I removed the perspex guard from the front of the machine and stuck the magnetic strip on the left hand side of the guard to the switch on the machine so the laminator would still work. Just be careful with your fingers when loading your prints. I cut the laminate to the same length of the print, peel back about 50mm of the backing paper on the laminate and crease back on its self. Then cut this piece of backing off. I then hand laminate this first 50mm onto a blank piece of the print I left at one end when I printed the image with a squeegee. I then hinge over the remaining lamiate back on itself and peel back a further 50mm of the backing and crease the backing paper, don’t cut it off this time. Hinge back onto the print and then hand squeegee this part of the laminate onto the print, again a blank section left for this purpose.
Then feed the laminated section, laminate up, into the roller for about 50 -70mm. Lay the remaining laminate over the machine toward the back. Peel back the laminate backing over the heat shoe, I have the heat shoe at about 40 -50 degrees, and start to roll the laminate backing paper. Turn on the laminator and slowly roll the backing paper holding a little tension as the print goes through the machine. I don not touch the print at all while doing this. I find this method works for me and I laminate everything I do this way, take a bit of practice, like everything, but I get no air bubbles.Kev
-
mod-edit 2 :police3:
see board rulesThanks again Kevin, more top notch super tips! Just a side thought for anybody reading this that is a paying member… Are the guides very good (and appropriate) for a noob like me? By noob I mean in terms of vinyl printing and lamination 🙂
Cheers again
-

Pete, I would reccomend you pay for the highest membership you can afford, apart from the benefits of the tutorials etc. UKSG will save you money in the discounts available alone.
You will also be able to send P’MsPeter

Log in to reply.