Home › Forums › Sign Making Discussions › Graphic Design Help › help needed with 1st attempt window graphic please?
-
help needed with 1st attempt window graphic please?
Posted by nelijane on 23 March 2004 at 18:27Hi guys. I’ve recently done a massive colourful sign for a co who are mad keen to have the design on their door as well. Fantastic! And obviously I’ve said I’ll do it… but I’m not too confident on the techniques, idiosyncrasies of applying normal vinyl to glass. I would really appreciate any tips. The design is very simple blocks of colour and text on two panels in their door and there is an ‘Open: ‘ bit where they want to be able to have an interchangable board showing opening times as they have 3 sets of opening times. I thought that this could be simply done on small white boards placed on the window in the appropriate place with little suckers! Any slicker solutions would be appreciated. I am particularly worried about some of the darker colours showing up, should I outline the whole thing in white, I just don’t know. Nelijane
nelijane replied 21 years, 9 months ago 7 Members · 13 Replies -
13 Replies
-

Hi NeliJane 😀
I had similar worries when I was attempting a window splash on my shop:-
http://www.uksignboards.com/viewtopic.php?t=5071
The job didn’t go too badly. Although for someone new to the trade it can seem quite a daunting task, the fact that you’ve already done vehicles, this should be a walk in the park to you.
I presume you’re applying to the inside of the glass? Simple enough to do with all your graphics cut in reverse. What I did was do a scale graphic of my windows on my PC in CorelDRAW. I then laid out the graphics I wanted on the window, reversed them and started measuring up where each graphic went. I then took a pad, wrote it all down, went to the window and taped each graphic in position exactly where it should go. At this point its worth mentioning not all windows are square, so it might be necessary to trim you graphics by hand before you apply them.
Anyway, once everything was in position, I hinged each graphic and went about apply them from the bottom to the top. This way the graphic wants to drop down towards the hinge, so no vinyl comes in contact with the glass til you need it. If you have a large flat area to cover, you can do this wet and squeegee the water out once its in position, but I’d reccommend against this. Its very hard to get every last bit of water out, and when you’re positioning the work, getting it perfectly aligned is a nightmare! It takes alot of elbow grease to do it all dry and your arms will ache like made, but doing it wet can be equally as much work trying to get the water out 🙁
Bubbles, you’ll get them. It doesn’t matter though, just take a pin or needle and make a small incision at one side of the bubble. Then use your finger or a felt squeegee and push the bubble towards the hole. I had alot of bubbles, but with a little extra time and patience, I managed to get rid of them. As you progress though, the bubbles get less and less, so it does get easier.
I hope this helps in some way. It can be very rewarding when your window graphic is complete, especially if you’re being paid to do it (I did mine for my own window) 😉 I tried to download your ai file but without success, but you can email it to signsforthetimes@blueyonder.co.uk if you like, I’ll help as best I can 😀
Cheers, Dewi
-

I’ve looked at your file and it all looks pretty straight forward. I would be concerned about the dark colours, as you have mentioned. Maybe you could take a small snippet of each colour and stick it to the glass to see how it shows up. A white outline would help but you need to remember that if you stick a white border overlapping the other colours you may get a line of air trapped around the blocks where the white contacts the glass. This isn’t necessarily too bad if you can make it neat and consistent, if you know what I mean.
Of course, you could offer something a bit different; like an etched version of the layout. Etch always looks good.
-

low tack application paper helped no end on the first window vinyl i did for a computer shop. Might help. Do it well and it can lead to no end of work especially if in a town shop (people seem happy to pay for that type of thing yet quibble over other harder to do stuff, work would be easy if it wasn’t for the clients 😉 …..) still window graphics looks cool…maybe i should take pic and post…. 😮
Phil
-

Hi Nelijane,
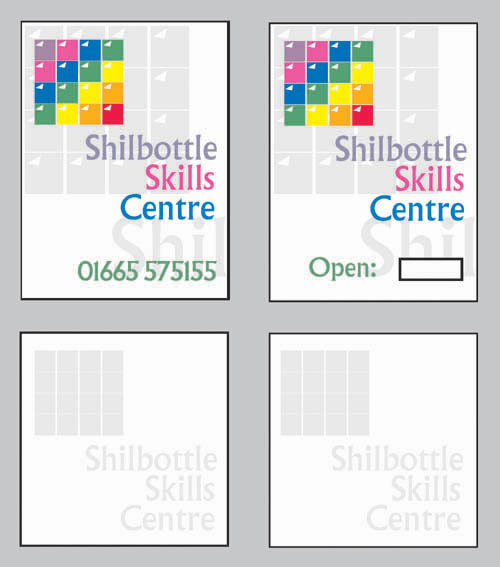
I’ve just had a quick play and here’s what I’ve come up with…
The light grey areas are dusted crystal vinyl, I use avery…There are others. This should eliminate the darker colours bit. I’ve also put some on the plain windows. Doesn’t hurt to try to upsell. The design can be cut on a smaller cutter easily so you don’t have to worry about taking the design to someone else to have it cut on a larger cutter, or have to worry about freehand cutting it on the glass.
For the opening hours, use some static cling with the opening hours applied in reverse …Should work a treat.
Lee
-
Hi all. Thanks for your help, there’s some things there that have really helped. I deliver the sign board for shilbottle skills centre this afternoon so I’m going to have another look at their doors bearing in mind what you’ve all said.
Dewi – I can see that the reverse hinge trick is going to be a God send! I think I’ll steer clear from the wet app trick as I’ve never done it before and I’m going to be working right infront of the customer (nightmare visions of a huge messy panic evolving in full view of bill payer – ouch!) I use signlab and I’m assuming that i simply use ‘mirror’ to reverse the graphics, I’ll give it a go, it’s just making my head feel a bit funny thinking about it! Cheers mate!
Big G (what does the G stand for?) I think I’ll stay away from the white outline technique as I can see those bubbles spoiling the overall effect of the design. What i will do this afternoon is try a snippet of each colour on the door, maybe I’ll order a couple of shades lighter than the main sign board. I love the idea of trying the etched glass vinyl and I’m definitely going to mention this to the customer this afternoon. Thanks!
Phil – please do take a pic and post it! Thanks for the advice.
Leeroy – Did you upload the file you had a go at, I’d love to see it.
Nelijane
-
Yepit’s there…Just click on the file name and you’ll get the file.
Lee
-

Lee love that design fantastic.
Where do you get this static cling stuff from, I know of self cling but thought you had to print to that, is that the same stuff?
Cheers
Dave
-
NeliJane, I can see the image file now 😀 Should be easy peesy that one, using the hinge at the base of each graphic/text, the hardest part will be lining up those squares. Totally doable though 😀 The text, you could apply the bottom hinge, then cut between the letters so you’re only applying a small area at once. Good luck with it though, I’m positive you’ll manage it without a problem!! 😀
Lee, smart design! I like the etch bits, I’d love to be able to do stuff like that.
Cheers, Dewi
-

dave
it is the same stuff you don’t have to print on it, i do window graphics for folk who want to remove their signs off the windows at the weekend, use self cling, stick vinyls in reverse!! 😆
nik
-
Hows that… Nic answered it for me. Dewi there’s no reason at all that says you can’t fit that sort of job. It’s just cut vinyl that’s all. I fit mine wet with an alcohol based slipping agent. Dries in about ten minutes.
-
Alcohol-based eh! I knew there was a reason you’re always smiling 😀
I figured there would be a way of fitting wet and improving on the drying time, just hadn’t gone into it properly. Do you use the plasticy app tape to apply it? The paper stuff I have just turns to mush when anything remotely wet goes anywhere near it, hence the ban on brews on the workbench 😉
Cheers, Dewi
-
You got me in one mate,
I use paper app tape, tried Oracal but that one didn’t like getting wet. I use either perfect tear or Graffix tape. They both work well. I clean the glass with the solution, remove the backing paper, wet the graphic and apply. I squegee out really well and wet the back of the app tape. This releases the app tape from the graphic. I don’t try to do the whole amount at once, just tear off strips.
I’d tell you the name of the one I use but I did that once before and got edited by Rob the MIGHTY SMITER… 😆 Don'[t want to get smitten again.
Lee
-
Hi guys
sorry its taken me a while to get back, been super busy! (which is good!) well, i fitted the doors pretty much as the original design and they look great (if i do say so myself) I would upload a pic but I’ve lent my usb lead to someone so I’ll do it on my return from sign uk on thursday. lee – I still can’t view that file but I realise that its something i’m doing wrong as everyone else can! would you mind emailing it to me on nelijane@hotmail.com. I made small boards for the interchangeable opening times bit and bought some neat little sucker hooky things from b&q to fit them, it worked a treat! signing off now, hope to see some of you in birmingham – I’m the pregnant bird with naomi walker on her name badge!

Log in to reply.