Home › Forums › Sign Making Discussions › Gallery › fabricated signage: rumours
-
fabricated signage: rumours
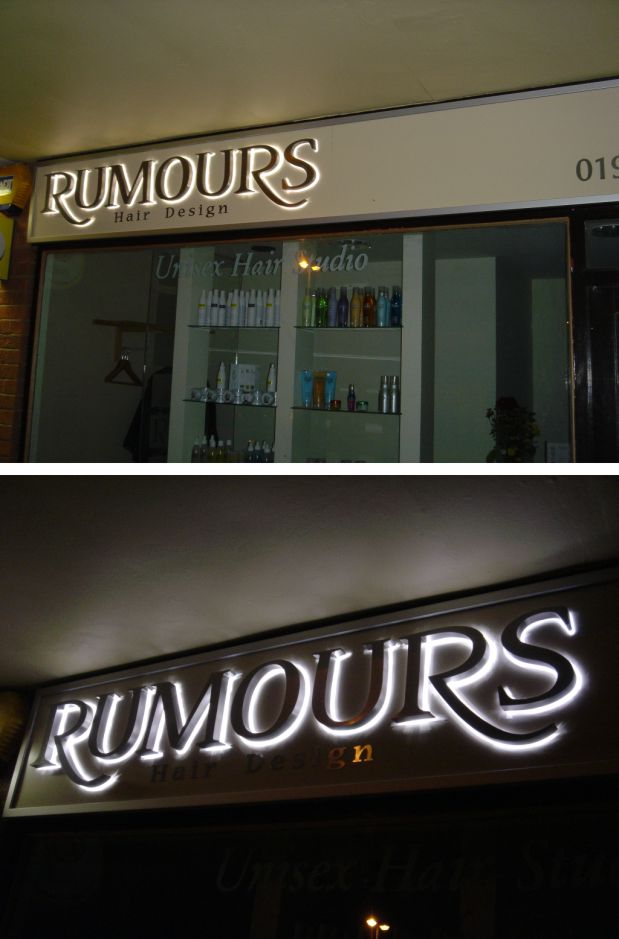
Posted by Nigel Fraser on 6 July 2004 at 21:34Just thought I’d show you guys/gals the result of my 1st ever LED illuminated sign. I don’t have a picture in the daytime yet but here are a couple of night shots. It’s (another!) hair dressers shop and the letters are built-up stainless with white leds mounted inside. Panel is cream dibond and fitted into a std eurotrim ali frame.
Not too bad – I thought in comparison to neon, and a lot easier to do !Nigel
Attachments:
 Gary Davis replied 20 years, 9 months ago 9 Members · 30 Replies
 -
30 Replies
-

looks very nice mate, ide be well pleased with that first go.. 😉
another hairdressers?
i wouldnt knock it mate, doesnt matter what they do, as long as they pay..
good thing about hairdressers is, if you get a decent one, they allow you to use your imgination to get the right image. image for them is everything, so they dont mind forking out a few extra pound.. well some do anyway 😉where did you get the leds?
-

youre quite right of course Rob – and I was very patient with her while she made up her mind about logos colours etc etc which paid off later on as she gave me a £50 tip on top 😀
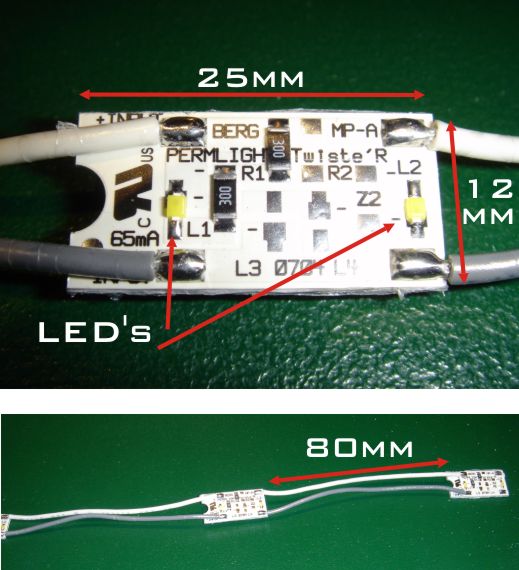
I used the twiste’R leds from Applelec who were very helpful – the letters were very thin in places and so their type of little leds were ideal to fit in.
I did take some assembly photos of this job if you are interested for future demo/info use ??nigel
-
i would love stuff for a demo mate 😛
i have a product test on LEDs coming in near future too.. i think there is a big absence for electrical work on this site & i think this type of thing is needed.. thank you 😉as for the leds used, how did you find them on cost & did you look at ashbys? from the leds i have seen, ashby seems to have the tightest knit leds i know, 24 i think in a 12 inch strip 😮 (hope i got that right) 😉
-
I looked at ashbys and was going to use them but there were three things stopped me – 1) not sure if they would have fitted in the tightest parts of the letters. 2) I wasn’t keen on the narrow angle “lens” type casing they use where the twiste’r ones are 180° view angle. 3) they worked out cheaper ! The modules(as per photo) were about £3.50each i think and I used 70 of them.
I will get the photos over to you when I get a moNigel
Attachments:
-
from memory, i thought the ashby ones were pretty narrow, easy to bend mate..
i know what you mean about the narrow lens but ide expect them to maybe have a good spread on the light over a short distance. 😕 but you could be right! ill waite and see how i go with the product test first and let you know.
having so many per strip would create a more intense light, not patchy i mean. from your picture it certainly doesnt look patchy.. so maybe the greater spread of light with fewer leds works better/cheaper?
i was having a rough guess but thought the ashby ones would cost roughly that price too.. but again im guessing on size of letters etc.how many transformers did you use with that amount of leds?
good to hear you found it all pretty easy to setup, im going to be using leds allot pretty soon. i have ideas on my own sign systems and hope to use leds with them.
-
Hi Rob,
I used a single transformer for all the leds on this sign, and wired it up with a dusk/dawn sensor mounted outside.
Youre right about the width of the ashby ones being pretty narrow but i still don’t think they would have fitted in the serifs/thin parts of my letters as there was only 7-8mm of space available in some areas. I had to put the twiste’r modules at 90° on the letter returns in these areas which is why the wide angle leds are better in this respect.
As I understand it the ashby strips only have so many leds per strip because the light exit angle is narrow and to avoid bright/dark spotting they have to be packed in a bit more. I would be more concerned about the effect of the light spread in relation to the “stroke” of a letter because of the narrower angle I think there might be difficulties in achieving a uniform light in both horizontal and vertical sections of the letters. Having said that I’m sure you do get more light output in total from them as you would expect with more led’s.Don’t get me wrong, I’m not rubbishing that system at all, but I just think that in some circumstances the wide angle leds are better at giving a more even light distribution, particularly with halo lit signs. Plus you can use them on flat cut letters too because they are so thin and will not be seen from the edge.
Re pricing, I used 70 modules which are 80mm apart so a length of 5.6m in total which would take 18 ashby strips (assuming no wastage) and theirs are 18.85each strip of 305mm which would be £340 where the twiste’r ones are only £247 so there is a fair saving mate.
I look forward to seeing any results/info you have come up with on alternative systems and uses – this subject fascinates me and I love to try and be creative about using illumination in signs in different ways.
cheers,
Nigel
Attachments:

-
quote :Don’t get me wrong, I’m not rubbishing that system at all,
not at all mate.. im just batting thoughts back and forward to you. im very interested in this sort of thing for various reasons. so i like to hear what you have to say & have found.
im very new to all this also.. but what your showing does make perfect sense.
i think i maybe over looking some things on my part because of what i intend using the leds for. sidelit signs, directories and the like..does the company you use do a sample pack etc?
i may call and get more info/prices from them also.cheers mate 😉
-
I havn’t asked about a sample kit as I actually have a few left over from that job which I intend to use for an example letter.
They seem pretty helpfull and I’m sure if you gave them a call they would sort some form of test sample for you. I spoke to Carl on 01274 774 477 or check their web site at http://www.applelecsign.co.uk/ for details. They do fibre optic illumination too but I think thats gonna have to wait till I get full use out of the leds first 😀Nigel
-
😆 small world… these guys emailed me just recently.
me, being me, slow as treacle i have still to get back to them. 😕
will do a.s.a.p. 😉check this link on their website under Trade Associations, Magazines & Journals
http://www.applelecsign.co.uk/links.html -

Nigel, looks really great …… very nice job yet again 😀
We are also looking into the led lighting … getting quite a few requests for it at the moment ….. and funnily enough applelec were first in line …. had some good info off them.
Great looking work!
Carrie & Steve 😀
-

Nigel That looks FANTASTIC!!!
Osram also supply a strip LED system , dunno , perhaps it’s worth a look?? Degussa also supply a specific pex that maximises LED light transmission.
Heres an idea: put a few of em in a channel or extrusion of sorts , laser cut and engrave 8mm acrylic , make a system that holds the pex upright with the leds lighting the bottom edge and used mirror tape to “seal” the side and top , and voila , you have an amazing low cost “solar edge” or edge lit sign. The laser is ideal for this , laser engraving “flouresces” extrmely well in this application. You can even use colour changing LEDS and program in sequences etc , and coloured transluscent vinyl applied in front is amazing. -
nigel
just wanted to know your veiw on this. (alougth it may not be an issue with letters of this style) but…
did the LED’s reflect a dot effect on the backing board of the sign?
what i mean is… the LED’s face the back board and form a glow. but if you stand under the sign at an angle, can you see the sequence of dots created by the reflection of the LED’s?i have been getting that with various jobs i have done recently using them.
i dont know if its just the sign maker in me that preffers not to see they dots, but i have ended up using a defuser plastic fo the rear of the letter to prevent this…just wondering your veiw on it?
-
Well I guess you can see a little bright patch rather than a defined dot – but thats down to the reflectivety of the back panel I guess. Plus I kept the gap between the letters and the panel pretty small (6-7mm) so that would help too. I used the mat side of the dibond for this job and it wasn’t too bad.
Sounds like a lot of hassel to have to make up opal/frosted backing trays but I guess that would do the job if you had a situation where it was going to be a problem.Have you got any pictures of your jobs Rob ?
Nigel
-

we used the same LED’s on 2 different sets of text, one red word, and a white word. we found they allow about a 2 1/2 inch before you start seeing a darkspot. (is that about right? I can’t remember the exact specs)
we used them on channel letters with opal front, you really have to plan where all the wires are going to go, (or raise the LED circuit up) ’cause you’ll get dark spots easily. especially when, as we were doing, replacing Neon (IE, the pillars/screws etc)
we also had 3 strips of red LED’s, but the manufacturers said to always use white LED’s on coloured opal, in retrospect, we possibly should have used the red in the red, however our oversight in thinking we were working with san-serif font (it was serif) meant we would have been there all night, on a scaffold in the freezing cold, trying to work out how to fit them in (the white we could wrap around). I don’t think we didn’t put enough in, it was decidedly dull. The white word was packed with them, and was easily as bright as neon.
about the light dot, because of the viewing angle, you can’t really pinpoint where each LED is, unless it is totally solitary.(that is assuming you’ve placed them the correct distance away. obviously)
and they’re so much easier/safer to use than Neon.
***edit, sorry for the corrections, I’m knackered :p***
-

I’m interested in peoples’ opinions/experience of the reliability of LEDs. My mate has had some problems with them, and has had to replace faulty LEDs on a few signs. Anyone else had any problems like this?
-
I’m sure they CAN go wrong, like everything else, but we’re replacing two major CCL signs we have to keep revisiting because they keep either:
a) going out and we have to check all the tubes, or
b) setting on fire.I’ve only worked with them in a very very limited capacity, but with the danger of electrocution severely reduced, I’d be more than happy to use them again, and again , especially if the only danger is a few LED’s being replaced now and again (an easy wiring job), because they are all parallel if one goes out, you still have it’s surrounding ones to pick up the pace.
I’d be tempted to “persuade” one of your clients to try them and just have a go at them.
🙂
teetering on the edge of off topicness, has anyone heard of those LED’s that can be “tuned” automatically and locked to any specific pantone colour, now THAT is what I call swish. plus the invention of fully RGB LED’s means MASSIVE full colour screens, that is IF you can afford millions of ’em.
-
hi Nigel
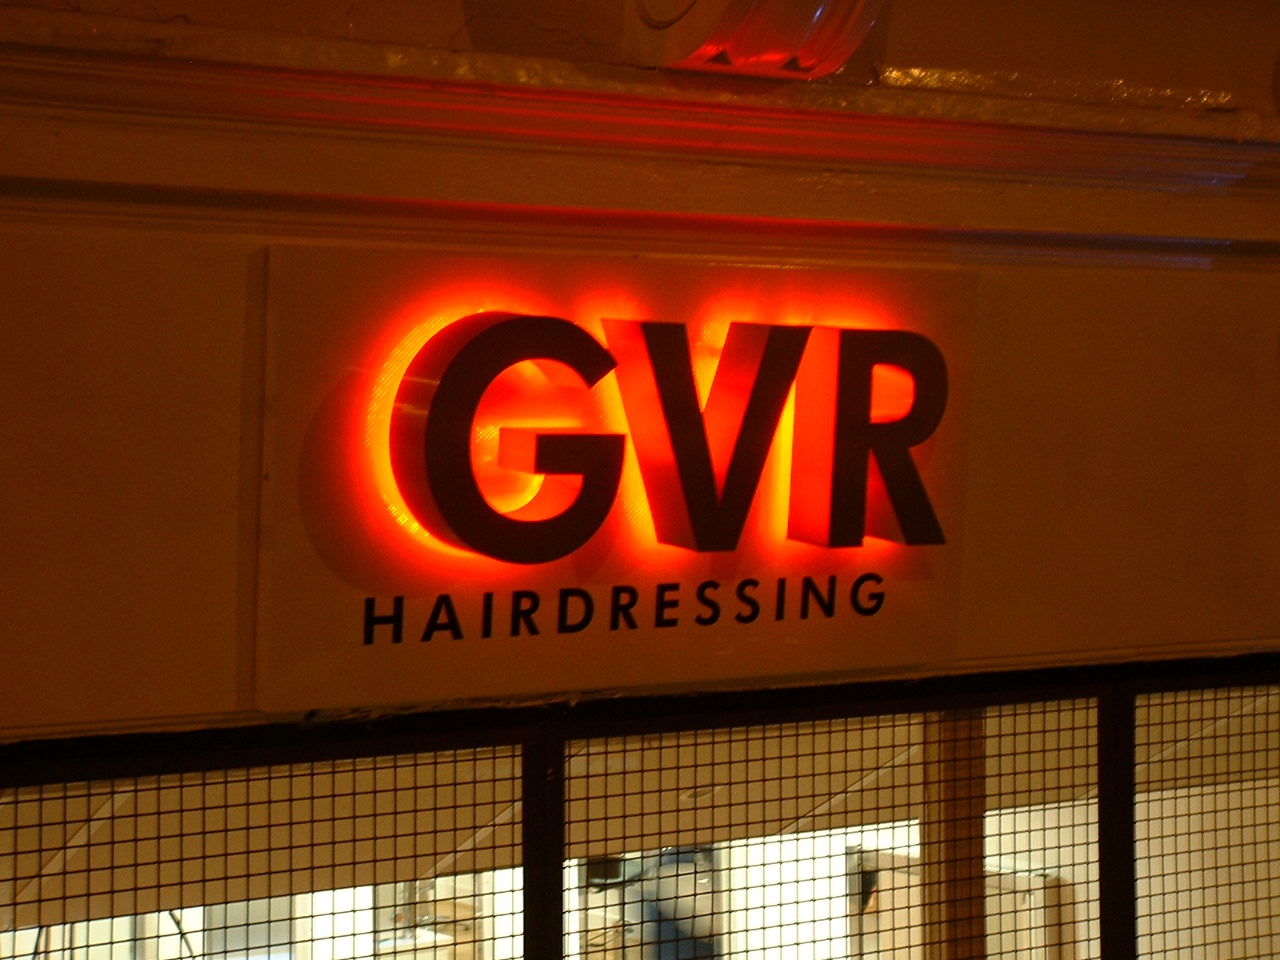
here is 3 jobs i did with LEDs recently….(click images to create a blowup image)
GVR & Cooper Bros worked the best.
i had defuser backings in all 3 jobs.
all 3 had 1 inch space from letter to backing board. this “may” have been why seeing the LED reflecting in backing board more apparent? although at night there was a brilliant spread on the glow.
The HQ job was another story altogether. it had white LED’s.
i think a combination of 3 things was the problem here.
again, i had the 1inch space, so had to have the defuser to illuminate the dots of the LEDs showing.
the backing board was rynabod, which o covered in chocolate brown vinyl.
i “think” the backing colour sucked up some of the glow, being dark. but i also think it being vinyl, gave almost no spread in the light, were as brown perspex would have helped more.
what i ended up with was pants… total crap in my honest opinion.
there was almost no glow.
the brown vinyl acted like a mirror and because of this you had a stark white light, and from an angle you could see a perfect reflection of the defuser behind the letter. because there was no spread, it shows up where my locator’s were even more… to be honest i was embarrassed to put my name to it. i live and learn eh?oh… i did try lowering the letter to about 5 mm Nigel, but due to the colour and it being vinyl, all i was doing was closing off more and more light.
Attachments:

-
They look great Rob, I know what you mean about the HQ problems – I saw another sign company locally do big built up s/s letters mounted on a dark blue powder coated alu tray and they used white neon but it still looks crap !
I kind of learnt from their mistakes not to use a dark or reflective background with any halo illuminated letters, but as you say, it’s a learning curve 🙄
What type of led’s did you use for those jobs out of interest ? The red ones look really bright even in the daylight !
NigelEDIT: And yours look good too Mike ! Are those letters built up acrylic ?
-

nice sign mike!! 😛 😛
don’t have the foggiest how you guys do them..but they look fab!! 😀
nik
-
 quote creativesign:And yours look good too Mike ! Are those letters built up acrylic ?
Thank you! and yes they are built up acrylic, fixed to a silver dibond background that was formed around an existing steel frame that had a horrendous manky galvanised steel plate job riveted with so many rivets even the water couldn’t get out 😮 😮 When we drilled out the rivets we had to wait 10 mins for the water to drain out :lol1:
-
great sign mike… un usual font for builtups… must have been a bit of a pain due to so many curves,
can i ask what LED’s you used mike?the LED’s i used are from ashby sign supplies. 24 leds on a 12 inch flexible strip. ill be showing a product test & step by step demo, including video download very soon. should be about a week or so till its loaded on the site.
like ramj mentioned you can created dark spots very easily when positioning LED’s but because of the vast amount of leds tight together on a 12 inch strip i didnt find this a problem, but i did if i had to have the locator situated near the edge of the letter.
-
i have just spotted something in the GVR image.
if you click picture and blow up the image, look at the left hand side of the “G” low down. you will See the LED’s dots, that i am speaking about.
the GVR has the defuser behind it, but… on the G we cut the defuser on the router with far too much minus-compensation, but due to the rush i was in with the letters i just used it. obviously at this angle the camera has managed to catch a few of the dots from the LEDs on that one letter because the defuser is a little small on the rear. -
Very nice work guys ….. like it all a lot 😀 looks great!!
Carrie 😀
-
quote Robert Lambie:great sign mike… un usual font for builtups… must have been a bit of a pain due to so many curves,
can i ask what LED’s you used mike?The lettering has actually been edited as the font has a line that runs along the top of the letters joining them all together. As this was not practical to build without ugly joints (and time constraints) the customer agreed to let me adjust it accordingly.
The “B” & “T” were also shortened in height to get the rest of the lettering in a better proportion to the sign face.The LED’s are from Ashby as well.
The letters were a pain and took way too long to make to make a true profit on, but that is usually the case with these jobs.
-
how did you find the LED’s from ashby to work with mike? i found them incredibly easy.. . 😮
what did you use to attache the clips to the inside of letter? i used 3m VHB -
The LED’s were very simple to use and install.
I forgot to mention that we also sprayed the insides of the lettering white to aid with the illumination. We didn’t use a defuser panel like you did, do you think that this would be neccessary for outdoor use???? (see still learning!)
WE did have a small problem where we had a bit of a tight curve we found the VHB held ok untill the following morning when we rechecked them found that the tape had turned under the strain, so we fabricated some simple clear acrylic wedges to hold the LED’s in line. -
hi mike…
i believe that you do not need a defuser at all. i was actually told that it didn’t need them from ashby and that as long as they aren’t completely exposed they are 100% fine. recessed in the back of a built-up is spot on. no worries i wouldn’t think…i know what you mean by the vhb holding on a tight bend. i had a few pop after an hour, but i put it down to the way it was applied, the inside of the letter wasn’t properly cleaned with meths etc… once i gave them a good clean, i applied the clip and left for about 3 minutes. i also applied a little heat from a heat gun to help it bite. then i clipped in place the leds…
i had one or two point in a couple of letters were i was thinking will the vhb hold this, (reality is it should be 100% fine, we are only talking the force of a little bent bit of plastic) none the less. i didn’t want to take chance so i adhered the flat of the clips to the based with a little squirt of 3M 2 part adhesive… worked perfect.
i used the defuser for two reasons, the main one on the first job was to hide the dots of the LED’s reflecting on the sign panel and being spotted from an angle, but once i lowered in the defuser it seems to spread the light a bit more even and i thought, cool.. this should work fine, so i went onto doing it on the others.
with the HQ job though, like the LED’s on the stark brown back, i could even see the reflection of the defuser and that was crap, 😕 -

know this is a fairly old post now but if any of those who posted up pics could give an idea of pricing of those signs it would be great, never done this type of sign and would be great to offer it to customers….but arent we talking mega bucks for this type of sign???? i find most customers lean more towards the budget end of any ideas offered, only a select few that are willing to splash out.
thanks in advance any figures would be appreciated.


Log in to reply.