Home › Forums › Software Discussions › Corel Software › can anyone help me with corel draw problem please?
-
can anyone help me with corel draw problem please?
Posted by widget on 4 February 2005 at 11:50Hello everyone
was wandering if anyone can help me with coreldraw?
i need to put a photo into a circle to be able to print it then cut the circle,i have been on for days and cannot find any way of doing this,i dont use corel often maybe thats the problem,or just the fact it cant be done.all i get is the circle in the middle with a big rectangle photo so when i go to print and cut it,its going to print the whole photo which is not what i want.
hope i am making some sense to someone out there 🙂
thankswidget replied 20 years, 11 months ago 7 Members · 20 Replies -
20 Replies
-
use the “power clip” function mate, there’s a section in the help files in corel that tells you how to do it.
-
Widget, you should be doing this in corel photo paint for the easiest way.
In photo paint mask the area with the circle mask, and then save it as a photo paint file. Import that file into corel, then you can deal with it however you want.
Depending how the photo paint is set up tho, you may have to invert the mask first.
Hope that is not too confusing.
Cheers
-
You can also edit the nodes on the bitmap using the node editing tool to crop it to a circle. You would have to make a replica of the circle on top though, for your cut line. Powerclip is probably the easier route.
-
If you create lots of noads your file creat a large print file when the job spools so I would stay away from this. Bitmaps should be edited in a photo package.
Mask the area you require then cut to the clipboard.
Goto file New From Clipboard.
Creates a new doc convert to cMYK if required then export as EPS.
Inport into Corel Draw as eps/prn file.
The image will then have a transparent background.Tim.
-
i’m not sure if i’ve got this right….still learning corel draw!! 😮
but i had to print & cut a similar thing, and what i did was got my picture then put a circle round it from the shape tool then clicked hairline and changed colour too magenta as my cutting settings are set to magenta (steve & carrie gave me this info) hope that made sense!! 😮 anyway it printed and cut fine for me!! if it’s all wrong no doubt someone will keep me right!! 😉nik
-
If I’m understanding what you’re after correctly, there’s a really quick way of doing it, providing you’re not using a white spot colour (unsure what printer you’re using)
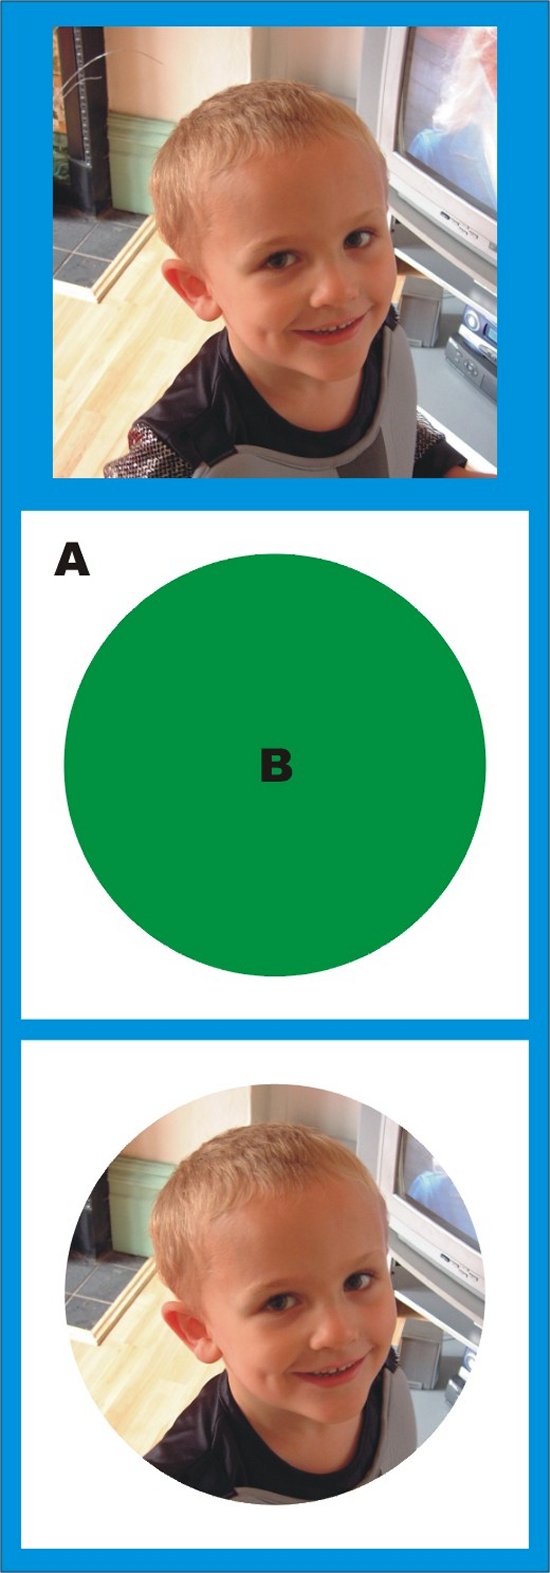
Start off with your photo, then make a square/rectangle that covers your picture (A) then make a circle the size you need (B). Trim B from A, then centre A over your photo (ensuring it is brought to the front. Delete B completely, make sure A is filled with white and the outline removed, you have the effect you need and its ready to print 😀
Cheers, Dewi
-
dewi do you do that in corel draw ?
still seems complicated to me,i managed to do it the other way but your way looks perfect
-
Yep, all done in Corel Draw, its pretty simple, Nigel (CreativeSign) showed me a way of speeding up doing stuff like this.
Draw a rectangle/square round your photo, and highlight both the photo and the rectangle/square. Now press the C key and then press the E key. This will centre both objects with each other. Now add a circle (the size you want and do the same, C key and E key.
Now highlight the Circle, go up to Arrange, down the list to Shaping, then to Trim. Click the Trim button that appears and select the rectangle. This will trim the circle from the rectangle. Delete the circle, colour the rectangle and Bob’s your Auntie’s husband! 😀
Its worth playing around with the trim and weld options, as you can make all sorts of shapes just using these 2 tools. The keyboard shortcuts are cool as well, as I say, Nigel showed me the keys to press and you’d be amazed how it speeds up your design work. 😀
Cheers, Dewi
-
nice one dewi!! my interpretation must have been pants!! 🙄
i’ll give your’s a go tomorrow brilliant, cause i like corel draw for the pc60 and all those tips are invaluable!! 😀 😀 (oh and lovely wee piccie of mini you!!)Nik
-
Actually Nik, I reread the thread earlier and Widget does want a cutline around the outside of this photo thingy in a circle. Your method is spot on!
Although this may sound weird Widget, instead of deleting the circle once you’ve trimmed it, highlight it, hold down the SHIFT key and go to one corner of the highlighted circle. Now hold down the left mouse button and the SHIFT key whilst dragging the circle a little larger than it was before.
Now change the colour of the circle to clear, make the outline black (or as Nik suggests magenta) and you have a cutline that leaves you with a circular photo with a white border. Does that all even make sense?
Before you cut, the end product should look like the piccy below….
Cheers, Dewi
Edit: The blue border is just there so you can see the white bits btw 😀 And Nik, that was Minime when he dressed up as a knight for a school play 😀
-
quote Dewi:Actually Nik, I reread the thread earlier and Widget does want a cutline around the outside of this photo thingy in a circle. Your method is spot on!
cheers dewi, but i think a big thumbs up goes to steve!! :thumbup2: :thumbup2: he told me how to do it!! 😀
Nik
-
i have been trying your method dewi but cannot get it to work 🙁
i get my photo in the circle with a coloured square around it but cannot work out how to get just the circle out with the photo in it,so i can import it into my cutting program and cut it.thanks
-
Widget, are you not using Corel to do the cutting?
Cheers, Dewi
-
dewi,
no i dont know how to do it ?
i am still learning yetthanks mate 🙂
-
K, lets start at the top, what machine are you using to print and cut? Is it a PC60 or PC600?
Edit: Scrub the above question, read the backposts and discovered you have a PC600… what OS are you using? Win 98/ME/XP or Apple Mac?
Cheers, Dewi
-
dewi i am using windows xp and corel draw 12 and artcut cutting software
cheers
-
Bear with me on this one Widget, this isn’t as complicated as it sounds.
Once you’ve got your image ready to print, go upto the File option, then down to Print Preview. Select this option. You will now be presented with a representation of what you want to print. Don’t worry what it looks like at the moment, we’re going to sort that in a minute.
Now you’ll see a button at the top of the screen that says Options. Click this once and it will open up a diddy window. At the top of this window you will see a header saying Destination and a drop down menu bar underneath this. Go to the drop down menu bar and select Roland PC600. To the right hand side of this drop down menu is a button named Properties. Clicking this will open another window, and in the bottom right hand corner you will see a button named Advanced. Click onto that.
You will now be presented with a whole series of options and settings for your PC600. These are cool to explore and learn more about, but for the minute, check that the paper setting is to 24″ wide (I think its 33″ drop) and if you follow Niks advice, check that the Cutting section has Cut by Colour marked as Magenta. This will ensure you’re cutting only the outline you’ve made in Magenta.
Near the bottom, you will see Output options. You can play around with these to change Process and Spot colour settings, but for the minute set this to Photo colour and to CMY. You don’t need to print the black (K) at the moment as the CMY will make this when they are mixed anyway.
Once you’re happy that the settings are correct, click okay to all the windows until you return to the preview of your print. Now reposition your print to the top left hand corner, and hit the print button (presumably you have the vinyl and ribbons loaded in the PC600 at this point). If you’ve done everything correctly, you’ll print the circular image and have a cut line made around the outside, leaving you a neat white border to your image 😀
I hope all that makes sense and its of some help.
Cheers, Dewi
-
cool 🙂
thanks dewi that makes things a lot easier 🙂never even knew i could do that i am well pleased 🙂
thanks again
Log in to reply.


