Home Forums Sign Making Discussions General Sign Topics 10MT Sign FITTING SUGGESTIONS

  • 10MT Sign FITTING SUGGESTIONS

    Posted by simon m stonuary on 22 March 2004 at 19:02

    Hi Everyone ๐Ÿ˜€

    Just looking for some suggestions.
    weather permiting this week i`l be fitting a 10m by 1.2m sign to a factory, i have never fitted a sign as big as this before.
    the sign is moulded grp in four sections with aluminium angle brackets behind.my concern is over this length there could potentially be scope for run out if each section is fitted using a spirit level.should the brackets span the joins?

    thanks simon

    Robert Lambie replied 21 years, 9 months ago 2 Members · 2 Replies
  • 2 Replies
  • Nigel Fraser

    Member
    22 March 2004 at 20:35

    Simon,

    I would fit the angle to overlap the joins as this will make it much easier to get a decent tight join without any vertical movement. As far as the level goes, it depends on the building features and material – i.e. if it is clad in horizontal cladding then any out of level and you will see it right away, but you also have a nice reference point to measure to aswell. If it’s brickwork or vertical cladding I would start with one of the centre two sections and mark out a horizontal using either a chalk line or a laser. Then work out from the centre which gives less chance of a problem. Personally over 10m I would think you should be ok as long as you mark out carefully and the trays are made well (i.e. decent 90 degree ends) Also make sure you dont get to much sag in the fixing angle when you fix this up to the building.

    Good luck with the weather !!

    Nigel

  • Robert Lambie

    Member
    23 March 2004 at 01:11

    Hi mate
    Ok, I hope I am understanding you properly. Not sure what you mean by the angle brackets holding the sign together but here is my explanation for doing signs on factories at this kind of length

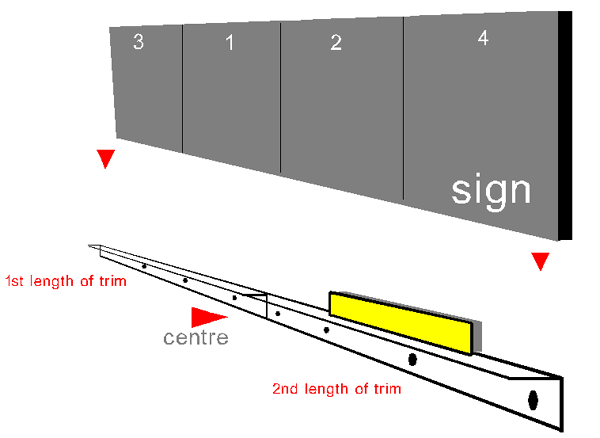
    1st take 2 lengths of inch-by-inch angle. They should be about 16 ft each & drill holes along one side of each.

    2nd using a spirit level and cordless screw gun using tech bolts.. (Starting from centre) screw the angle to the wall as shown.

    3 repeat again with second length of trim using level as you go along.

    What you should have now is a nice strong ledge 100% level. Very easy to fit because it is so light.

    4 check it is level all along without any sagging areas.

    5 starting from the centre again using the order indicated for the panels.
    Sit the sign parts onto the ledge. The ledge will allow you to easily lift the sign onto it freeing your hands while someone else holds it against the building. The angle ledge will take all the weight and keep it perfectly straight and free from slipping while you get it fastened.

    6 repeat each section as before.

    7 once all panels are secure and checked. Remove the angle ledge from below 7 take it home.

    The only side effect from this method is that you have several small drill holes were the angle was. But from the ground you cant see them and they are so close to the sign they are not noticed.. If it is high up, youโ€™re laughing


    Attachments:

Log in to reply.