Creating Traditional Style Scallops in Cut Vinyl
note: needless to say if the actual truck panels were very small then you’d probably create and apply the entire pinstripe and scallops all in one. Our diagrams only appear as compact panels for the purpose of the demonstration.
First of all we need a couple of shapes, namely the scallop corner and the pinstripes themselves.
The easiest way to ensure both elements match up exactly when we use them on the truck, is to take them from the same original – like this…
Create your original pinline box with scallop corners on screen (below left), in Signlab this is a simple function called ‘decorative borders’ – in other software packages you may have to create it in a different way. Next draw a couple of boxes, one under one of the corner scallops and the other under one of the ‘straights’ of the pinstripe (below centre). Weld these together with the original decorative pinline using an ‘AND’ type weld (one which leaves only those parts that overlap), this will result in the two elements we need (below right).

Take these two shapes, duplicate and stack them to get the best use from the vinyl…DO NOT apply application tape – just leave them exposed on their backing paper. Be sure to cut plenty of spare pieces too.

On the truck – apply the straight lengths of pinstripe to suit the panel in question. In this way, without regard for the corner scallops, you’re more likely to create the flowing freehand lines that will give movement and style to the individual panels (even if the ones in our diagram are only simple!). Just let the ends run off the panel at this point.

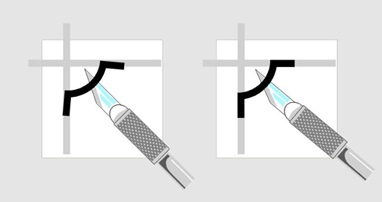
Lift one of the corner scallops from its backing paper with the blade of a scalpel (preferably a blunt blade as we don’t want to slice them through). Approaching one of the pinstrip intersections, hover roughly in position. Then, with the tip of a finger, press one of the legs of the scallop into place (below left) and then, guiding the scallop with the blade, place the other leg directly over the other pinstripe (below right). Don’t waste time on this – if it goes down wrong then just scrap it and quickly grab another.

Having done one corner (indicated below left) – proceed to do all four – or as many as the design requires.

Next, and with a SHARP scalpel, remove the excess pinstripe with two light cuts. Use very light pressure, barely cutting the pinstripe at the places shown on the diagram (below left) and tease away the excess vinyl to leave the finished corner shape (below right).

Repeat this for all the corners (below left) and add corner decoration and main panel decoration as required (below right).

The whole process is quite fast. By applying all the pinstripes to all the panels first of all – without any of the corner scallops or other decoration – you can quickly build up a picture of the extent and overall design of the pinstriping. Adding the corners and trimming is then simply a matter of ‘finishing off’. Take plenty of spare scallops and pinstripe, work fast and expect casualties! With a little practice you can bend these soft pliable scallops to fit corners that are considerably more acute or obtuse than 90 degrees.
You can create endless variations on this theme by creating a different ‘master’ from which to take your main elements and customising your additional decoration. In some instances only opposing corners have scallops and where a panel is very slim then the scallops can be placed back to back. Secondary pinstripes can also be added to achieve a different look.

In the following designs, the same scallops have been rotated 180 degrees and finally – four very different yet very simple corner designs, all based on the same scallops…

As for applying pinstripes, well, you can mark the panels with a crayon beforehand if you want but believe me, there’s little need…after applying a few stripes you’ll know just what looks right. Remember, the less you worry about it – the better it’ll be!
I would normally anchor one end and then just take the slack out of the pinstripe (without stretching it). Choose a point where the line will run too, fix that with your eyes, and with one gentle movement, lower the loose end of the pinstripe onto that spot. Look down it to check it hasn’t “banana’d” (that’s a technical term by the way!) and then apply the squeegee. When squeegeeing pinstripes, remember to run along the pinstripe as if your squeegee’s on rails – don’t deviate from your position on the line or vary the angle. Apply a gentle pressure and work out from the middle point to minimise stress in the line…
If you leave the wheel arches and other irregular shapes til last – you should have got your ‘eye-in’ by then and be able to scoot around them. Hold the pinline horizontal between both hands at arms stretch. Approach the wheel arch and, keeping the pinline level, anchor one end at the top of the arch using your thumb. With the index finger of the same hand, press down the line onto the panel whilst slowly lowering the other hand (which holds the free end of the line) as you proceed.
In this way one hand slowly drops as the other hand moves along the pinline, pressing it into place. Altering the speed of either movement will change the arc of the line, so the idea is to do it in a steady and regular fashion – it’s a bit like the ‘patting your head whilst rubbing your tummy’ thing, but it’s easy to master. After one or two attempts you’ll be flyin’… If it goes wobbly or astray – then just back up a way, pulling the line back off and then continue. This type of thing is often easier done ‘by-eye’ than trying desperately to follow pre-made marks.