Converting a Photograph to cut vinyl Graphics.

Photograph to cut vinyl.
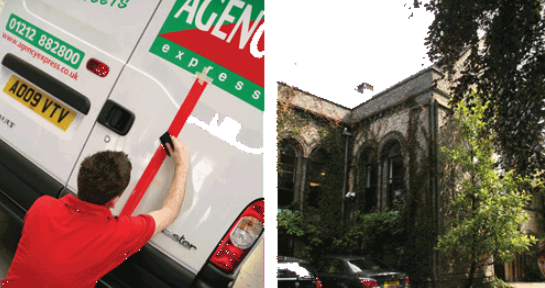
Recently, A member of the site was faced with a difficult design brief which called for a large number of graphics to be brought together in a single design for a van (and possible signs too) for a company called Parker Brothers.

The customer suddenly drops the original idea and presents a photograph of an ornamental garden, saying; “I want something like this but I don’t want that digital stuff!”

I thought I’d use this as an opportunity to show a process we sometimes use to re-create the essence of a photo but in cut vinyl! – and it goes like this…


We can’t possibly re-create the entire photo, so let’s select a part of it that gives us a little bit of everything – tree, water, bridge, grass and rocks…
Scan or import the photo into Corel Photopaint (or a similar graphics package), select the area you’ve decided on using a ‘mask’ tool and then ‘crop to mask’ to discard the unwanted portion (above left).
‘Desaturate’ it (that removes the colours to me and you!) or ‘convert to greyscale’. Next, lighten it to make it ghosted or ‘washed-out’. then print it out (above centre).
Take a medium Black felt tip pen and draw in the different sections of the image – simplify it and even add bits or alter them to suit (above right).
NOTE: as we’re going to make cut vinyl shapes from this drawing – don’t leave any ‘loose ends’…make sure all the pen lines join up to one another to form ‘closed shapes’ including an outer border to enclose the whole lot!
The next three steps go like this…


Place your drawing under the scanner. Scan it into your sign package BUT before you do – increase the brightness of the scanner so that it doesn’t see the faint greyscale of the printout – ONLY your heavy black felt tip pen…NOW you can scan it (above left).
Next, vectorise it (in Signlab this is done using the ‘Accuscan’ module) to convert the scanned line drawing into a vector image leaving you with a sort of ‘cob-web’ of lines and shapes. If you need to know more about this procedure or process then let us know (sample: above centre).
Ungroup or ‘break apart’ this vector image and proceed to colour the shapes to give a good representation of the original photo (above right).

Next, we just spend a few minutes adding some highlights and lowlights – notice them on the tree canopy and the water, plus the stripes in the grass etc. Oh! – and a nice light Blue border. I like the rough edge line of this piece – it’s kinda ‘arty – but I’d still like to create a clean outer edge to the design as a whole.
Now we’ll place it onto a sign blank and add some text to suit…et voila!…the actual process from first scan to finished design only took about 40-50 minutes…not too difficult to recoup in the finished cost…

HOLD ON! – we’re not quite finished…” That’s going to take months to make up” I hear you say. Well, it wouldn’t take that long but there’s nothing to stop you from printing it on a digital machine is there?! When the customer says they don’t want digital – it usually means ‘not photos’ but printing blocks of colour is surely no more or less offensive than cutting them in vinyl and sticking them on…
…with some digital…you could apply this lot to a van in no time….

I hope the demo helps some and that you may find this method useful at some point in the future either for cut vinyl or digital…