Beautiful Wood Sign Carving Tutorial
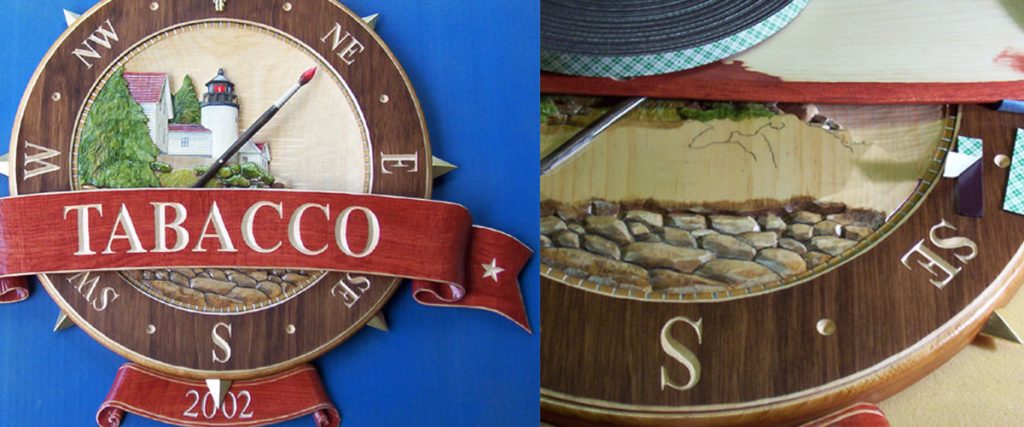

This is a family crest that I designed based on a piece that I made for a letterhead meet held in Stonington Ct.
The size of the circle is 16” and the entire piece is made of Eastern White Pine. The main focus of this “How To” will be the carving of the lighthouse and the assembly of all the parts.
Picture 1
The circle is first cut out on a band saw. The outside of the circle is then stained with a Black Walnut oil stain. Then, using a beading bit in a small router the outside edge is formed. I then used a compass jig with my router with a ¼” straight fluted bit to form the flat surface around the inside of the “Compass”.
Picture 2
The pattern for the lighthouse was first drawn on a piece of tracing paper and transferred to the wood.

Picture 3
Once again, using my small router with a 1/8” straight fluted bit, I cut the primary outline of the lighthouse about ½” deep. Using the same router, I made stop cuts separating the other major elements within the design. (Tower from shed, shed from house etc.) These cuts varied from 1/8” to 3/8” deep.
Picture 4
To avoid having to re-draw a lot of lines that would be removed with carving, I extended (wherever possible) many of the lines into the flat area that wouldn’t be carved until last. I then used them as a guide, after the basic “rough-out”, to restore the lines. This can clearly be seen in the flat areas surrounding the carving.
All of the “rough-out” was done with a 20mm #5 and a12mm #3 straight gouges. Both are quite shallow gouges.
Picture 5
Using a detail knife and the 12mm #3 gouge, I then carved the basic form of the different elements of the lighthouse structure. I also roughed in the trees and rocks.

A note here on the basic process that I use to coordinate all of the elements of a relief sculpture…..It starts with a basic philosophy. “The form of any object is made up of the sum total of all of its details. Therefore, if you get the form right….all the details are right on the surface”. Mechanically, I first separate all the elements with a “stop cut”. This is a verticle cut into the wood that will determine where the chip will end, or “stop”. The first cut that I put in with the router is a “stop cut”. Next, I carve the major elements so that they are at the right depth in relation to their neighboring elements. And third, I give each element it’s correct shape. The result of these three steps can clearly be seen in this picture.
Picture 6
Using a detail knife, a 6mm #7 gouge and an 8mm fishtail gouge, I now add the final details to each of the elements of the carving. Those areas that will be covered by the ribbon are not carved.

Picture 7
Using artists oil pigments and Minwax Natural Stain, I create colored stains to “paint” the sculpture. This adds color to the piece but its transparency allows the grain of the wood to be an aesthetic part of the finished piece.
Picture 8
Using 1 Shot Metalic Silver, I paint in the “degrees” of the compass. This is the only paint used on this entire piece.
Picture 9
These are the ribbons, brush and points that will be assembled onto the compass.

Picture 10
The Fleur-de-lis design is made up of pin striper brushes.
Picture 11
The bottom ribbon and points are attached by first inserting a small screw into the points so that they project about ¼”. An oversized hole is drilled into the corresponding location along the circumference of the compass. The holes are filled with a 2 part epoxy wood filler and the points are inserted.
(The letters are carved though the stained surfaces of the carvings, which reveals the “white” of the White Pine. Each piece is then cleared before assembly. In this case, because it’s an interior piece, I used a semi-gloss laquer.)
Picture 12
After locating the main ribbon, I used masking tape to form a “hinge” so that I could easily locate it once the VHP tape was applied. If this was going to be an exterior piece, I would have secured the ribbon from the back with galvanized screws.

Picture 13
These are the 5 carving tools needed for this job.

Picture 14
All together & complete!


Responses