How to create realistic Client Sign Visuals


How to create realistic Client Sign Visuals
Using the CorelDRAW® PhotoPaint distort tool to create client visualisations.
If like me you like to create an impressive client proof that’s got some “life” to it then the distort tool is the simple answer.
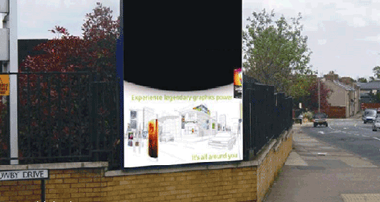
Let’s start with a site board sign as an example. Our client asked us to replace the graphics that were already present with some new ones. We took a digital photograph of the existing site sign. We then import this picture/file into CorelDRAW® and “blank” out the existing artwork, which leaves the picture looking like this >>
Picture- 1

It helps to know the “actual” size of the panel, just so when we distort the graphic to fit the shape of the blank its not stretched out of proportion in an odd way. Simply design your sign/graphic as you would normally.
I have just lifted an image from the web and cropped it to the correct proportion of our sign.
Now open the sign blank image in PhotoPaint (If you haven’t already converted the sign and blank white box to one bitmap) simply highlight the sign blank and click edit bitmap on the toolbar to launch the program. >>
Picture- 2
You’ll now have the signblank open in PhotoPaint, go back to draw and highlight the artwork you’ve created and click copy>>
Picture- 3
Go back to PhotoPaint and click on edit – paste – paste as new object>>
Picture- 4

You’ll now see the artwork in PhotoPaint (over the signblank) and it’ll have a “dancing line” outline.
Now click on the distort mode button>>
Picture- 5
Now one at a time grab a corner and drag it to the outer edge of the signblank “fitting” the artwork to size. >>
Picture- 6

Do all four corners and you have a completed simulation, simply save the file as a jpeg/bmp and email it to your client. >>
Picture- 7

Well thats all there is too it, I hope this demo is of some use to you all…
Andy


