Home › Forums › Sign Making Discussions › General Sign Topics › Advice req’d on post depth / wind load
-
Advice req’d on post depth / wind load
Posted by Hugh Potter on 1 May 2012 at 10:46Hi Guys n Gals,
I’ve had a quick search but can’t find what I know is on here somewhere!
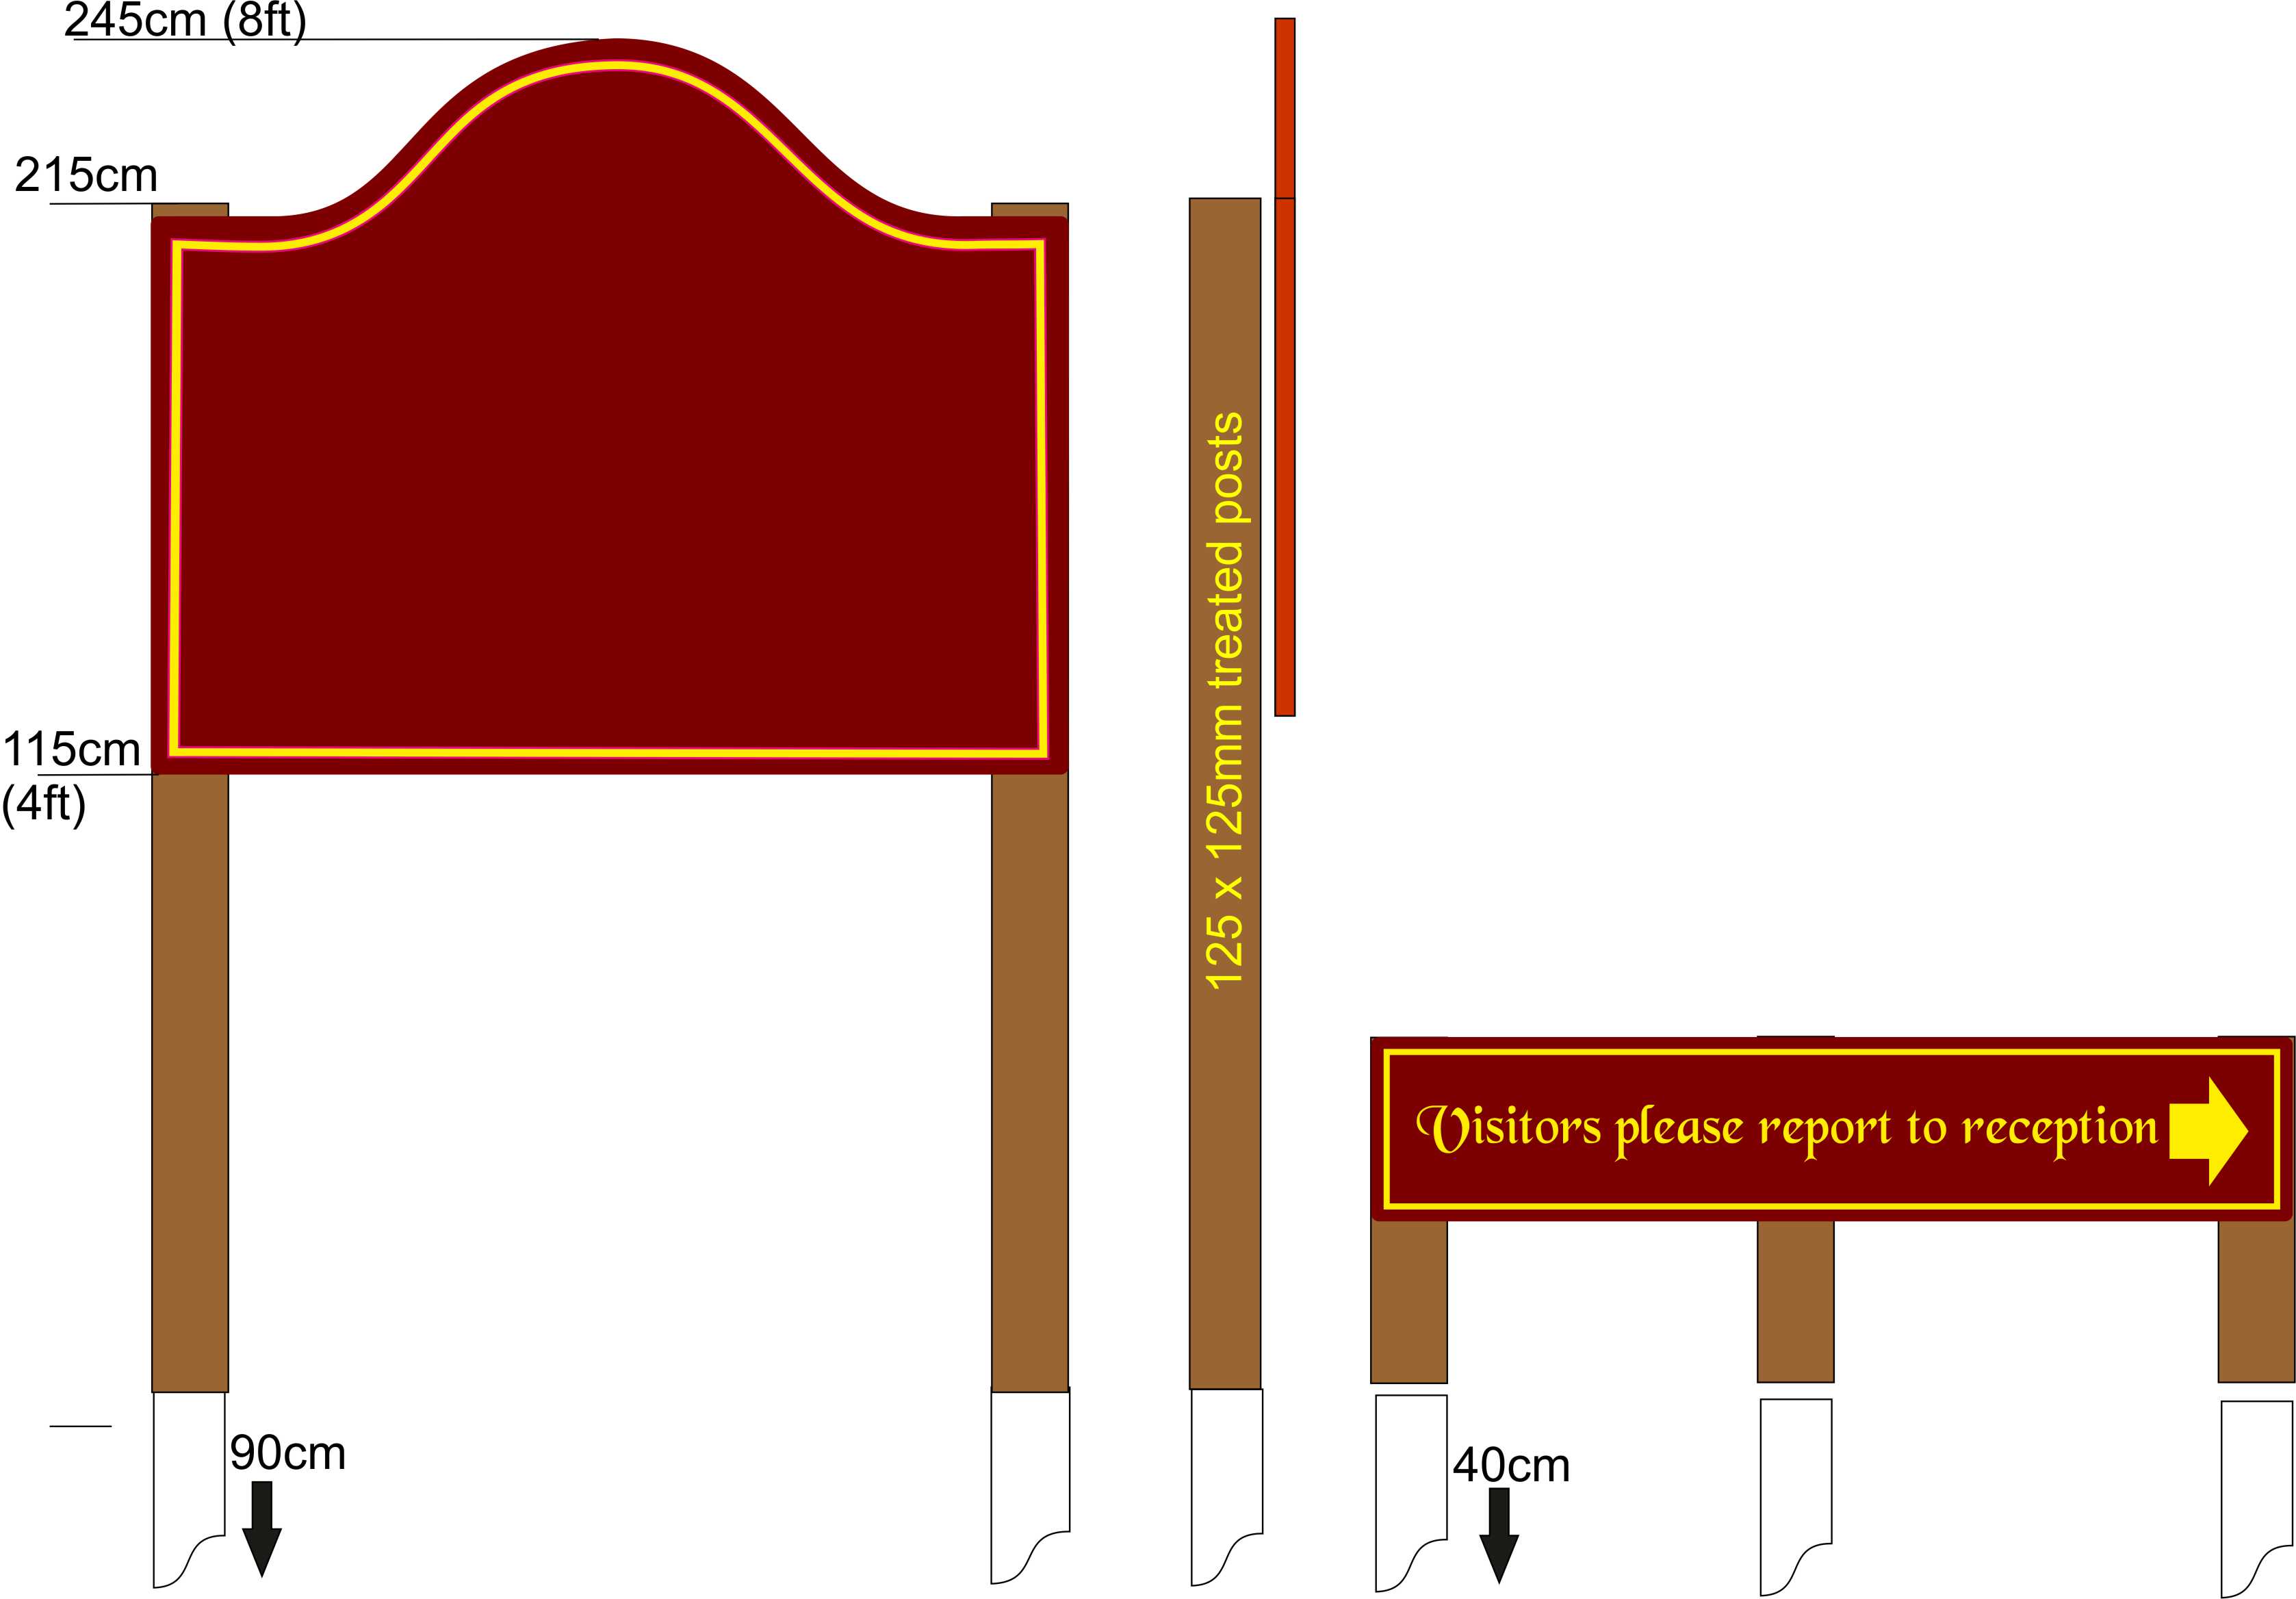
I have this job to install this week, I intend to go and put the posts in tomorrow am and then the signs on thursday, I just have a couple of questions…
.. the scales are on the image attached.
1), is 900mm deep / concreted / 2 posts enough to safely hold this sign in place? going into fairly firm ground.
2) do I need to concrete the smaller one in place or just pack the soil back in tight?
It’s in the grounds of a primary school so despite radius corners I’ve put the posts to the edge of the sign, should I have a 3rd post in there – really? posts are damned strong and very heavy!
thanks in advance,
Hugh
Attachments:
 Doug Edwards replied 13 years, 8 months ago 10 Members · 21 Replies
 -
21 Replies
-

900mm under ground would be fiine I would think…rule of thumb is a third underground
I would also use concrete on the smaller sign,
Third post could be over kill depends how wide the sign is and what panel is msde of,
.happy digging
-

cheers Martin,
the signs are both 3mm powder coated aluminium. My concern with the smaller one is that kids might sit or lean on the thing, being on 300mm tall it’ll most likely bend, hence – unfortunately, the third post! I might buy a 100×100 for that one as 125 x is a bit overkill!
Hugh
-
quote Hugh Potter:cheers Martin,
the signs are both 3mm powder coated aluminium. My concern with the smaller one is that kids might sit or lean on the thing, being on 300mm tall it’ll most likely bend, hence – unfortunately, the third post! I might buy a 100×100 for that one as 125 x is a bit overkill!
Hugh
I would put a third post in then Hugh, but make them all the same size, it would look better.
-
do you mean a third post for the big one or as i’ve done on the little one?
do have a spare post if I need it. don’t want to overkill too much though!
Hugh
-
quote Hugh Potter:do you mean a third post for the big one or as i’ve done on the little one?
do have a spare post if I need it. don’t want to overkill too much though!
Hugh
Little sign Hugh.
If it’s a concern that the sign might be sat on kicked etc, then a third would be a good idea, but make them the same size ie, 3 x 125mm. -

If you put three posts in then set the two outside ones tomorrow, dig the hole for the third but concrete it in after you have fitted the sign. That way you won’t get in a muddle if one of the posts moves slightly.
John
-
that’s what I thought ya meant, though when I said might use 100mm posts I meant all three on it, may as well use the big’uns now I got them!
-

Hugh you could of run a nice capping piece along the top of the smaller one
with a bevel edge all round if you are concerned about it being sat on, stood on etc etc. -

are those wooden posts hugh?
i wouldn’t use wooden posts, look great for a bt but will warp and rot eventually.
remember its below the ground the water and stuff will penetrate first.Your also not doing our environment any favor’s with wooden posts, you Tree Murderer you! :yikes:
I wouldn’t put the posts right tight to the outside of the panel unless fully constructed and lowering into the hole in one go.
your going to leave yourself side open to the poles being out slightly other wise.come in at least a foot from either end of the sign.
rounding the corners of your panel can easily be done with a jigsaw with metal cutting blade and a file.the depths you have are about right, but as martin says use concrete on both small and large sign.
-

In any case it’s a good idea to form your footings as trenches running perpendicular to the face of the sign – rather like feet. Throw in any lengthy scrap[1] lengths sign trim (oops! is that a ‘green’ issue too? 🙂 ) to act as rebar too.
Chris’s Ashby diagram looks fairly realistic to me – especially if you do the footings as described above.
[1] price of scrap these days it may be more economical to buy steel rebar! 🙂
-
Hi Rob,
The school specified wooden posts as the area around has a large pergola type thing, I did explain the posts would prob only last a few years and they were ok with that (I have it in email writing!)
The sign was made / powder coated with radius corners but, being only 4ft from the ground and next to one of the footpaths, I’m concerned about kids bangin heads, even a radius corner can do some damage to a kid running into it with his forehead! I can’t go back further from the path as the chainlink fence is only a foot or so back.
re fitting the posts, my intention was to screw 4×1 across the faces to hold the posts in place while setting, I was more concerned about wind affecting it while setting – even if braced, though due to time this may be my option now.
devil and the deep blue eh!
-
Rob: just my way of doing it.
Lay the posts on the ground
Space them according to the width of your sign
Take two 4×1 (if this is what you have) and screw them across it (just as you have said) one at the top of the posts and the other down below where the bottom of the sign panel will be.
Make sure the tops are square to the framework (use 3/4/5 to square it).
Take another 4×1 and screw it diagonally (top-right to bottom-left or whatever) between the horizontal rails. One going each way would be better (second on the other side of the posts).Dig the holes
Stand the framework up in the holes
Plumb and level
Use some more 4×1 (if this is what you have – heavier would be better) and brace both posts – each way.
Pour the concrete -
 quote Robert Lambie:are those wooden posts hugh?
i wouldn’t use wooden posts, look great for a bt but will warp and rot eventually.
remember its below the ground the water and stuff will penetrate first.Your also not doing our environment any favor’s with wooden posts, you Tree Murderer you! :yikes:
http://www.postsaver.co.uk/postsaver_news.html
BTW less carbon footprint from a wooden post than a Steel/aluminum one 😀
-

Hugh,
Why not put a horizontal piece of timber along the back of the smaller sign instead of the extra post into the ground. There are numerous ways of joining it to the posts, depending on your carpentry skills or lack of them and you can make it up in your workshop ready to drop into the ground. I like the post treatment that Ian’s link goes to.Personally I wouldn’t worry too much about rot if the ground looks like it drains well, if it’s heavy clay then you could have problems in about 5 years.
Bear in mind you are only putting up relatively small signs so a bag of ‘Post Fix’ per post, from the local Wicks/B&Q will be more than adequate. Stand the posts on a pieces of brick/stone in the bottom of the holes before you pour the mix in that will allow any moisture that soaks down the edges of the posts to drain right past the bottom of the post
-
cheers guys.
I left the boys (my fencing neighbour and occasional subby) and my son to do the donkey work! they had the first two holes dug to 1m before I even left – easy with the right tools!! I just made it all look like a proper site, you know… cordoning of the working areas with warning tape, making sure they had their boots and hi vis on, liasing, etc etc!
I quite like this foreman lark, a man could get used to it!
anyways, two signs in the ground, two onto walls, nice n easy for them really.
Steve,
my ‘man’ said the same about some 4×2 across the back but, since the holes dug easily there was little point in making a special trip (again) to the merchants. i’ve left em with 8 bags of crete to do 5 holes so they’ll have plenty! -
Glad to hear it all seems to be going to plan. Nice to have someone to help with the digging, not a luxury I ever have which is why I would have avoided having the third post 😀
-
quote Hugh Potter:that’s how I intended to do it Neil.
thanks,
Hugh😀 😀 😀 Good stuff and I notice the job’s all but done now. A bit of a long winded reply, I know, but once I got started I didn’t know how to stop! 😀 😀 😀
Hope you got a decent day for it.
-

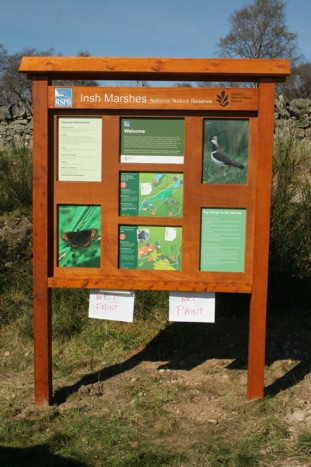
Bit late for advice but out of interest here is a frame I installed yesterday. Although the RSPB only specify the posts be in the ground 600mm I put them in 900mm with 2 bags of postcrete each. The recommended timber to be used is oak but these posts are Larch which is good for underground use as well. Doug
Attachments:

Log in to reply.