Home › Forums › Sign Making Discussions › Graphic Design Help › how do i blend the edge of photo onto the next one?
-
how do i blend the edge of photo onto the next one?
Posted by Dave Bruce on 7 September 2005 at 18:01I was wondering if you photoshop guys can help, I have a photo of a wall which needs to be printed on to vinyl to cover the length of a Transit(lower Section). As you can imagine I need to dublcate the picture to extend it to the length of the van, but you end up with lines at the joins as the stone work doesn’t match, are you following?
There must be a way I can blend the edge of one photo in to the next to reduce the line, how?
Cheers
Dave
Martin Grimmer replied 20 years, 1 month ago 8 Members · 10 Replies -
10 Replies
-

Why not incorporate a series of pillars in your design? Instead of a continous wall you could have a section of wall – then a stone pillar (slightly higher than the wall) then a section of wall again – repeated as often as needed. The “Pillar” would be the joining point of the repeat photograph. It shouldn’t be to difficult to mock up a stone pillar in a conventional art package 😀
-

ah. depends on how the photos were taken, i would take a picture with a tripod with the camera at a fixed distance from the wall and then move the camera to the next position and take another then stitch them together with layer fades in photoshop.
The secret is how you take the photographs, you can do trickery in photoshop but it is much easier to get the shots right.
-

Why not use the seamless background of a wall in photoshop.
Goop
-

Thanks Phil but this is a slate wall, you know like drystone type with top stones, but good thinking.
Cheers Dave, I was affraid someone was going to say that. The wall I photographed was not long enough for the van length which is why I only have a short section (the best bit of the wall). I could possibly go back and take a couple either side of the one I have and reduce the number of ‘joins’ on the print.
Thanks
Dave
-

I think I know what you are talking about Dave. What I do when I need to blend something like that together is to overlap the layers, then use the eraser tool with a low opacity setting and the clone stamp tool to either add or take-away from each layer. I suck at explaining what I mean. Sorry.
-Marek -

I do lots of photo editing and i usually clone it – from right next to what you want to cover up.
it’s called clone tool in corel photo paint. I’m sure it’s in photo shop, just not sure what it’s called.
After you’ve done it a few times it’s pretty quick.
I can do it for you if it’s small enough to email..Or, what merek said would work as well…. just erase the photo you’ve pasted on top after overlapping.
-

We’ve done a bunch of this stuff in the past for interpretive centres. Lots of great ways to proceed as mentioned above (cloning, etc). Depending on the images used you can sometimes reduce the effect of the join by working with layers in Photoshop and using layer masks to blend (toy with a gradient around the blend area). Doesn’t work with all subject material but worth your consideration.
There’s also a lot of software out there to stitch images together where they attempt to eliminate seem effects and lighting issues. Some of this stuff isn’t that expensive. Might not be worth it for this job depending on money but perhaps useful to consider for the future.
Good luck
Rob
-
folks, a demo is going to appear from me in the next few days… it uses RobGF method but the admin has reviewed it, might help figure out what you can do.
-
Thanks for the advice guys, when I get a mo I will try and figure it out.
Cheers
Dave
-

Dave,
you could try a photoshop plugin demo from flaming pear called tesselation – the demo is free for a couple of weeks after download I think and is not too expensive (http://www.flamingpear.com/tesselation.html).
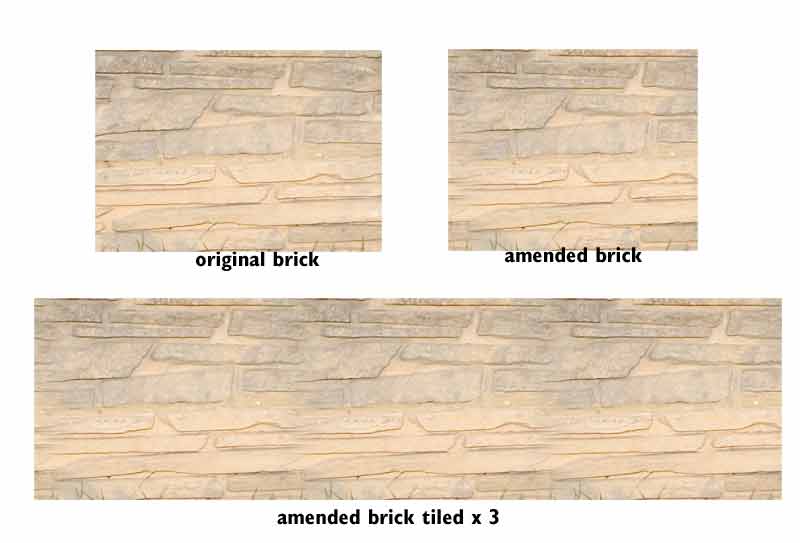
This does some of the blending for you (you can blend ends only – which is I guess what you need – or top and bottom as well). Its not always suitable but for repetitive and regular brickwork should hopefully be ok for your needs. You will need to select the area you want to copy, go to ‘filters’/flaming pear/tesselation and follow instructions etc., then join two or three copies of the altered ’tile’ together.
Will try to attach a picture to show you (perhaps not the best example as not too uniform and there are JPEG artifacts from reducing file size).
If you want me to have a go PM me the file and will try to get back this w/end.
Martin
Attachments:

Log in to reply.