Home › Forums › Sign Making Discussions › Vinyl › multi-colour layering chisel effect
-
multi-colour layering chisel effect
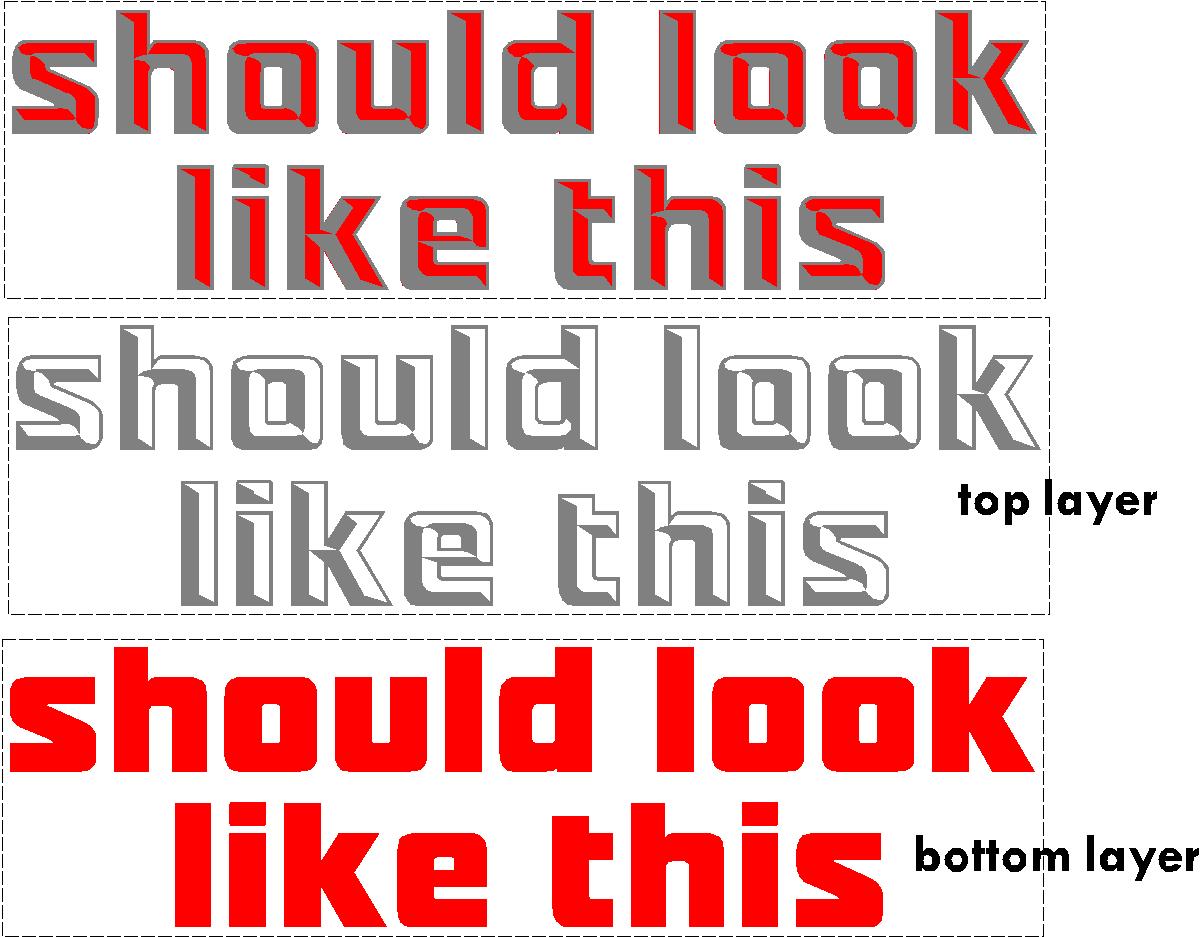
Posted by Peter Normington on 2 April 2005 at 21:17Not sure why you are using punched holes, I would use reg marks or the weed border, anyway it should look like this
Attachments:
 Robert Lambie replied 20 years, 8 months ago 9 Members · 14 Replies
 -
14 Replies
-

You don’t need any registration marks as registration marks apply to printing, in print you cannot physically move the colours around to obtain desired co-ordination.
Multi colour vinyl applying is very very simple, place your first base layer, then use clear application sheet and align wet for your other layers.
-
Peter – Thanks for you example, the font I am using is pre-made by ingram publishing. I was using the punched holes as per my design for alignment, have I done this incorrectly as you mention I should be using reg marks which I thought these were?
outline – I thought I could apply the second layer dry also??
Thanks
Nathan -
quote Nathan:outline – I thought I could apply the second layer dry also??
Thanks
NathanNever try and do multi colour vinyl work without application fluid, it’s too easy to make mistakes, first layer dry, all the rest wet, *slide ’em* into position, if you’re not happy peel it off quick, more fluid, re-align, depends on the close(ness) of the register, I did a two colour dry today, but it was a simple logo, anything else iseasier wet on the layers, (I peronally do multi layer dry, with no guides or marks but that only comes with years of experience) and a lot of vinyl in the bin from learning 😉
-
quote outline:You don’t need any registration marks as registration marks apply to printing, in print you cannot physically move the colours around to obtain desired co-ordination.
Multi colour vinyl applying is very very simple, place your first base layer, then use clear application sheet and align wet for your other layers.
Now thats not entirely true. I apply dry all the time using reg marks… tiny squares in two corners so I can line up each layer. Yes, registration marks are used in the CMYK printing process, but they work really well in multilayered vinyl signs.
Applying wet, brilliant for being able to move the graphics, but blimey you have to wait some time for the bugger to dry. And clear application tape… I could go on for hours, but I can’t stand the stuff. Personally I think the sign world in general would be a whole lot better off without it.
Cheers, Dewi
-

I think I know were your problem lays.
If you are using the ingram fonts, which I also use, dont use their “unchiseled” one for the first layer, they do not always line up. you must only use the chiseled version and and weld them yourself. I think ingram tell you this in the read me file on the disc.
Wet or dry with or without reg marks is only personal preference and experience, and shouldn’t Affect the final effect.
Peter -

I do mulit layered jobs all the time, applying 100% dry and using Politape clear application tape….never have problems. I guess we all have our methods. 🙂
I cut larger squares somtimes for help with alignment, but often find that different vinyls cut differently and that judging by eye is best, I have found differences in layer lengths on both sprocket and friction cutters, with sprocket it can vary depending on who’s converted the rolls and at what speed they have spooled them and there are diffrences to using friction cutters at times..
-
quote Peter Normington:I think I know were your problem lays.
If you are using the ingram fonts, which I also use, dont use their “unchiseled” one for the first layer, they do not always line up. you must only use the chiseled version and and weld them yourself. I think ingram tell you this in the read me file on the disc.
Wet or dry with or without reg marks is only personal preference and experience, and shouldn’t Affect the final effect.
PeterI can’t find any info on this in the “read me” file of the fonts and I don’t quite follow what I should be doing regarding the design reading the above. Any chance you could explain it again to me Peter.
Thanks
Nathan -
The race fonts from ingram consist of two sets, one plain and one chiseled.
The plain font looks the same, but the spacing may be different.
In effect if you place the chiseled version on top of the plain one they do not always line up.
If you need a 2 colour version yo need to place the chiseled font on the background colour and weld it.
Hope this makes sense.
if not post the actual file, or words you are using an I will draw it for you.
Peter -

thats hard work if thats how ingram intended it to be used its got alignment problems all over it – i have altered file to how i would do it
chris
-
In just dug out the disc, and there are some pdf files in the samples diectory explaning how to do it
Peter -
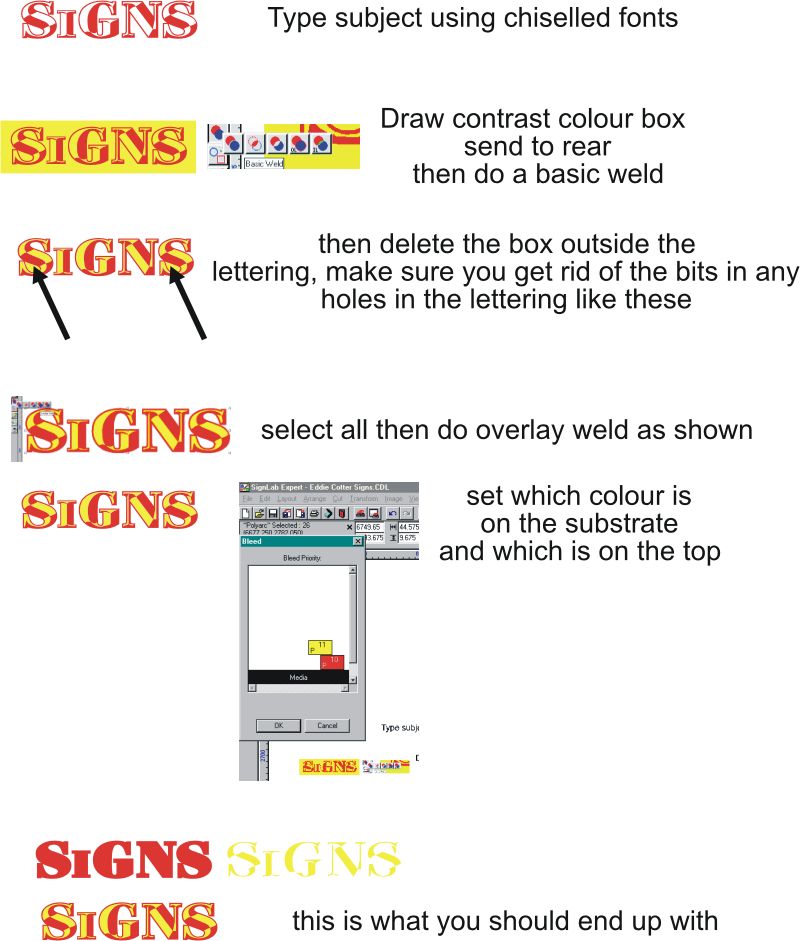
Okay I’ve now managed to cut and apply the affect successfully, not sure if I’m going round the houses but here’s how I did it.
Selected a chisel font as my background and converted it into curves and broke the curve apart.
Placed a non-chisel font on top of the chisel font.
Then selected the background pieces and piece by piece deleted them as appropriate or placed them on top of the non-chisel font.
-

if i have a difficult multi-layer job to do i use a registration line.
works same as a reg mark but i find it better, self preference maybe.
basically when you complete your artwork create a solid line about half an inch and run it the exact width of your graphic & sit it a couple of mill below graphic. when you cut one colour the line should be included, when you cut next one, the line should be included and so on.
when you come to apply line the line up only and the rest will fit together perfectly. in the past i have found registration marks to fall off app tape and sometimes you get say… one reg at one side of a wide graphic lined up then get the other side lined up but you find in the middle it has risen so is slightly out of line. a line helps keep it constantly straight.also, anything, no matter how large can be applied dry! its just down to capability and confidence. if wrapping and lots of vinyl work is were you want to head with your business, then starting to apply dry now (only when you can) is the way to go.

Log in to reply.