Home › Forums › Sign Making Discussions › Gallery › Window Graphics: Sunny days
-
Window Graphics: Sunny days
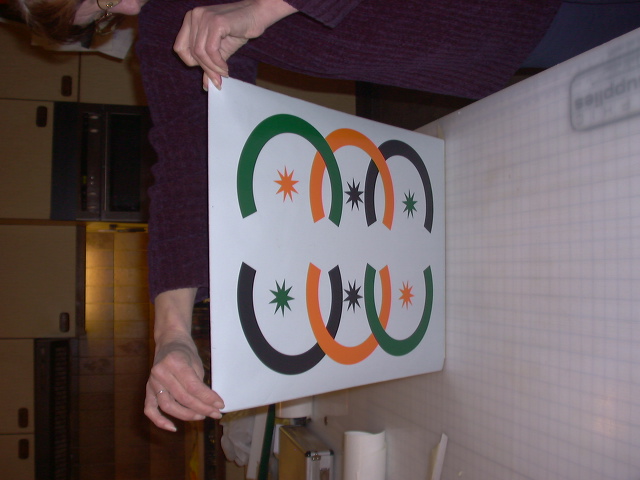
Posted by Bill Dewison on 26 February 2005 at 17:37Finished another window graphic today so I thought I’d post it up. All 751 vinyl, took 6 hours to fit it all (Don’t know where the time went, I didn’t stop once! 😮 )
Above the leaflets bit on the right hand side window there is an LED display thingy being installed, and I think I’m backing the doorway glass in blue vinyl as well, so there’s still a bit to do. Inbetween the top and bottom graphics in the middle three windows will be suspended plastic holders for property info and stuff like that, so it should look quite good when thats all in.
Anyway, I’m shattered now, so like a true northern jessie, I’m going for a beer 😀
Cheers, Dewi
Attachments:
 Mark S replied 20 years, 3 months ago 21 Members · 43 Replies
 -
43 Replies
-

Looks really nice Dewi. Have a beer for me as well, I’m stuck at work!
-Marek -

Lovely, lovely peice of work again, Dewi. Is it a combo of printed and plain vinyl.
Are you putting the LED thingy in or not. Post another when its all in.
Regards
Lee -

Thnaks guys 😀 Its all cut vinyl Lee. I’m not sure whetehr or not I’m putting the LED thingy ma jig in yet, I’ve seen it in action and it just scrolls red text across it. I’ll post another pic when I’ve done some more though 😀
Cheers, Dewi
-

dewi what can i say yet another fine pice of work 😉
-
OK. How did you do it then …..both CJ and I would love to know…….
-
It looks more complicated than it actually is. I start off with a design, no different to how you’d design a small sign. I enlarge it to fit the window space, then create 590mm width boxes across the design. Then it’s sliced up into 590mm x whatever length so it will fit my plotter, mirrored so it will fit to the inside of the window.
Once I’m onsite, I have a layout doc, which is a printout of the design with measurements. I’ve used templates attached to the window and registration marks in the past, but with this being a simple design, I got away with measurements. Each 590mm width of vinyl is applied, with the next in line overlapping by a couple of mil, kind of like hanging wallpaper.
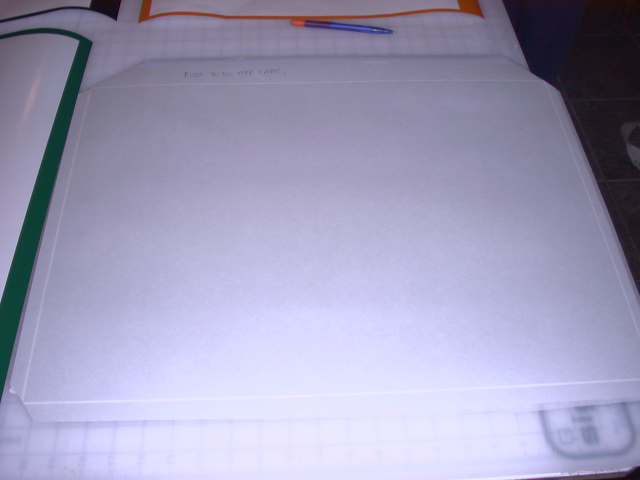
Thats about it. I took Peter’s advice and attempted to lay up in the workshop before I left for site, but I only managed the white and green on one sheet. To overlay the other colours would have taken far longer in the workshop than onsite, so I just taped then up and took them with me.
Cheers, Dewi
-

nice one mate, you do know your gonna get a great rep for vinyl window displays! 😉 one after the other they are coming and all different.
nice one mate, windows are never easy but do look good when complete.thanks for the taking the time to post mate 😀
-

clever work Dewi
always good to see something different done in vinyl.master craftsman!
regards
kevin
-

Nice work Dewi!
I’ve never actually seen this much layout on a window, and I must say it’s impressive.When you have this much vinyl covering glass don’t you have to worry about the glass breaking due to such heavy coverage?
very nice work
-

nice one dewi, a++
still think its quicker to lay up in the workshop, and saves on materials.
and time on site.
peter -

That’s bloody marvelous matey.
I really like the villa type thingy. What about the bit that says ‘£49’? Is that behind/under the blue? I hope they don’t change the prices, or maybe it would be good if they did. You could charge all over again!
Soft southerner.
-

Well done agin Dewi.
Full displays like that are very rare over here too. You have done well. As Rob says, you’ll be the resident expert here.
Cheers
-
Thank you 😀 I’m not sure I could be classed as an expert, but I do enjoy doing the window graphics and the more examples I have, the easier it is to sell them to new customers, so hopefully I’ll get to do many more.
Leigh, not overly sure about the weight issue. I’ve applied alot of vinyl to windows, full coverage and multi-layered, but the vast majority of shop windows are laminated glass (for insurance & safety I think) so its doubtful it would break. Anyone ever come across a problem with windows & vinyl?
Peter, I tried mate, I really did. When I overlay each layer onto the backing paper of the first colour, the problem arises when I come to take the app tape off. With small vinyl pieces everywhere (which alot of my designs tend to have) the app tape lifts the vinyl off the backing paper. I’ve managed 2, maybe 3 colours, but to manage everything and overlay the black would be virtually impossible in my opinion. Then there is the lining up issue once I’m onsite, I can’t see from outside because of the backing tape and I can’t see from the inside because of the black. Any advice on achieving this would be appreciated, I just can’t see how its possible though 😕 Apart from doing it wet, but then I’d be onsite even longer 🙁
Big G, you’re right, if he needs price changes the blue layer will have to be removed. After saying that I think his prices will stay the same for 12 months or so, which is about the time he’ll probably want a new graphic anyway as he already had a graphic before that had a palm tree type thing on it.
Next time I do a full window (which I think will be in about 2-3 weeks) I’ll have to take some piccies as I’m going along. I’m usually that busy applying the stuff I don’t think about taking photos of each stage 😳 You get some funny looks when you’re applying stuff like this though, as it looks pretty weird until you have all the colours in. Just wish I’d spent more time design the ‘Spanish Property’ bit as it looks a bit weird to me 😕
Cheers, Dewi
-

Are you applying this to the inside Dewi with the glue side showing outwards and if so does it look alright then?
Goop
-
Yep, its all applied to the inside. You tend to find that you have to go over certain areas a few times with the felt, but if you’ve applied it evenly, it looks pretty much as if you’d applied it on the outside (less glossy though) Usually the glass does alter the colour a little, as opposed to say applying to foamboard. I’ve made mistakes in the past, not noticing that someone’s glass has a slight tint, and this has a drastic effect on colours, dulling them silly. 🙁
Cheers, Dewi
-

Nice job dewi!! 😛 looks great and i like the villa looks right spanishey!! 😀
quote Dewi:Anyone ever come across a problem with windows & vinyl?yes i have dewi, had to quote for a solicitors building there was around 40 big windows, vinyl was to cover all the glass, which i noticed was very old 😕 i explained to the customer there might be a chance that the windows will crack…he did not take any notice and ended up getting a homer done on the cheap……….yes and guess what happened the windows all cracked 🙄 the customer even had the cheek to ask me what to do!! 😮 and could i do something with them….i told him get the guy who done the job to do it… 😉
nik
-
Dewi, I use a table frame with a table top of opal perspex and a couple of fluro lights underneath, that shine up thru the perspex.
This allows you to see thru the various layers giving you the opportunity to lay them over each other.
If you use the 7725 material with the clear plastic backing, you can use water on each layer. Finally, if you use a low tack, or reusable application tape, this makes getting the tape off between each layer easier.
Don’t know if I have explained this that well, but I hope you get the general idea.
Cheers
-
quote dsi:I use a table frame with a table top of opal perspex and a couple of fluro lights underneath, that shine up thru the perspex.
This allows you to see thru the various layers giving you the opportunity to lay them over each other.
If you use the 7725 material with the clear plastic backing, you can use water on each layer. Finally, if you use a low tack, or reusable application tape, this makes getting the tape off between each layer easier.
Blimey Shane, you’re a dark horse! They are fantastic solutions to this type of work! 😀 I haven’t come across the vinyl with the clear backing, its a real shame that all vinyl isn’t made with it, but I’ll be looking into it now. I love the table frame, even with paper backed vinyl it would work brilliantly! Not overly keen on using water, but I’ll give anything a try if it makes the job move along at a faster pace 😀 Thanks again for the help! 😀
Cheers, Dewi
-
dewiwrote
quote :Peter, I tried mate, I really did. When I overlay each layer onto the backing paper of the first colour, the problem arises when I come to take the app tape off. With small vinyl pieces everywhere (which alot of my designs tend to have) the app tape lifts the vinyl off the backing paper. I’ve managed 2, maybe 3 colours, but to manage everything and overlay the black would be virtually impossible in my opinionDewi
the vynil is supposed to come off the backing paper, this is then laid down onto the next layer. You cant remove the app tape then apply a layer. the app tape you only use once and build it up a layer at a time, will post a few picture soon to give you a better idea of what i’m blabbing on about
Peter -

I Do a similar thing to Shane but I just use my office window.
There is usually enough light comming through the window to line up two or three layers.
Each layer of app tape has a longer hinge than the one before so when it comes to fitting you just hinge the top layers up out of the way apply layer one, remove the app tape, apply layer two etc
I don’t know if this even makes sense to me now
Paul R(Mackerelbus Design)
-
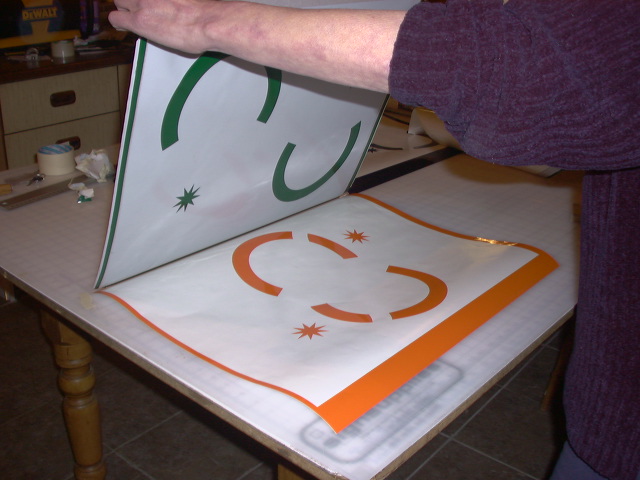
picture of how I do it, should be self explanatory, but can only post two at a time
Fist pic is just the white lood coat within the weed border.
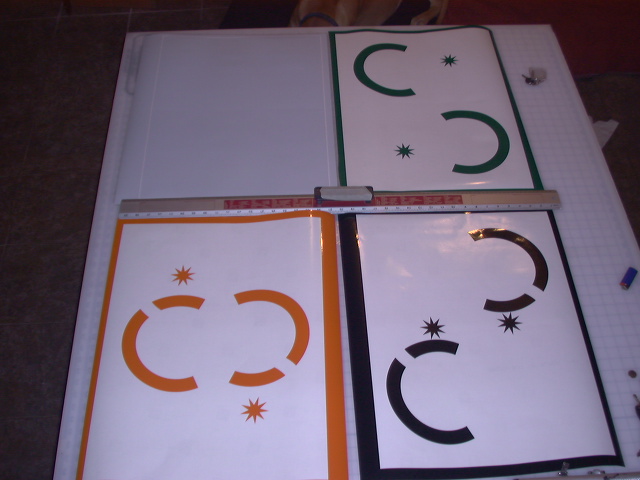
Second pic is the 3 other layers weeded withe the same border
Attachments:
-
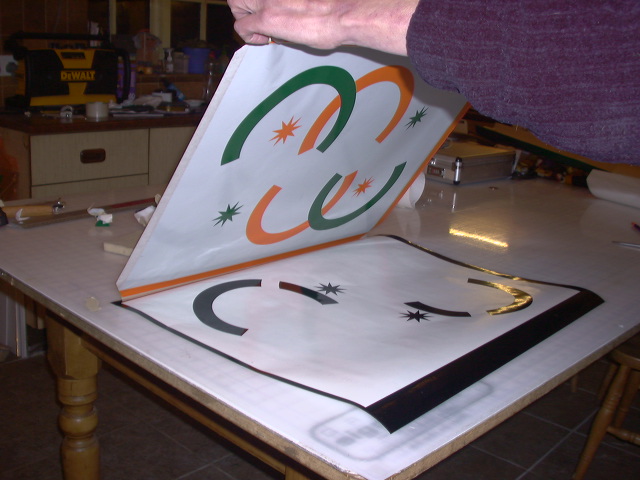
next 2
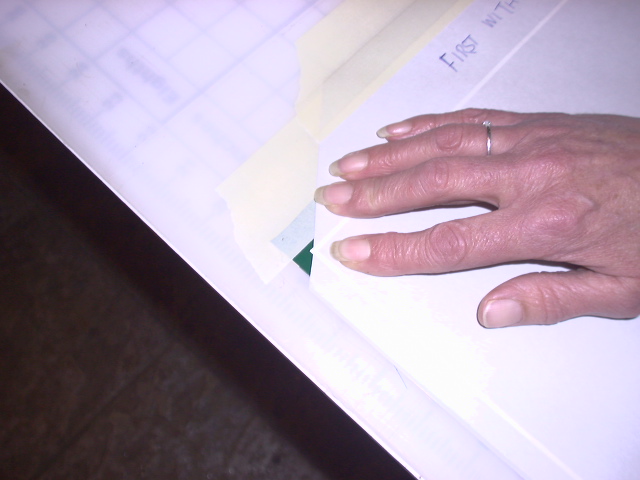
The white has app tape applied and the corners nipped of to align with the nect layer, taped with a hinge, and then the backing is removed.
Fist 2 layers are then combined. Process then repeated for nect layer
Attachments:
-
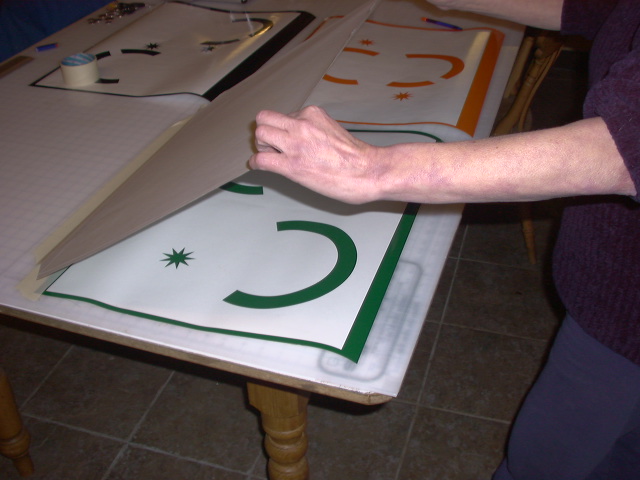
ready for application adhesive side down, backing paper removed
Attachments:
-
No reg marks or light box, just a border round the whole lot.
Small bits can be put on as needed directly onto the backing paper in the correct position before starting the process. the last/first layer, in this case a flood coat could be put on the window after if to large to do in the shop.
Hope this helps
Peter -
Thats exactly how I do single layered and multilayered vinyls when I want to lay them up for site. The problem I encounter is I use alot of individual small pieces, then they’re backed with black, then usually white and its all done in reverse for application to the insides of a window. The initial layers are laid side by side, similar to your pictures, but when it comes to the overlaying colours that outline the first layer once in the window, I can’t see what I’m doing and even reg marks don’t guarentee I line up perfectly. I like the windows I do to look good closeup as well as from a distance, so registration is something I spend alot of time on, possibly why it takes me so long as well. 😕
Do you use a low tack tape to do that Peter or standard application tape? I use the standard Orafol tape from Europoint, a paper tape with a medium tack, maybe thats where the problem is coming from. I can’t stand using the clear plasticy tape, its aweful to work with for me and the felt just slides round on it when I’m applying… horrible 🙁
Main difference between our techniques is I use reg marks alot, usually huge ones as the old eyesight is letting me down alot.
Thank you for taking the time to post those up though Peter, you’ve done some work there to put that together!
Cheers, Dewi
-

Dewi, thought you were squinting the other day when i came round, was sure if you’de trapped a nerve or something 😉 Thanks for the vinyls though, yorra gud un.
Mark. 😉
-
:lol1: :lol1: I was squinting a bit, I get motion blur sometimes when I’m working in Corel :lol1:
You’re welcome mate, more than happy to help out any time and you even made my coffee drinkable!! 😮 Miracle worker, you can come again! 😀
Cheers, Dewi
-

A bit late I know, but that is top notch.
Are you vectorising your own images or have you got a superduper
clipart cd your not telling us about. If its the former I really like you style.Keep it up, Pete
-
Great work there Drew,
I think i would have had a beer before i started on that Job.
Not that confident as of yet, But just shows what can be achieved 😀Following on from Peter’s Demo.
quote Peter Normington:picture of how I do it, should be self explanatory, but can only post two at a time
Pete I’ve been looking and scratching my head for ages trying to get around this picture?
What’s puzzling me is?
Is the App Tape coming down on the next Layer?
If so that begins to make sense?
If not can you explain a little more, as your making it look so easy.———–
I have just done a 4 Layer but i stuck the App Tape down on the table,
sticky side up, and brought the vinyl layers down to it.
So i was looking at the backing when rolling out (Bubbles).
It worked, but a little out on one layer 🙁I’m trying to find a method I’m going to be more comfortable with.
Hopefully seeing that Pete has no problems,
it may rub off on me to?Thanks in advance.
Mark
-

i prefer to layer before i go out, tho for big stuff i usually layer on site, when i build the bench in the shed i’ll be (somehow) buying a thick glass top for the 12ft (x3’6″) length of it, then i’m gonna install lights all along underneath it so i can use it as a light bench, this will help loads !
the main trouble i find at present with layering at home, is that my table top is not perfectly flat, and i end up with bubbles here and there, i usually lay the first layer of vinyl down, and tape it to the table, then each layer thereafter is seperately taped and layered, usually wet as i cant see thru with the backing on, grrrrr,
Dewi, the image of the villa is brilliant, as someone above mentioned, did you draw yourself or did you have it on a disc ? really need to learn how to draw better, or at least use corel 12 better ! image design is my real weak point as i have no past design experience with any of the usual design suites, i’m also a little confused as to how you’d have layered that from the inside ! unless using very large reg marks ! tho i read you just measured sections ?
really like it !
you’re lucky i cant pm or mail ya …. i’d be bending yer ear now !
-
I’ll try to explain a little better, sorry if the pictures were not very clear.
This was done to demo for vinyl to be applied to a window, on the inside. the first pic you posted is in effect the last layer, from the glass outward.It is just an oblong of white, to which all the rest will be layered.
only one piece of app tape is used. Dont know if this explanation will make sense but…Treat the backing paper as the substrata (whatever the vinyl will be applied to) then its much the same as robs demo, you just keep adding layers. And then the final layer is put on the van/plastic/whatever. Hope this makes sense.
Peter -
No sorry just read my own post and it dosnt make sense. Its like asking a centipede how it walks, I just do it without thinking, Sorry will try and put it in better words, or perhaps do a vid?
Peter -
hi Pete, afraid i cant see Robs video as i’m not paid up yet 😥
i can se the principle/theory of what you’re doing, it looks pretty simple when the graphics are fairly well spaced like they are,
what i think i’m trying to say is….
when i layer, depending on neccesity, i’ll often use a large ‘contour’ behind each upper layer, so as to avoid unsightly ridges on the upper layers, i can see that my method will not always be applicable, and unless i see how dewi built up the villa, i’m still no wiser as to how to build up a larger image in reverse, either o the glass or on the bench, i would feel the need to use outlines rather than layers to achieve the same thing that dewi has here !
damn, confusing myself now !
-
Layers are usually better than as you say”outlines” When vinyl is but joined it can and does shrink, leaving gaps, and if you over lap or bleed onto the adjoining colour you can get an unsightly line, and colour change, especialy between light and dark shades, if this makes sense
peter -
The top line is my prefered method if you see what I meen
there is less chance of problems if the registration is slightly out.
The bottom line can risk a gap between the layers. -
yes Pete, it makes perfect sense ! that was why i was saying i like to make a full layer for each errr…layer !
-
Go on Drag on, you know you should, and trust me, its well worth the beer money, hand over about .00001% of your turnover to the boards.
You will get the benefits.
Peter -
Cheers Pete,
Its all making sense now.If i just treat the Hinge Layer in the picture as the app tape
i should get there 🙂Thanks for sharing…
I can share Bubbles and Creases if anyone intrested lol…
Thanks again.
But its now a useful demo if i need to stick on the inside of a window too 🙂
Mark

Log in to reply.