Creating Badges

Andy’s recent “badge” submission prompted me to “port” this post here from the site it was originally posted on. The posts were originally done over a three-week time with each its own new entry. I’m still keeping it as three separate submissions, just combining it under one unified post. The thought was posting it here may be beneficial to someone. After looking at the poll regarding software used, maybe this will apply to just one person. Hope some others enjoy it anyway.
*** There may be some tools or settings used that do not look familiar to you. I’ll attempt to review most items, however, some explanations may be overlooked. For further clarification immediately, use the help file included within GA or Omega by pressing [F1] in Composer or Plot. For a delayed response, please post a follow-up question below. All screenshots are from Omega 1.54 as well as any menu commands. Most items described are achievable within GA, however, hotkeys or menus may differ slightly. ***
This is the first in a multi-part “article-like” posting. Covered here will be using AutoText and AutoNumber. The next post will cover sending multiple jobs or selections to the Edge to print as “one” file. For this example, we’re going to use serialized numbered name badges with a logo. The picture below represents how the end product should look.
After having the design or concept established, we will utilize some of the tools within the software to reduce the efforts required to produce such an item. If the customer can provide a text document with the names, you’re done that much quicker. Plus, correct spelling can now be their responsibility since you will be utilizing the provided data file. By utilizing the AutoText and Auto Number feature, you can have some of this technology work for you in place of working so hard yourself.
Scan the text document for the longest name to be used. This will help to establish proper kerning and forced length settings. In our example, this name will be “Whipper Snapper”. Place this name within the design and adjust all text properties to reflect how you want the name laid out.
The picture below reflects a forced length of 115% and a character spacing value of –25.
Repeat this process for the AutoNumber area of the badge as well. Type in the widest number that will be used; in our example, this is “0A6ZE000”. All text properties will be set off of this number in a similar fashion to the text operation done above.
By default, AutoText is “keyed” to the “&” while AutoNumber is represented by “#”. These symbols, when used in conjunction with the “auto” features, signals to the software that additional information is going to be required and that “it” will have to perform some additional functions. So now it is time to place these “keys” within the text areas. First item to address will be the text entry representing the names. Double clicking on the text will open the text entry dialog box. Each line of text needs to be represented with the “&” symbol and line number. We are now going to edit the text area to reflect the following; line one will have “&1” and line two “&2”. It’s important to verify that all existing settings remain the same as they did before editing; font, size, spacing, etc. This will assure that all the badges will have a uniform look that was determined earlier.
The badge pictured below reflects the changes made.
The first five digits in the serial number will remain constant; only the last three digits will change in our badge sample (000). In order to accomplish this, modifications will need to be made to the existing number entry and an additional text entry will need to be made that will contain the “#1” value to signify an AutoNumber function. Before making the modifications, place a vertical guideline on the left edge of the first “zero” that will be used in the AutoNumber feature. This will verify the proper placement of the new information that will be entered.
Double click the serial number to access the text entry dialogue box. Edit the data to reflect “0A6ZE” only by deleting “000” from the string. Verify that all settings return to the same values BEFORE the edit. (In this case, Force Length % needed to be adjusted back to 170) Now, create a new text entry. The properties should reflect the same values as those from the “0A6ZE”.
Some justification will be needed after placing this entry in the design. In our sample badge, centred vertical justification was applied to the existing number sequence. The last item was to align it with the guideline that was placed earlier.
Here is what our sample badge looks like in colour at this point.
It is important to have all the fills, cut lines, and other “objects” set for actual production before advancing on with AutoText or numbering. Although it is possible to assign these values after the fact, it defeats the productivity gained by using these automated tools.
Let’s look at some of the options available within the Repeats/Merge dialogue box (found under the tools drop-down menu). The first tab displayed by default is Repeats. From this tab, such items as the number of repeats, spacing between repeats, and layout of repeats are set. There is also an area informing of the overall height, width, and total area of the repeats.
Take a moment to see how the layout can be affected depending upon what options are selected. Understanding what control you have here can be a real asset when doing some advanced repeat work. Note what direction the information flows with the corresponding options checked.
The second tab is Text Merge. This is where you assign, create, or edit data files to be merged. After a properly formatted data file has been selected, some vital statistics are displayed within this area as well. Perhaps the most important information displayed are the number of records found and the line count per record. In our sample badge project, we are doing a total of eight badges with each containing two lines of the test; first and last name.
If the information displayed does not correspond with what you believe it needs to be, stop and correct it now. Of particular interest will be number of records and lines per record. If this information is not correct here, it will not work correctly later; stop and fix the problem now.
A few formatting rules need to be followed in order to be properly acknowledged as a viable data file. First item the data file needs to have is the number of lines per record followed by a carriage return. Next item is the data itself. If each record contains two lines of data, be sure to include both lines. An empty line can be a placeholder if only one line of data is required for a particular record with the file. It important that that empty line be inserted, otherwise it will mismatch the line records with each record. The last item from a formatting standpoint is an empty line placed at the end of the data file. This informs the software that this is indeed the end of the data file. The picture bellow shows our properly formatted data file for our sample badges.
Earlier it was mentioned that by default, AutoText is keyed by “&” and AutoNumber by “#”. The next tab within the Repeats/Merge dialog box is Options. Here is where alternative symbols can be assigned to “key” the auto functions.
Last tab is AutoNumber. In this area up to two AutoNumber functions can be set at once. Enter the starting value number and increment value on the left side. The ending value will be automatically displayed based upon those settings and the amount of repeats entered. Formatting of the numbers is set on the right side of this dialog box. For a brief visual review of formatting options check out a past thread titled Autonumber in Omega.
AutoNumber can be a great time savor in most instances just as AutoText. How about those instances where there are non-sequential numbers required in a job, say perhaps 1,5, 9, 10, 12, 16, and 20; AutoNumbering cannot achieve those results. AutoText is not limited to just text entry and can be used with numerical values as well. Using an external spreadsheet program like Excel or similar can be used to generate these non-sequential numbers then saved out as a text file. Again, the final text file will need to be properly formatted for proper use.
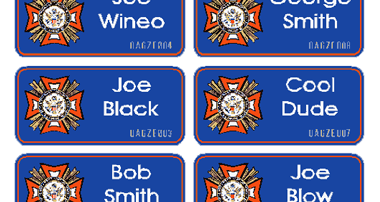
After accepting all the values input in the Merge/Repeat dialog box, our eight sample badges look like the following.
Becoming familiar with both “auto” functions can be a real productivity tool in addition to a revenue generator. Another competitive advantage to those shops that use these tools over those that don’t. Hope this will encourage a few people to experiment on their own. Again, look in the Help section for additional details or further explanation on most of the items reviewed above.
The next post will probably help those still using Graphix Advantage more than Omega users, as it addresses some ways to overcome “object” limitations that can become apparent when doing jobs like this.