Creating 3D Acrylic Letters

Material selection
To keep things simple, we will be using a CAST acrylic in 3 or 5 mm thickness. (Extruded Acrylics are not really suited to fabricating letters)
Cast Acrylic has excellent forming properties for building up 3-dimensional lettering with the added bonus that if you get it wrong you can throw the return back in the oven and start again as the material will return to its flat piece form.
I tend to use 3mm on smaller letters say up to 350 to 450mm in height and 5mm on anything bigger going up to 6mm on the biggest of things
When you have mastered the basic techniques using cast acrylics, you may want to experiment using different materials i.e., Foamex, Polycarbonate or Patterned Acrylics
For bonding the returns to the letter face, I prefer to use “Dichloromethane”, which is a thin watery chemical, applied using a small brush to the joint, It chemically welds the acrylic together.
I finish of running around the joints with Tensol 70 which is a two pack acrylic glue that sets hard and strengthens and seals the joint.
I usually finish off the letter with a foamex or Polycarbonate back depending on if it is illuminated or not.


Equipment
You will need to have some basic hand tools, some workshop machinery as well as an oven (the one you have at home will work if you’re just having a go, but i would ask the wife first!) you will also need to bend the strips using a heat gun to get them in the oven.
To cover the basics you will need:-
– Engineers steel square and scriber
– ½ round hand file
-Hammer
– Hand drill
– Table saw ( to cut the lengths/returns into strips) unless your acrylic distributor will cut them into strips for you.
– A sander
– Polishing wheel to mitre the joints
– A bandsaw
– Line bender
A good Sturdy bench! [
[
Fan Assisted Oven
We have a custom-built oven approx. 2500mm x700mm x 700 with two pull-out shelves and centrally split doors, it has a working temperature from 60 deg up to 210 deg, is fan assisted, and thermostatically controlled it cost around £2500.00 but quickly paid for itself within a few jobs, it also comes in handy for stove enamelling, drying and cooking pizzas on late nights in the workshop
First of all, take your letter face and spin it over so you are looking at it in reverse, look at it and decide where you are going to break it up into individual pieces (returns).

Have a look at this sketch of the letter R, the red lines indicate all the separate pieces which join together to make up the letter. It’s a process that you will get used to doing and as you do more it will become second nature to you

I always try to bend angles like this on the line bender as it saves a lot of time, especially on long run jobs where there are a lot of repeat letters, all the other straights and angles are mitred using the sanding wheel and my judgement but don’t worry if you have to mark off the angle on the sander table for now as you’ll soon be able to do it by eye
Curves
Basic curves: – When I’m at the stage where I’m ready for bending the curved segments of the letter, there are what I call ‘inside & outside’ curves (inside & outside referring to where the nails or formers will go.Not to the actual external and internal curved parts of the letter, i.e. outside of an ‘O’ or middle of an ‘O’
If we take a look at the following letters you will see where the ‘inner’ and ‘outer’ curves get their names as the nails are placed both inside and outside the physical perimeter of the letter as in diagram 3, you will also see that the letter ‘S’ has both types of curve on the same edge
If you look closely at the letter O, you will see that i do not complete the full perimeter with nails, this is because i usually do these in 2 pieces and join the returns at a place that the eye will not see


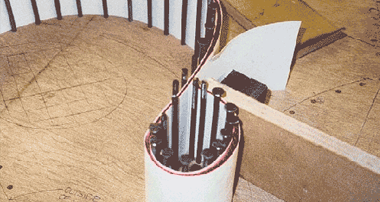
Inside curves:- When you are marking up for an inside curve, draw the section you need (not forgetting to do this in reverse) and extend the line of the curve approx. 30mm on each end to give you a bit of material to play with, using the metal guide , note that the guide has two lines marked on it, one is 3mm away from the edge and the other is 5mm away, these marks indicate the thickness of the material you are using and they also act as a guide when your punching the wood on inside curves as you need to take into account the material thickness, take a nail and lightly punch the wood at regular intervals carefully following the curve, when you have completed this, drill a hole using a bit which is slightly smaller in diameter than the nail you are going to use, being careful to be very accurate and upright, when you have done all the holes take your nails and knock them in just until there stiff to a slight prod with a finger, again using the metal block as a guide to keep them upright, when there all in just run you’re eye along the top of the nails to make sure you have a nice even curve, make any adjustments you need to then take 2 strips of paper, usually the same width as your acrylic strip and place them round the nails

Mark up the length of acrylic you need and place it in the oven to heat, gloves on and get ready to do you’re first bend, when the acrylic is ready, working quickly place the return between the strips of paper and smooth round the return using blocks of wood as shown, as the acrylic starts to become stiff place the weights to hold everything and wait until the acrylic has cooled enough before you move it and there you have you’re first bend.

Outside curves :-Remembering that you don’t need to allow for material thickness on these curves, apply the same methods as above and you’ll soon have all the bends needed to complete a letter

Now lets just complicate things a bit by introducing a letter ‘g’, you will see that this letter has both types of curve on the same edge, switching from an ‘outer’ curve to an ‘inner’ curve usually on the flatish part of the curve. Now you can choose to do the curve in two bits or if you’re feeling brave, try it in one piece, have a look at the photo above and you will see where you have to place the nails and the point at which they switch from an ‘outside’ to an ‘inside’ curve, at this point all you have to do is feed the acrylic through and smooth in both directions (you may need a third hand for this) then weight up and leave to cool

Straights
These should be pretty self explanatory by now, just mark up a length of acrylic as needed, scribe a vertical line on it and mitre the joint to the angle needed, I do this always on the sanding wheel but it does take some practice to get them right all the time, I usually do all the big pieces first on all the letters then fill in with the smaller fiddly pieces at the end.
There you have the basic methods used for building letters up, play with the ideas and tweak them to suit you’re own needs and you should be able to bend any shape you come across.

Jointing and bonding
As mentioned before the two glues commonly used here in the UK are dichloromethane (DCM) and Tensol 70’s.
DCM is a very thin liquid and is best applied by using a small artists sable brush (as it melts nylon), load up the brush and simply run it along the joint you wish to bond, hold for a brief period say 20 – 30 secs and the bond should be strong enough to hold there on its own ( if it doesn’t hold just hang on a little bit longer)
Have a go using 2 pieces of clear at 90 degs to each other and watch how capillary action sucks the glue into the joint, glue all your letters like this first then run a bead of Tensol 70 (which is a 2 part acrylic glue) all round the inside of the joint, blob the top of any vertical joints and let the glue run down, this gives you strong and more importantly fully sealed joints
Its also a good indicator if you ever buy channel letters, if there not done like this then there not done right !!!!!

Finishing
I finish off most of my letters by trimming the face of them flush to the return by using a router with a bearing guided cutter inserted in it,

( you have to have good accurate returns or the letter face will take the shape of your dodgy returns)
If necessary use a small buffing wheel over the joints to shine them up, especially if you have had to fill in a joint using powdered acrylic.
Important Tip
Do you get gaps between your joints?
Well don’t panic, take a piece of return to the sanding wheel and sand it to give you a fine powder
Scoop up the powder and move back to your letter, take some of the dust and rub it into the joint, clear excess powder and lightly run a dichloromethane-filled brush over the remaining powder in the gap. Instantly turning the powder into acrylic and eliminating the gap.
Works well if you are inlaying letters into a panel as well
Feel free to repeat as many times as you need to then buff up the joint if necessary
Well, that’s all there is to make your first set of built-up acrylic lettering, just remember that preparation is the key, get your nails right and the rest will follow. Don’t be afraid to play with different thicknesses and materials to get used to all the various working temperatures and methods that you will need to learn, and a final word ‘Rome wasn’t built in a day, neither will your first set of letters be!
Apply these methods to your imagination and you can build up panels, hanging signs and all sorts of shapes !!!!!!
Paul Davenport….


Responses