Sign Carving in Progress

Sign Carving in Progress
Software used:
CorelDraw
Photopaint
Signlab
Components:
4x8x2″ HDU,
2x4x1″ HDU,
23.5 gold leaf,
dark green smalts,
Luminore brushable copper. (real copper),
3/4 marine grade plywood for a backer of HDU.
West epoxy system.
Picture 1
Design of the last draft…

Picture 2
Last draft with effects added…

Picture 3
Last draft with effects and laid over onsite photo of clients location.

Picture 4
2″ HDU 15 lb. 4’x8’

Picture 5
Red arrows indicate the outside perimeter of the design being cut out of the sandblast material. There were 3 panels of material for the layout. I have a 24″ plotter limitation. You have to do a little hand trimming to get the patterns to “butt” each other.

Picture 6
Four different panels for this project are ready for sandblasting. Notice that I’ll wait to cut the contour of the panel after it’s been blasted. It’s just easier to set still on this design. All the white area is primer as I was taught to prime for better adhesion of the sandblast material. So, after blasting then, all the white area will be removed and therefore relieved. Displayed are the main panel with the “Cupola, open to the public”. I also made a small sample sign for my shop at the same time.

Picture 7
Here I used clear masking material for a template of the letters that will be glued to the main panel. This is 1″ HDU 15 lb.

Picture 8
Outlining the letters for preparation for the scroll saw. After tracing around them I removed the mask.

Picture 9
I used a variable speed scroll saw to cut out these letters that will later be glued to the main panel.

Picture 10
The rough cut letters…

Picture 11
I used a 1/2″ router bit to round over the edges and give me a pattern to finish by hand the rest of the letters. You can only get so far down with the router bit and will have to finish by hand doing it this way.

Picture 12
The Cupola is made from 1″ HDU 15 lb. which will be glued to the main panel. Here we are simply cutting louvres in it. It had been to the sandblaster to do the window area.

Picture 13
This is showing the main panel with appliques showing the outline area of the main copy and how it was done. The Cupola area was a bit tricky to see what I needed to do. I wanted it to all be on one flat surface and had to think about how to design and weed the mask…

Picture 14
Here is everything in primer ready for the finishing stage…

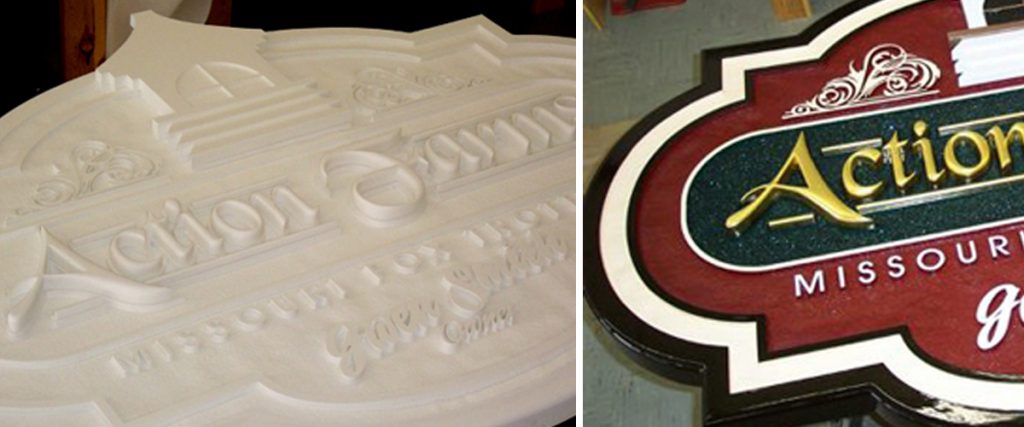
Picture 15
And the finished product of a sign blasted sign with appliques.

If anyone has any questions/comments about this demo please reply and ask Chuck, I’m sure he will be more than happy to reply and explain.
Chuck added he was rather annoyed that he misplaced some pictures of his gold leaf & paint work in progress and added he will submit more if the opportunity arises.
I would like to thank Chuck for submitting this demo as it shows another area of our trade & how it should be done.
The above content is the property of Joe Cieslowski & is Protected by © Copyright, all rights reserved.
The above text and associated pictures are copyrighted material and may not be altered or reproduced in whole, in part, in any print or electronic form without direct written permission from Joe Cieslowski of Connecticut Woodcarvers Gallery.