Illuminated Menu Sign
Picture 1
Below you will see half of the sheet of Perspex I will use for my illuminated light box menu. The Perspex used is opal/translucent Perspex. This can be bought from many plastic suppliers.
I have sat it on a metal-topped table as shown. But before doing this I have wiped the table down with a damp cloth. Once I set the Perspex on the table I then wiped it down with a damp cloth also, then a dry cloth to rid any moisture. You should now have a dust & static-free area & material. This is important because when you remove the large piece of vinyl from the carrying paper it becomes charged & any tiny pieces of dust will jump from the table/Perspex onto the sticky side of the vinyl. Leaving lumps and bumps once applied. When the Perspex is illuminated these bits/particles of dust etc can show up as little dark dots thru the vinyl.
The vinyl used is regular 751 Oracal vinyl. In most cases a translucent vinyl is required but in this case I was using a light colour, which is already semi-translucent & because the main illuminated areas will be the text weeded from the panels I did not really matter.

Picture 2
Here you see 2 people laying up the vinyl. We have completely removed the carrying paper from the rear and we are applying as one.
However, this is not the only way to do this. You can, of course, peal-back only half the carrying paper & apply, then remove the rest and continue. Or, remove it all as I have but apply with a mist of water. My personal preference is dry, as most will know.

Picture 3
Applying the vinyl/flood coating, starting from the centre or one end. Tack the vinyl in place and keep the opposite side about 8 inches from the surface. This would be held by the second body as you start to work in vertical slicing swipes.
if you work alone, I would suggest masking taping down both sides of the tape to the bench then begin to remove the app tape from beneath the vinyl as you apply bit by bit.
Picture 4
I feel the way a squeegee is held plays a big role in expelling the air from beneath the vinyl properly. As you can see in this next picture the squeegee is at a slight angle and about 2/3rds of the squeegee is in doing the work of pushing the air out.

Picture 5
Do not try pushing the air out in this fashion. It opens the door to many problems of trapped air and bubbles.

Picture 6
Once the vinyl has been laid in position you must now remove the application tape.
If this were applied wet you would have a bit of a wait on your hands before proceeding. Apply dry and you can quickly remove the vinyl instantly.
When removing, keep the app-tape flat on the surface and using your hands slide/walk the tape off. Always keeping an eye on the vinyl coming away. If this happens, simply rub down again and proceed with tape removal.

Picture 7
This is not the way to remove the tape. Removing tape like this can cause problems.
You are basically pulling the vinyl from the surface while pulling the tape from the vinyl. It is not uncommon for a section of vinyl to come away, if only just applied. If this happens while removing like shown, you stand a chance of ripping or creasing the vinyl making it impossible to re-lay & must be scrapped.
I would advise cutting numbers and text like this as a group, taping them in the same fashion also. it speeds application up and is far more accurate than laying one by one.
Picture 8
This picture shows any overlaps of vinyl being trimmed away around the edges of the Perspex.

Picture 9
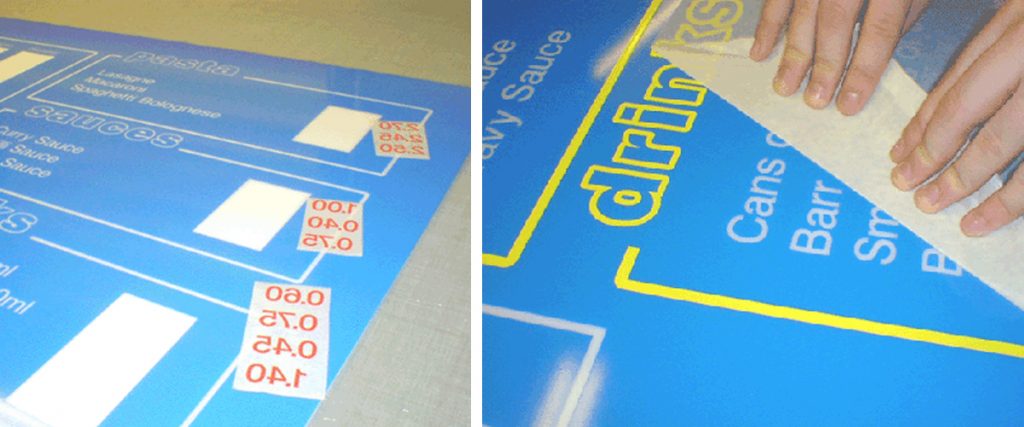
Next I will apply the numbers. As you can see I have left complete boxes where the numbers will be applied. This is so the owner of the shop can simply remove individual numbers for price increases/decreases. When the menu is complete we give the own 10 number 1’s 10 number 2’s & so on.. This way he has plenty of spares to do as he wishes with.

Picture 10
When designing I decided to make the titles and borders of the boxes a different colour.
Because the sign is illuminated I have given a 1mm bleed/overlap to stop any light penetrating the edges of the text/lines. it also helps later if the vinyl shrinks a little.

Picture 11
This picture shows red text that has an outline of white which will illuminate
Picture 12
This picture as you can see shows a completed section of the menu.
The white box has been left deliberately to allow for info and text to be changed.
Before finalising the design of the menu I asked which parts will be possibly getting changed at a later date. These sections were mostly the prices.
If a complete section has to be changed it is still easy too, as the area within the yellow borders can be removed entirely and replaced.


Responses